Landmine Kneeling One-Arm Shoulder Press: Form, Benefits, Sets & Tips
Learn how to perform the Landmine Kneeling One-Arm Shoulder Press with proper form. Discover muscles worked, setup, step-by-step execution, sets and reps by goal, common mistakes, FAQs, and recommended equipment.
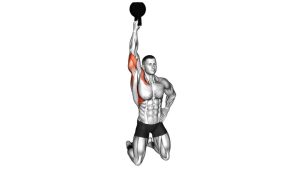
Landmine Kneeling One-Arm Shoulder Press
This exercise works best when the torso stays tall, the core stays braced, and the press follows the natural landmine path. You should feel the front of the shoulder doing most of the work, with support from the upper chest, triceps, and stabilizers. Since it is performed one arm at a time, it also teaches you to resist twisting and leaning, making it a strong option for both strength development and movement quality.
Quick Overview
| Body Part | Shoulders |
|---|---|
| Primary Muscle | Anterior deltoid |
| Secondary Muscle | Upper chest, triceps, serratus anterior, obliques, and core stabilizers |
| Equipment | Barbell, landmine attachment or anchored bar setup, weight plates, optional pad or mat |
| Difficulty | Intermediate |
Sets & Reps (By Goal)
- Strength: 3–5 sets × 4–8 reps per side (75–120 sec rest)
- Muscle growth: 3–4 sets × 8–12 reps per side (60–90 sec rest)
- Shoulder stability / movement quality: 2–4 sets × 6–10 controlled reps per side (45–75 sec rest)
- Accessory pressing work: 2–3 sets × 10–15 reps per side (moderate load, smooth tempo)
Progression rule: Add reps first, then load. Only increase weight when you can keep the ribs down, avoid torso rotation, and press through the full arc without compensating.
Setup / Starting Position
- Set the bar: Place one end of a barbell into a landmine attachment or secure corner setup, then load the free end as needed.
- Take a half-kneeling stance: Kneel on one knee with the opposite foot planted in front. A common option is to press with the arm opposite the front leg for extra core demand.
- Grip the bar end: Hold the sleeve or bar end with one hand at shoulder height, keeping the wrist neutral and the elbow slightly in front of the body.
- Brace your trunk: Squeeze the glute of the down-leg side, keep the ribs stacked over the pelvis, and stay tall through the torso.
- Start strong: The non-working arm stays relaxed by your side or slightly out for balance. Keep the chest proud, but do not overarch the lower back.
Tip: A pad or folded mat under the kneeling knee can make the setup more comfortable and help you stay stable.
Execution (Step-by-Step)
- Set your base: Lock in the half-kneeling stance, brace the abs, and keep the torso upright.
- Drive the bar up and forward: Press the landmine in its natural arc until the arm is nearly straight, without shrugging aggressively or leaning away.
- Reach with control: At the top, allow the shoulder blade to rotate naturally so the press finishes smoothly rather than stopping short.
- Pause briefly: Hold for a moment while keeping the core tight and the pelvis steady.
- Lower under control: Bring the bar back down to shoulder level on the same path, keeping the elbow under control and avoiding a sudden drop.
- Repeat evenly: Finish the set on one side, then switch sides and match the same tempo and range.
Pro Tips & Common Mistakes
- Keep the ribs down: Don’t turn the press into a standing-backbend pattern through the lower back.
- Use the landmine arc: Press slightly forward and up, not straight overhead.
- Stay tall through the trunk: Avoid leaning to the non-working side to finish the rep.
- Control the lowering phase: Don’t let the bar crash back to the shoulder.
- Let the shoulder blade move: Natural upward rotation helps the rep feel smoother and stronger.
- Don’t overgrip the handle: A death grip can create unnecessary tension through the wrist and forearm.
- Match both sides: Use the weaker side to guide loading decisions when programming unilateral work.
FAQ
What muscles does the Landmine Kneeling One-Arm Shoulder Press work?
The main target is the anterior deltoid. The exercise also involves the upper chest, triceps, serratus anterior, and core stabilizers that resist twisting and help keep the torso stacked.
Is this better than a regular overhead press?
It is not automatically better, but it is often more comfortable for people who prefer a more natural pressing angle. The landmine path can reduce how demanding a fully vertical overhead position feels on the shoulder.
Why use a kneeling stance instead of standing?
The kneeling setup reduces momentum and makes it easier to control pelvic position, rib alignment, and torso rotation. That often leads to cleaner pressing mechanics and more core involvement.
Which leg should be forward?
Both options can work. Many lifters prefer the opposite leg forward because it increases anti-rotation demand, while same-side leg forward may feel more stable and easier to learn at first.
Is this exercise good for shoulder hypertrophy?
Yes. It can be an excellent hypertrophy accessory for the front delts and supporting pressing muscles, especially when performed with controlled tempo and moderate reps.
Recommended Equipment
- Landmine Attachment for Barbell — the most direct tool for setting up smooth landmine presses and other barbell arc-based movements
- Landmine Base / T-Bar Row Base — useful if you want a dedicated swivel base for pressing, rowing, and rotational work
- Resistance Bands Set — great for shoulder warm-ups, serratus activation, and upper-back prep before pressing
- Thick Exercise Mat — adds comfort under the kneeling leg and improves training setup on hard floors
- Adjustable Workout Bench — helpful for broader shoulder training, support work, and complementary pressing variations
Tip: Prioritize a stable landmine setup first. For this exercise, setup quality matters more than fancy accessories.