Push-Up on Stability Ball: Chest-Focused Form, Sets & Tips (Swiss Ball Push-Up)
Master the stability ball push-up to build chest strength and core control. Learn perfect setup, step-by-step execution, sets & reps by goal, common mistakes, FAQs, and recommended equipment.
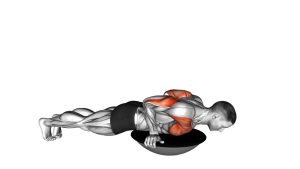
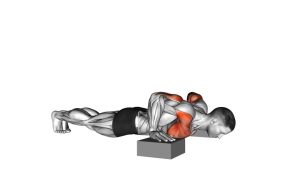
Push-Up on Stability Ball (Chest Focus)
This movement rewards control more than speed. You’ll get the most chest stimulus when the ball stays stable, your torso remains in a strong plank, and each rep is smooth—especially during the lowering phase. If your hips sag or the ball drifts, regress the variation and rebuild stability.
Quick Overview
| Body Part | Chest |
|---|---|
| Primary Muscle | Pectoralis major (chest) |
| Secondary Muscle | Triceps, anterior deltoids, serratus anterior, core stabilizers (abs/obliques) |
| Equipment | Stability ball (Swiss ball) + non-slip surface (recommended) |
| Difficulty | Intermediate–Advanced (high stability demand) |
Sets & Reps (By Goal)
- Strength (controlled reps): 4–6 sets × 3–6 reps (90–150 sec rest)
- Hypertrophy (chest + triceps): 3–5 sets × 6–12 reps (60–90 sec rest)
- Endurance / conditioning: 2–4 sets × 12–20 reps (45–75 sec rest)
- Stability focus (clean form): 3–4 sets × 5–8 reps (2–3 sec lower, 60–90 sec rest)
Progression rule: First make the ball more stable (cleaner reps), then add reps, then increase difficulty by slowing tempo or moving feet closer together. Don’t “progress” if you’re wobbling.
Setup / Starting Position
- Ball placement: Put the stability ball on a non-slip surface. If needed, place it on a mat to reduce rolling.
- Hands on the ball: Place palms on top of the ball, about shoulder-width. Spread fingers and grip lightly for control.
- Step back: Walk feet back into a strong high plank. Start with a wider stance for stability.
- Brace your body: Squeeze glutes, tighten abs, ribs down. Your body should form a straight line from head to heels.
- Shoulder position: Keep shoulders stable and slightly “packed” (no shrugging). Ball stays centered under your chest line.
Tip: If the ball slides, widen your stance and slow down. Stability comes from core tension and scap control, not from rushing reps.
Execution (Step-by-Step)
- Inhale and lock your plank: Brace abs and glutes so your torso moves as one unit.
- Lower under control: Bend elbows and bring your chest toward the ball. Keep the ball steady—no rolling forward or side-to-side.
- Elbow path: Let elbows travel at a comfortable angle (about 30–60° from your torso). Avoid extreme flare.
- Bottom position: Chest approaches the ball while shoulders stay controlled (no collapsing or shrugging).
- Press up: Exhale and push the ball away as you return to lockout, keeping your plank rigid and stable.
- Reset: Pause briefly at the top to regain balance before the next rep.
Pro Tips & Common Mistakes
- Pro tip — “Push the ball away”: Think about driving your hands through the ball to keep it stable during the press.
- Pro tip — slow eccentric: Use a 2–3 second lowering phase to build control and chest tension.
- Mistake — hips sagging: This turns it into a low-back extension. Fix by bracing abs + squeezing glutes.
- Mistake — shoulders collapsing forward: Keep scapula controlled and avoid shrugging up toward your ears.
- Mistake — ball rolling: Widen feet, reduce depth, and slow the descent. Rolling usually means you’re losing tension.
- Mistake — flaring elbows hard: Excessive flare can stress shoulders. Use a moderate elbow angle.
FAQ
Is this better than regular push-ups for chest growth?
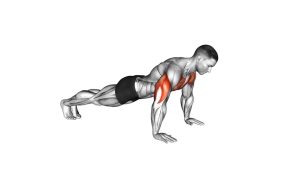
It can be great for chest growth, but only if you can keep the ball stable. If instability limits your reps too much, you may build more stability than chest. A smart approach is to pair it with standard push-ups or presses for volume.
How do I make it easier?
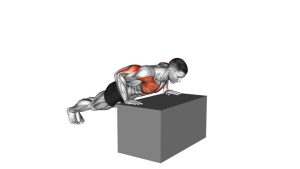
Widen your stance, reduce range of motion, slow down, or do an incline version (hands on ball, feet elevated less). You can also start with hands on a stable bench before moving to the ball.
How do I make it harder?
Narrow your stance, slow the eccentric to 3–5 seconds, add a pause at the bottom, or use a weighted vest. Only progress if the ball stays stable and your plank remains solid.
Where should I feel it?
Mostly in the chest and triceps, with strong core engagement. You’ll also feel the shoulders and serratus working to stabilize. If you feel it mainly in the lower back, your hips are likely sagging.
Is it safe for wrists and shoulders?
It can be, but the instability increases joint demand. Use a non-slip setup, keep the ball controlled, and avoid collapsing into the bottom. If wrists are sensitive, consider push-up handles on the ball or regress to a stable surface.
Recommended Equipment (Optional)
- Anti-Burst Stability Ball (Swiss Ball) — the main tool; choose the right size for your height and keep it properly inflated
- Stability Ball Base / Ring — reduces rolling for safer learning and better control
- Non-Slip Exercise Mat — improves traction and helps keep the ball from sliding
- Wrist Wraps — optional support if wrists get fatigued during instability work
- Weighted Vest — optional progression for advanced athletes once stability is mastered
Tip: Your best “equipment upgrade” is stability. If the ball moves a lot, regress and rebuild clean reps before adding load.