Padded Stool Supported Climber: Form, Core Benefits, Sets & Tips
Learn the Padded Stool Supported Climber for core stability, hip control, and beginner-friendly conditioning with setup, steps, tips, FAQs, and gear.
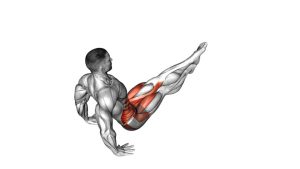
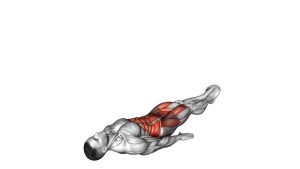
Padded Stool Supported Climber
This exercise works best when the stool stays stable, the body remains long, and the knee drives happen without bouncing the hips. Although the movement looks simple, it requires steady bracing through the midsection. Therefore, you should focus on rhythm, posture, and control before increasing speed.
Quick Overview
| Body Part | Core |
|---|---|
| Primary Muscle | Rectus abdominis and deep core stabilizers |
| Secondary Muscle | Hip flexors, obliques, shoulders, chest, and quadriceps |
| Equipment | Padded stool, low bench, or stable elevated support |
| Difficulty | Beginner to intermediate, depending on speed and body angle |
Sets & Reps (By Goal)
- Beginner control: 2–3 sets × 8–12 alternating knee drives per side, slow tempo
- Core endurance: 3–4 sets × 20–40 seconds, steady pace, 45–60 seconds rest
- Conditioning: 4–6 rounds × 30–45 seconds, moderate pace, 30–45 seconds rest
- Warm-up activation: 1–2 sets × 10–15 reps per side before core or cardio training
Progression rule: First improve control and posture. Then increase time, reps, or speed only if your hips stay stable and your lower back does not sag.
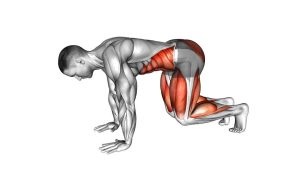
Setup / Starting Position
- Choose a stable support: Place a padded stool, firm bench, or low platform on a non-slip surface.
- Set your hands or forearms: Position your upper body on the padded support so your shoulders feel steady and relaxed.
- Step the legs back: Extend the legs behind you into an inclined plank-like position.
- Brace the core: Keep the ribs controlled, the hips level, and the spine neutral.
- Start with one knee slightly forward: Prepare to alternate the legs without jumping or twisting.
Tip: The higher the stool or bench, the easier the movement usually feels. A lower support increases the challenge.
Execution (Step-by-Step)
- Hold the supported plank: Keep your hands or forearms firm on the padded stool while your body stays long.
- Drive one knee forward: Bring one knee toward the chest or under the torso without rounding the back aggressively.
- Return the leg back: Extend that leg behind you again until the body returns to the long supported position.
- Switch sides: Drive the opposite knee forward as the first leg moves back.
- Continue alternating: Maintain a smooth left-right rhythm while keeping the upper body quiet.
- Control the finish: Stop the set before your hips bounce, your shoulders collapse, or your lower back starts sagging.
Pro Tips & Common Mistakes
- Keep the hips steady: Avoid lifting the hips too high or letting them drop as the legs switch.
- Use a smooth rhythm: Move with control before adding speed.
- Do not push the stool forward: Press down into the support, but avoid sliding it away from you.
- Keep the neck neutral: Look slightly down or forward without craning the head.
- Avoid excessive twisting: A small amount of natural movement is normal, but the torso should not rotate heavily.
- Shorten the range if needed: If your lower back arches or your shoulders tense up, use a smaller knee drive.
- Breathe continuously: Exhale lightly as the knee comes forward, then inhale as the leg returns.
FAQ
What muscles does the Padded Stool Supported Climber work?
It mainly trains the core, especially the abs and deep stabilizers. In addition, the hip flexors help pull each knee forward, while the shoulders and chest help hold the supported position.
Is this easier than regular mountain climbers?
Yes, it is usually easier because the upper body is elevated and supported. As a result, it can be a better option for beginners, people building core endurance, or anyone who wants a lower-impact climber variation.
Should I perform this exercise fast or slow?
Start slow. Once your posture stays stable, you can gradually increase the pace for conditioning. However, speed should never replace control.
Can I use a bench instead of a padded stool?
Yes. A sturdy bench, padded box, or stable low platform can work well. Nevertheless, the surface must stay secure and should not slide during the movement.
Why does my lower back feel this exercise?
Your lower back may feel stress if your hips sag, your core relaxes, or your knee drive is too aggressive. Reduce the range, slow down, and keep the ribs and pelvis controlled.
Recommended Equipment
- Padded Workout Stool — useful as the main support surface for this assisted climber variation
- Adjustable Weight Bench — a stable alternative that allows different incline heights
- Non-Slip Exercise Mat — helps keep the feet and support surface more secure during knee drives
- Exercise Sliders — optional tool for smoother climber variations on suitable floors
- Fitness Wrist Wraps — optional support if the hands carry pressure during the supported position
Tip: Choose equipment that stays stable under bodyweight pressure. If the stool, bench, or mat shifts during reps, stop and reset before continuing.