Resistance Band Air Bike: Core Form, Sets, Tips & FAQ
Learn the Resistance Band Air Bike for stronger abs, obliques, and core control. Includes setup, step-by-step form, mistakes, FAQs, and equipment.
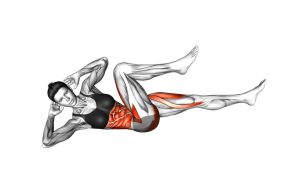
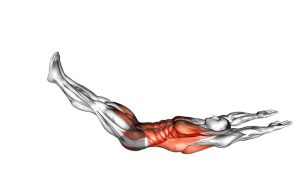
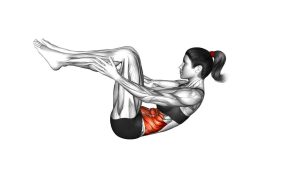
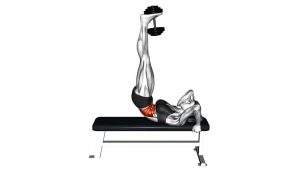
Resistance Band Air Bike
This movement is more demanding than a regular air bike because the resistance band adds extra tension through the arms and upper body. As a result, your core must work harder to prevent the ribs from flaring, the lower back from arching, and the hips from rocking side to side. A clean rep should look controlled from start to finish. The legs alternate smoothly, the shoulders stay slightly lifted, and the band remains active without jerking.
For best results, treat the Resistance Band Air Bike as a quality-focused abdominal exercise, not a speed drill. Each switch should be deliberate. The extended leg should hover without touching the floor, while the bent knee moves toward the torso. Meanwhile, the band should create enough resistance to make the abs brace, but not so much that your neck, shoulders, or hip flexors take over the movement.
Quick Overview
| Body Part | Core |
|---|---|
| Primary Muscle | Rectus abdominis |
| Secondary Muscle | Obliques, transverse abdominis, hip flexors, serratus anterior, shoulders |
| Equipment | Resistance band and exercise mat |
| Difficulty | Intermediate |
Sets & Reps (By Goal)
- Core endurance: 2–4 sets of 20–40 total alternating reps with a smooth tempo.
- Strength and control: 3–4 sets of 10–16 total reps with slower leg extensions and stronger bracing.
- Beginner progression: 2–3 sets of 8–12 total reps using a light band and shorter leg range.
- Fat-loss circuit training: 3 rounds of 30–45 seconds, resting 30–60 seconds between rounds.
- Core finisher: 2 sets to technical fatigue, stopping before the lower back lifts or the band loses tension.
Progression rule: Increase control before increasing speed. Add reps, extend the legs lower, or use a slightly stronger band only when your lower back stays stable throughout the entire set.
Setup / Starting Position
- Lie on your back: Use an exercise mat so your spine and hips feel supported during the movement.
- Set the band: Hold the resistance band with both hands or secure it in a stable position depending on your variation.
- Create light tension: Extend your arms enough to feel the band, but avoid pulling so hard that your shoulders shrug.
- Lift the legs: Bring both knees above the hips, then slightly curl your upper back off the floor.
- Brace the core: Draw the ribs down and gently press the lower back toward the mat.
- Set your neck: Keep the neck long and relaxed. Your chin should stay slightly tucked without pulling the head forward.
A good starting position should feel active but controlled. If your lower back arches before the first rep, keep the legs higher or use a lighter band.
Execution (Step-by-Step)
- Start with tension: Hold the band steady and keep your shoulders slightly lifted from the mat.
- Drive one knee in: Bring one knee toward your chest while the opposite leg extends forward.
- Control the extension: Straighten the opposite leg only as low as you can without arching your lower back.
- Maintain band resistance: Keep the band lightly pulled so your core must stabilize against the tension.
- Switch sides smoothly: Extend the bent leg as the opposite knee comes in, creating a bicycle-style motion.
- Keep the torso stable: Avoid rocking your hips, twisting aggressively, or pulling with the neck.
- Breathe with rhythm: Exhale as each knee drives in, then inhale lightly during the transition.
- Finish cleanly: Stop the set when your legs begin dropping, your lower back lifts, or the band starts snapping back.
Pro Tips & Common Mistakes
- Keep the lower back connected: The most important cue is to prevent the lower back from arching as the leg extends.
- Use a controlled band pull: The band should add resistance, not pull your body out of position.
- Avoid rushing: Fast reps often turn this exercise into hip flexor swinging instead of true core training.
- Do not yank the neck: Keep the head supported by core tension, not by aggressive neck flexion.
- Shorten the range when needed: A higher leg angle is better than a low leg position with poor spinal control.
- Keep breathing: Holding your breath may increase tension in the neck and shoulders.
- Match the band to your level: A light or medium band usually works better than a heavy band for clean abdominal control.
- Pause if form breaks: Reset your ribs, hips, and band tension before continuing the next rep.
FAQ
What muscles does the Resistance Band Air Bike work?
The Resistance Band Air Bike mainly works the rectus abdominis, which helps flex and stabilize the trunk. It also trains the obliques, transverse abdominis, hip flexors, shoulders, and serratus anterior because the body must coordinate leg movement with band tension.
Is the Resistance Band Air Bike good for abs?
Yes. It is effective for abs because it combines trunk flexion, anti-extension control, and alternating leg movement. The band increases the challenge by forcing your core to stabilize while the arms maintain tension.
Should beginners do this exercise?
Beginners can use this exercise if they start with a light band and a shorter leg range. However, a regular dead bug, heel tap, or standard air bike may be better first if lower-back control is difficult.
Why does my lower back arch during the movement?
Lower-back arching usually means the leg is extending too low, the band is too strong, or the core is not braced enough. Raise the extended leg higher, slow down, and focus on keeping the ribs down.
How can I make the Resistance Band Air Bike harder?
You can make it harder by slowing each rep, extending the legs lower, adding a brief pause, increasing total reps, or using a slightly stronger band. Progress only if your hips and lower back remain stable.
Recommended Equipment
- Resistance Bands Set — provides different tension levels for progressive core training.
- Loop Resistance Bands — useful for lower-body and core variations with compact resistance.
- Exercise Mat — protects your back and hips during floor-based ab exercises.
- Resistance Band Door Anchor — helps create a secure band setup for anchored core variations.
- Core Sliders — useful for adding variety to home ab and stability workouts.
Choose equipment that supports clean movement. A lighter band and stable mat will usually produce better technique than heavy resistance that pulls your body out of position.