Reverse Plank: Proper Form, Muscles Worked, Benefits, Sets & Tips
Learn how to do the Reverse Plank with safe form, core and glute activation, sets by goal, common mistakes, FAQs, and equipment tips.
Reverse Plank
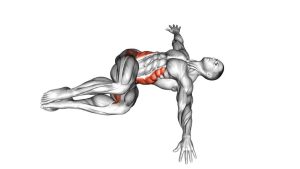
This exercise is best performed with a controlled, lifted posture rather than a rushed or overly arched position. Your hips should stay elevated, your legs should remain straight, and your arms should support the body without bending at the elbows. Meanwhile, your chest stays open and your shoulders remain stable behind the wrists.
Quick Overview
| Body Part | Core |
|---|---|
| Primary Muscle | Rectus abdominis, transverse abdominis, glutes |
| Secondary Muscle | Shoulders, triceps, quadriceps, upper back, hamstrings |
| Equipment | None; optional exercise mat for comfort |
| Difficulty | Beginner to intermediate, depending on hold time and body control |
Sets & Reps (By Goal)
- Beginner control: 2–3 sets × 10–20 second holds, resting 45–60 seconds between sets.
- Core endurance: 3–4 sets × 20–40 second holds, resting 60 seconds between sets.
- Glute and posterior-chain focus: 3–4 sets × 15–30 second holds while actively squeezing the glutes.
- Workout finisher: 2–3 sets × maximum clean hold time without letting the hips drop.
Progression rule: Add time before adding difficulty. Once you can hold a clean reverse plank for 40–60 seconds, progress by slowing your breathing, improving hip height, or adding a single-leg variation.
Setup / Starting Position
- Sit on the floor: Extend both legs straight in front of you with the feet together or close together.
- Place your hands behind you: Put both palms on the floor behind your hips, slightly wider than shoulder width.
- Open the chest: Pull the shoulders gently back and avoid rounding the upper body.
- Prepare the legs: Keep the knees straight and press the heels lightly into the floor.
- Brace before lifting: Engage your core and glutes before raising the hips.
In the uploaded video, the movement is shown as a static hold with straight arms, extended legs, lifted hips, and no visible equipment.
Execution (Step-by-Step)
- Press through your hands: Push the floor away while keeping the arms straight and stable.
- Lift your hips: Raise the hips until the body forms a long diagonal line from shoulders to feet.
- Squeeze the glutes: Actively contract the glutes to support hip extension and prevent sagging.
- Brace the core: Keep the midsection firm so the ribs do not flare and the lower back does not overarch.
- Hold the position: Maintain steady breathing while keeping the legs straight and the chest open.
- Finish with control: Lower the hips slowly back to the floor when your form begins to break.
Pro Tips & Common Mistakes
- Keep the hips lifted: Dropping the hips turns the exercise into a weaker hold and reduces core engagement.
- Do not bend the elbows: Straight arms help create a stable base and reduce unnecessary shoulder strain.
- Avoid shrugging: Keep the neck long and the shoulders controlled instead of letting them rise toward the ears.
- Control the ribs: Do not overarch the lower back just to make the hips appear higher.
- Squeeze the glutes: Strong glute engagement helps keep the pelvis lifted and aligned.
- Keep the legs straight: The visible exercise position uses extended legs, so avoid bending the knees unless modifying.
- Breathe steadily: Holding your breath can create unnecessary tension and shorten your hold time.
FAQ
What muscles does the Reverse Plank work?
The Reverse Plank works the core, glutes, shoulders, triceps, quadriceps, and upper back. It also challenges posture control because the body must stay lifted and aligned against gravity.
Is the Reverse Plank good for beginners?
Yes, beginners can use the Reverse Plank when they start with short holds and focus on clean alignment. However, people with wrist or shoulder discomfort may need to reduce hold time or use a modified position.
How long should I hold a Reverse Plank?
Start with 10–20 seconds if you are new to the exercise. Then, gradually build toward 30–60 seconds as long as your hips stay lifted and your shoulders remain stable.
Why do my hips drop during the Reverse Plank?
Hips usually drop because the glutes, core, or shoulder stabilizers are losing tension. Therefore, shorten the hold, reset your posture, and focus on squeezing the glutes before increasing duration.
Can I do the Reverse Plank every day?
You can practice it often if the volume is low and your joints feel good. Even so, allow recovery if your shoulders, wrists, or lower back feel irritated after training.
Recommended Equipment (Optional)
- Exercise Mat — adds comfort for the hands, heels, and seated setup position.
- Non-Slip Yoga Mat — helps keep the hands from sliding during the hold.
- Wrist Support Wraps — may provide light support for users who feel wrist pressure.
- Push-Up Bars — can reduce wrist extension for some users during floor-supported holds.
- Mini Resistance Bands — useful for glute activation drills before reverse plank practice.
Tip: Equipment is optional. The uploaded exercise is performed as a bodyweight floor hold, so prioritize clean form before adding accessories.