Hip Circle with Hula Hoop: Core Form, Sets, Tips & FAQ
Learn the Hip Circle with Hula Hoop for core control, waist movement, rhythm, and low-impact cardio with proper form, sets, tips, FAQs, and gear
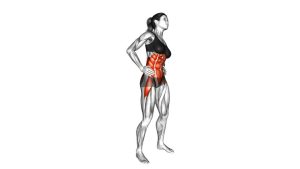
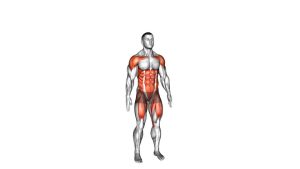
Hip Circle with Hula Hoop
This exercise works best when the movement stays smooth, steady, and rhythmic. Instead of shaking aggressively, guide the hoop with a repeated hip circle: forward, side, back, and side again. As a result, the core, obliques, and hip stabilizers stay active while the body learns timing and control. Because the video shows a standing waist-level hooping pattern, this guide focuses on a clean hip-driven technique without adding extra arm movements or unrelated variations.
Quick Overview
| Body Part | Core |
|---|---|
| Primary Muscle | Obliques and deep core stabilizers |
| Secondary Muscle | Glutes, hip flexors, lower back stabilizers, and abdominal wall |
| Equipment | Hula hoop |
| Difficulty | Beginner to beginner-plus, depending on hoop control and rhythm |
Sets & Reps (By Goal)
- Beginner technique practice: 3–5 rounds × 20–40 seconds, resting 45–75 seconds between rounds.
- Core control and rhythm: 4–6 rounds × 45–60 seconds, using a smooth hip circle and steady breathing.
- Low-impact cardio: 5–8 rounds × 60–90 seconds, resting as needed while keeping form clean.
- Warm-up or movement prep: 2–3 rounds × 30–45 seconds at an easy pace before core or cardio work.
Progression rule: First increase control and time under tension. After that, progress by extending each round, reducing rest, or using a slightly more challenging hoop only when the waist-level rhythm stays consistent.
Setup / Starting Position
- Stand tall: Place your feet about shoulder-width apart with your knees softly bent.
- Position the hoop: Set the hula hoop around your waist or hip line, as shown in the video.
- Stack the torso: Keep your chest lifted, shoulders relaxed, and head in a neutral position.
- Brace lightly: Engage your core just enough to stay stable without holding your breath.
- Prepare the rhythm: Start with small hip circles before trying to make the hoop spin faster.
Tip: A slightly wider stance can make the first few reps easier because it gives the hips more balance and control.
Execution (Step-by-Step)
- Start the hoop: Give the hoop enough initial momentum to begin rotating around your waist.
- Drive from the hips: Move your hips forward, then to the side, then backward, then to the other side.
- Keep the loop continuous: Blend each direction together so the hips create a smooth circle.
- Stay upright: Keep your torso tall while your hips provide most of the motion.
- Control the tempo: Match your hip rhythm to the hoop speed instead of chasing it with large movements.
- Maintain balance: Keep both feet planted and allow only subtle weight shifts between the legs.
- Continue smoothly: Repeat the circular hip pattern for the full round while breathing normally.
Pro Tips & Common Mistakes
- Use the hips, not the arms: Once the hoop starts moving, let the waist and hips control the rotation.
- Keep the movement small: Bigger circles are not always better. In fact, smaller circles often create cleaner rhythm.
- Stay tall through the torso: Avoid collapsing forward, leaning back excessively, or twisting the shoulders.
- Soften the knees: Locked knees can make the movement stiff and reduce hip control.
- Do not rush the rhythm: If the hoop drops, reset calmly instead of jerking the spine to save it.
- Control side-to-side shifts: Subtle weight transfer is normal, but avoid stepping unless you are intentionally resetting.
- Breathe continuously: Holding your breath makes the movement tense and harder to sustain.
- Choose the right hoop: Beginners often control a larger, slightly heavier fitness hoop more easily than a small lightweight hoop.
FAQ
What muscles does the Hip Circle with Hula Hoop work?
It primarily trains the obliques and deep core stabilizers. Additionally, the hips, glutes, lower back stabilizers, and abdominal wall help maintain posture and rhythm.
Is this exercise good for beginners?
Yes. It can be beginner-friendly when performed with a comfortable hoop, a steady stance, and small controlled hip circles. However, beginners should start with short rounds and focus on rhythm before increasing duration.
Should I move my hips in circles or side to side?
In this version, the visible movement is a circular hip pattern. The hips move forward, side, back, and side again to keep the hoop rotating smoothly around the waist.
Why does the hoop keep falling?
The hoop often falls when the rhythm is too slow, the hips move too aggressively, or the torso leans too much. Therefore, reset your posture, make smaller circles, and match your hip timing to the hoop.
Can I use this as cardio?
Yes. When performed continuously, hula hoop hip circles can become a low-impact cardio drill. For conditioning, use longer rounds while keeping the hoop controlled and the movement comfortable.
Is this exercise safe for the lower back?
It can be comfortable for many people when the movement stays controlled and pain-free. However, avoid excessive leaning, aggressive spinal bending, or forcing the hips beyond a comfortable range.
Recommended Equipment
- Weighted Fitness Hula Hoop — useful for beginners who need a hoop that moves slower and feels easier to control
- Adjustable Hula Hoop for Adults — allows you to change hoop size for comfort, height, and skill level
- Padded Fitness Hula Hoop — provides a softer feel around the waist during longer practice rounds
- Non-Slip Exercise Mat — helps create a stable training area, especially on smooth floors
- Fitness Interval Timer — helpful for timed rounds, rest periods, and cardio-style hula hoop sessions
Tip: Choose equipment that supports control first. If a hoop causes discomfort, bruising, or poor rhythm, use a lighter, softer, or better-sized option.