Leg Extension Star Crunch: Core Form, Benefits, Sets, Tips & FAQ
Learn the Leg Extension Star Crunch for stronger abs, obliques, and hip flexors with step-by-step form, sets, mistakes, FAQs, and gear.
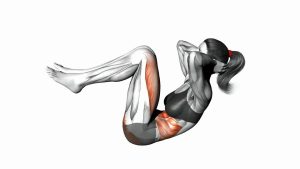
Leg Extension Star Crunch
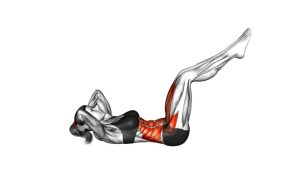
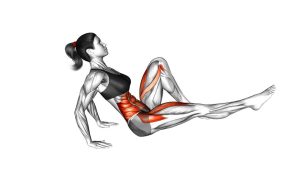
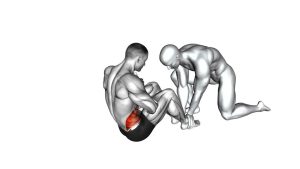
This exercise works best when every repetition stays controlled. First, the knees tuck toward the body. Then, one leg extends forward while the opposite arm reaches toward the raised foot. As a result, the core must stabilize the trunk while the limbs move in opposite directions. Keep the movement clean, avoid rushing the reach, and return to the tucked position before switching sides.
Quick Overview
| Body Part | Core |
|---|---|
| Primary Muscle | Rectus abdominis |
| Secondary Muscle | Obliques, hip flexors, quadriceps, deep core stabilizers |
| Equipment | None required; optional exercise mat for comfort |
| Difficulty | Beginner to intermediate |
Sets & Reps (By Goal)
- Core activation: 2 sets × 8–10 reps per side with slow, clean control.
- Muscular endurance: 3 sets × 10–15 reps per side with 30–45 seconds rest.
- Beginner strength: 2–3 sets × 6–8 reps per side, using a smaller leg lift if needed.
- Bodyweight conditioning: 3–4 sets × 12–20 alternating reps with steady breathing.
Progression rule: Add repetitions before increasing speed. Also, keep the leg extension smooth and the reach precise before making the exercise more challenging.
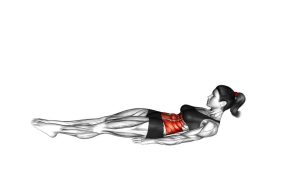
Setup / Starting Position
- Sit on the floor: Place your hips on the ground and lean your torso slightly back.
- Support with your hands: Position both hands behind your body on the floor for balance.
- Lift the feet: Bring both knees toward your torso while keeping the feet off the ground.
- Brace the core: Keep your ribs controlled and avoid letting your lower back collapse.
- Set your gaze: Keep the neck neutral and look forward rather than pulling the head aggressively.
Start with a small range of motion if the full leg extension feels difficult. This makes it easier to keep the core active without overloading the lower back.
Execution (Step-by-Step)
- Begin in the tucked position: Keep both knees bent, feet elevated, and hands planted behind you.
- Extend one leg forward: Straighten one leg away from your body while the opposite knee stays bent.
- Lift the extended leg: Raise the straight leg upward with control instead of swinging it.
- Reach across the body: Take the opposite arm forward toward the raised foot, creating a light twisting crunch.
- Return with control: Bring the reaching arm back and lower the extended leg without dropping quickly.
- Reset the tuck: Bring both knees back toward the torso before switching sides.
- Repeat on the other side: Extend the opposite leg and reach with the opposite arm in the same controlled pattern.
Pro Tips & Common Mistakes
- Keep the hands grounded: Since the exercise is supported, use the hands to stabilize the torso without pushing aggressively.
- Avoid rushing the toe reach: The reach should follow the leg lift, not pull the body out of position.
- Control the lower back: If the back arches or lifts too much, reduce the leg extension range.
- Do not kick the leg: Instead, extend and lift the leg smoothly so the abs stay engaged.
- Rotate lightly: The twist should come from the torso, but it should not feel forced or jerky.
- Reset between sides: Returning to the bent-knee position helps preserve control and improves rep quality.
- Breathe consistently: Exhale during the reach and inhale as you return to the starting position.
FAQ
What muscles does the Leg Extension Star Crunch work?
The exercise mainly works the rectus abdominis. In addition, the obliques assist during the reaching twist, while the hip flexors and quadriceps help lift and extend the legs.
Is the Leg Extension Star Crunch beginner-friendly?
Yes, it can be beginner-friendly when performed with a small range of motion. However, beginners should move slowly, keep the hands on the floor, and avoid extending the legs too far if the lower back loses control.
Should my hands stay on the floor?
Yes. In the visible exercise pattern, the hands support the body behind the hips. This support helps the torso stay stable while the legs and reaching arm move.
Why do I feel this in my hip flexors?
Some hip flexor work is normal because the legs are lifted and extended. Nevertheless, the abs should still feel active. If the hip flexors dominate, shorten the range and focus on bracing before each rep.
How can I make the exercise easier?
Keep the knees more bent, lower the leg lift height, or perform fewer reps per side. Additionally, pause in the tucked position between reps to rebuild control.
How can I make it harder?
Extend the legs farther, slow down the lowering phase, or add a brief pause during the reach. However, only progress if your lower back stays controlled.
Recommended Equipment (Optional)
- Exercise Mat — adds comfort for seated floor core exercises.
- Non-Slip Yoga Mat — helps keep the hands and hips stable during alternating reps.
- Adjustable Ankle Weights — optional advanced progression for stronger hip flexor and core control.
- Resistance Bands Set — useful for pairing this move with full core and hip training routines.
- Core Sliders — helpful for related bodyweight core progressions and controlled leg-extension drills.
Tip: Equipment is optional. Start with bodyweight first, then add tools only when your form stays stable and pain-free.