Assisted Sit-Up: Proper Form, Core Benefits, Sets, Tips & FAQ
Learn how to do the Assisted Sit-Up with safe form, core-focused technique, sets by goal, common mistakes, FAQs, and useful equipment.
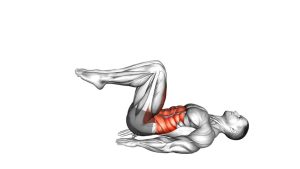
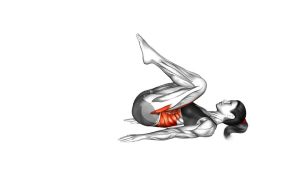
Assisted Sit-Up
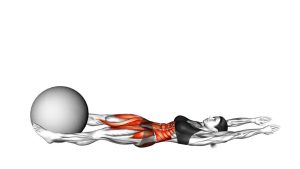
The Assisted Sit-Up is useful for building basic abdominal strength, improving trunk flexion, and teaching a smooth curl-up pattern. Since a partner holds the ankles or feet, the athlete can focus more on the abdominal contraction and less on keeping the lower body stable. However, this support should not turn the movement into a fast swinging drill. Instead, every repetition should begin with a controlled curl of the head, shoulders, and upper back before the torso rises.
During the movement, the first half of the rep is usually where the abs work hardest. Then, as the torso moves closer to the knees, the hip flexors contribute more. Therefore, a clean Assisted Sit-Up should feel like a coordinated core exercise rather than a momentum-based pull. In addition, the lowering phase matters just as much as the lift because the abs must resist gravity while the spine returns to the floor.
Quick Overview
| Body Part | Core |
|---|---|
| Primary Muscle | Rectus abdominis |
| Secondary Muscle | Hip flexors, obliques, transverse abdominis, deep trunk stabilizers |
| Equipment | Exercise mat and partner assistance; optional sit-up bar or ankle anchor |
| Difficulty | Beginner to intermediate |
Sets & Reps (By Goal)
- Beginner core control: 2–3 sets × 6–10 reps with a slow 2–3 second lowering phase.
- General ab strength: 3–4 sets × 10–15 reps with steady tempo and full control.
- Muscular endurance: 2–4 sets × 15–25 reps while avoiding bouncing or neck pulling.
- Warm-up activation: 1–2 sets × 8–12 reps at an easy effort before larger core or full-body training.
- Tempo-focused training: 3 sets × 8–12 reps using a 2-second lift and 3-second descent.
Progression rule: First improve control, then increase reps. After that, progress by slowing the descent, reducing partner support, or moving to stricter unassisted sit-up variations.
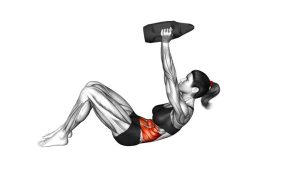
Setup / Starting Position
- Lie on your back: Start on an exercise mat with your knees bent and feet flat on the floor.
- Set the feet: Keep the feet about hip-width apart so the knees track comfortably upward.
- Use partner support: Ask your partner to kneel near your feet and gently hold the ankles or tops of the feet.
- Position the arms: Cross your arms over your chest, or place the hands lightly near the shoulders.
- Brace before lifting: Exhale slightly, tighten the abs, and keep the ribs from flaring upward.
- Keep the neck neutral: Look toward the knees without pulling the chin aggressively into the chest.
A stable setup makes the exercise smoother. In addition, the partner should only secure the lower body; they should not pull the athlete upward.
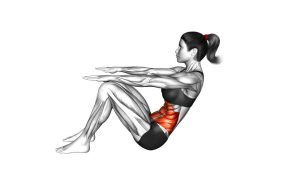
Execution (Step-by-Step)
- Start with control: Brace your core and keep your feet stable while your partner holds them gently.
- Curl the upper body: Lift your head, shoulders, and upper back first instead of throwing the torso upward.
- Continue into the sit-up: Roll through the spine until your torso approaches an upright position.
- Stay smooth at the top: Pause briefly near the top without collapsing forward onto the thighs.
- Lower with tension: Reverse the motion slowly and let the spine return to the floor under control.
- Reset before the next rep: Allow the shoulders to touch down lightly, re-brace, and repeat without bouncing.
Pro Tips & Common Mistakes
Pro Tips
- Exhale as you rise: A steady exhale helps the ribs come down and improves abdominal contraction.
- Control the first half: The early curl-up phase is where your abs should do the most focused work.
- Use the partner correctly: The partner should stabilize the feet, not pull or push the body.
- Slow down the descent: Lowering under control increases time under tension and improves core strength.
- Keep the arms passive: Crossing the arms prevents pulling on the neck and keeps the movement cleaner.
Common Mistakes
- Using momentum: Swinging the torso reduces abdominal tension and can irritate the lower back.
- Pulling the neck: Yanking the head forward creates unnecessary neck strain.
- Bouncing off the floor: A hard bounce makes the exercise less effective and less controlled.
- Overusing the hip flexors: If the movement feels only like a hip pull, slow down and curl the spine first.
- Rushing reps: Fast repetitions usually reduce quality, especially for beginners.
FAQ
What muscles does the Assisted Sit-Up work?
The Assisted Sit-Up mainly works the rectus abdominis, which is the front abdominal muscle. In addition, the hip flexors help lift the torso, especially during the upper part of the movement. The obliques and deeper core muscles also assist with stability.
Is the Assisted Sit-Up good for beginners?
Yes. Because the feet are stabilized, many beginners find this version easier than a strict unassisted sit-up. However, beginners should use a slow tempo and avoid swinging. Quality matters more than high reps.
Should my partner pull me up?
No. The partner should only hold the feet or ankles in place. If they pull you upward, the exercise becomes less effective and can change the movement pattern. Your core should create the lift.
Why do I feel Assisted Sit-Ups in my hip flexors?
Some hip flexor involvement is normal because the torso moves from lying to seated. Nevertheless, if the hip flexors dominate, slow the movement, exhale as you rise, and focus on curling the ribs toward the pelvis before sitting fully upright.
Can Assisted Sit-Ups hurt the lower back?
They can bother the lower back if you use momentum, arch excessively, or lack enough core control. Therefore, keep the reps smooth, avoid bouncing, and stop if you feel sharp or persistent back pain.
How can I make Assisted Sit-Ups harder?
You can increase difficulty by slowing the lowering phase, pausing near the top, reducing partner assistance, or moving to strict sit-ups. Later, you may use light resistance, but only after your bodyweight form stays controlled.
Recommended Equipment
- Exercise Mat — provides cushioning for the spine, tailbone, and shoulders during floor-based sit-ups.
- Door Sit-Up Bar — helps anchor the feet when a partner is not available.
- Ab Mat — supports the lower back and can help improve sit-up range and comfort.
- Adjustable Ankle Straps — useful for secure lower-body anchoring setups in home training spaces.
- Core Sliders — helpful for adding complementary core exercises such as mountain climbers, body saws, and knee tucks.
Tip: Equipment should make the exercise more stable, not more aggressive. Therefore, choose tools that help you move with better control.