Back Steps Plank: Core Stability, Form, Sets, Tips & FAQ
Learn the Back Steps Plank to build core stability, shoulder control, and hip strength with step-by-step form, sets, mistakes, FAQs, and gear.
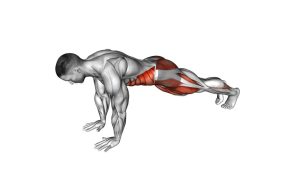
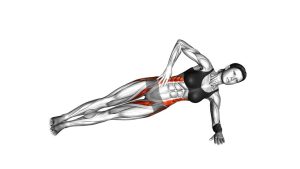
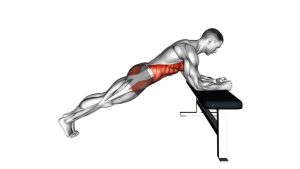
Back Steps Plank
This exercise works best when the plank stays quiet. Instead of rushing the step, brace your midsection, press your forearms into the floor, and move one foot backward without letting your hips twist. As a result, the drill improves core control while also reinforcing shoulder stability.
Quick Overview
| Body Part | Core |
|---|---|
| Primary Muscle | Rectus abdominis, transverse abdominis, and obliques |
| Secondary Muscle | Shoulders, triceps, glutes, hip flexors, hamstrings, and lower-back stabilizers |
| Equipment | Bodyweight only; optional exercise mat |
| Difficulty | Beginner to intermediate |
Sets & Reps (By Goal)
- Core control: 2–3 sets × 8–12 steps per side, resting 45–60 seconds.
- Strength endurance: 3–4 sets × 20–40 seconds, using slow alternating steps.
- Warm-up activation: 1–2 sets × 6–10 steps per side before planks, push-ups, or full-body training.
- Beginner practice: 2 sets × 5–8 steps per side with a short step range.
Progression rule: First increase control, then increase reps or time. However, do not make the step longer if your hips start shifting or your lower back begins to sag.
Setup / Starting Position
- Start on your forearms: Place both elbows under your shoulders and keep your forearms flat on the floor.
- Extend your legs: Step both feet back into a forearm plank with your toes on the ground.
- Stack your body: Keep your head, ribs, hips, knees, and heels in one long line.
- Brace your core: Gently tighten your abs as if preparing for a light punch.
- Set your shoulders: Push the floor away slightly so your chest does not sink between your shoulders.
If the plank feels too hard, widen your feet slightly before stepping. This gives you more balance and reduces unwanted hip rotation.
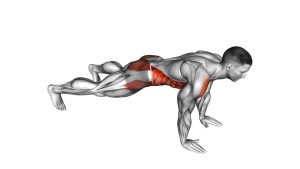
Execution (Step-by-Step)
- Hold the plank: Begin in a steady forearm plank with your hips level and your neck neutral.
- Step one foot backward: Move one foot slightly farther behind you while keeping the opposite foot planted.
- Control the hips: Keep your pelvis square to the floor and avoid twisting from side to side.
- Return the foot: Bring the stepping foot back to the original plank position with a slow, controlled motion.
- Repeat on the other side: Alternate legs while maintaining the same straight-body plank line.
Pro Tips & Common Mistakes
- Keep the step small: A shorter step usually trains better control than a large, unstable step.
- Do not let the hips sag: If your lower back arches, reset your plank and reduce the set length.
- Avoid rushing: Use a smooth tempo so your core has to stabilize each transition.
- Press through the forearms: This helps keep your shoulders active and prevents collapsing through the upper body.
- Keep your neck neutral: Look down at the floor instead of lifting your head forward.
- Breathe steadily: Exhale gently during the step and avoid holding your breath for the whole set.
FAQ
What is the Back Steps Plank good for?
The Back Steps Plank is useful for building core stability, shoulder control, and hip stability. Since one foot moves while the body stays braced, it also trains anti-rotation control.
Is this exercise better than a regular plank?
It is not always better, but it is more dynamic. A regular plank builds static endurance, while the Back Steps Plank adds movement and challenges your core to stay stable during foot repositioning.
Should I feel this in my abs?
Yes. You should mainly feel your abs and obliques working to hold your body steady. Additionally, your shoulders, glutes, and legs may work to support the plank position.
Why does my lower back hurt during this exercise?
Lower-back discomfort often happens when the hips drop or the ribs flare. Therefore, shorten the set, brace your abs, and keep your hips level. If pain continues, stop the exercise.
Can beginners do the Back Steps Plank?
Yes, beginners can do it if they already have a basic forearm plank. However, they should start with small steps, short sets, and wider feet for more balance.
Recommended Equipment (Optional)
- Exercise Mat — cushions the forearms and improves comfort during plank work.
- Core Sliders — useful for advanced plank variations and controlled foot movement.
- Mini Resistance Bands — can add light hip and glute activation once basic form is mastered.
- Push-Up Handles — helpful for related plank and upper-body stability exercises.
- Workout Towel — keeps the forearm area dry and helps maintain a secure plank position.
Tip: Equipment is optional. For best results, master the bodyweight version first before adding sliders, bands, or longer plank sets.