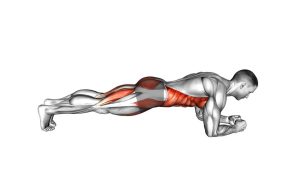
Lying Leg Raise: Proper Form, Core Benefits, Sets, Tips & FAQ
Learn how to do the Lying Leg Raise with controlled form to train abs, hip flexors, and core stability. Includes steps, tips, FAQs, and equipment.
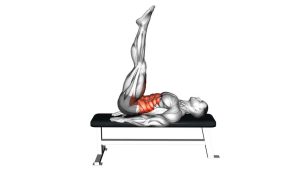
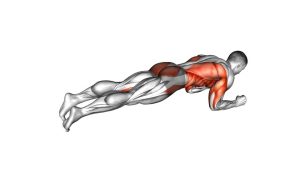
Lying Leg Raise
This exercise is useful for building stronger abs, improving lower-core control, and training the body to resist unwanted lower-back arching during leg movement. Since the legs act as a long lever, the exercise can become challenging even without added weight. Therefore, the main goal is not speed. Instead, focus on a smooth lift, a stable torso, and a slow return.
Based on the uploaded video, the movement uses both legs together with mostly straight knees. The hands are not perfectly clear in every frame, although they appear to support the body near the sides or under the hips. Because that detail is not fully visible, this guide keeps the hand position flexible while still matching the movement pattern shown.
Quick Overview
| Body Part | Abs |
|---|---|
| Primary Muscle | Rectus abdominis |
| Secondary Muscle | Hip flexors, transverse abdominis, obliques, and deep core stabilizers |
| Equipment | No equipment required; optional exercise mat |
| Difficulty | Beginner to intermediate, depending on range of motion and lower-back control |
Sets & Reps (By Goal)
- Core control: 2–3 sets × 8–12 reps with a slow lowering phase.
- Muscle endurance: 3–4 sets × 12–20 reps using a smooth, repeatable rhythm.
- Beginner technique: 2–3 sets × 6–10 reps with a shorter range of motion.
- Abs-focused finisher: 2–4 sets × 10–15 reps near the end of a core workout.
- Tempo challenge: 3 sets × 6–10 reps with a 3–5 second lowering phase.
Progression rule: First improve control. Then increase reps, slow the eccentric phase, or lower the legs closer to the floor without losing pelvic stability.
Setup / Starting Position
- Lie on your back: Start flat on the floor with your legs extended and together.
- Place your arms for support: Keep your arms by your sides or place your hands slightly under your hips if that helps you control your pelvis.
- Set your ribs down: Gently brace your abs so your torso stays steady before the legs move.
- Keep your head neutral: Let your head rest naturally unless your specific setup requires a small adjustment.
- Start with control: Avoid rushing into the first rep. The legs should move because your core and hips control them, not because you swing them.
If your lower back arches immediately, bend your knees slightly or use a smaller range of motion until your control improves.
Execution (Step-by-Step)
- Brace first: Tighten your abs lightly and keep your torso steady against the floor.
- Lift both legs together: Raise your legs upward in one smooth motion while keeping them mostly straight.
- Move through the hips: Let the hips flex as the legs rise, but avoid jerking or kicking upward.
- Reach the top position: Continue until your legs are near vertical or until your range of motion stays clean.
- Pause briefly: Control the top position without relaxing your abs.
- Lower slowly: Bring your legs back down with control instead of letting them drop.
- Stop before form breaks: If your lower back starts to arch, stop the lowering phase early and begin the next rep from there.
Pro Tips & Common Mistakes
- Control the lowering phase: Most form breakdown happens on the way down, so lower slowly.
- Avoid swinging: Momentum reduces core tension and makes the exercise less effective.
- Do not chase the floor: Lower only as far as you can while keeping your trunk stable.
- Keep the legs together: This matches the clean bilateral movement shown in the video.
- Use a smaller range if needed: A shorter, cleaner rep is better than a full-range rep with back arching.
- Relax your neck and shoulders: The exercise should challenge your core, not create upper-body tension.
- Breathe with control: Exhale during the lift or lowering phase if it helps you keep your ribs down.
- Do not rush reps: A steady tempo keeps the abs engaged and protects the lower back from sudden stress.
FAQ
What muscles does the lying leg raise work?
The lying leg raise mainly trains the rectus abdominis while also involving the hip flexors and deep core stabilizers. In addition, the obliques help keep the pelvis and trunk steady during the movement.
Is the lying leg raise good for lower abs?
It is often used as a lower-ab-focused exercise because the abs must control the pelvis as the legs move. However, the rectus abdominis works as one muscle, so the goal is better abdominal control rather than isolating only one section.
Should my legs stay completely straight?
In the video, the legs appear mostly straight. However, a slight knee bend is acceptable if it helps you maintain better control and prevents your lower back from arching.
Why does my lower back arch during lying leg raises?
Your lower back may arch when the legs lower too far for your current core strength. To fix this, reduce the range of motion, slow down, and focus on keeping your ribs and pelvis controlled.
Can beginners do lying leg raises?
Yes, beginners can do this exercise if they use a manageable range of motion. For many people, bent-knee raises or partial-range leg raises are better starting options before progressing to straighter legs.
How many lying leg raises should I do?
Start with 2–3 sets of 8–12 controlled reps. Once your form stays clean, increase reps slowly or make the lowering phase longer.
Recommended Equipment (Optional)
- Exercise Mat — adds comfort and support for floor-based ab exercises.
- Thick Yoga Mat — useful if your lower back or hips feel uncomfortable on hard flooring.
- Adjustable Ankle Weights — optional progression only after you can control bodyweight reps safely.
- Core Sliders — helpful for related core progressions and floor-based stability drills.
- Resistance Bands Set — useful for complementary core, hip flexor, and lower-body activation work.
Tip: Do not add ankle weights until your lower back stays stable throughout the full movement. Control should always come before load.