Inchworm to Cobra: Form, Benefits, Sets, Tips & FAQ
Learn the Inchworm to Cobra for full-body mobility, core control, hamstring flexibility, and spine extension with form tips, sets, mistakes, and gear.
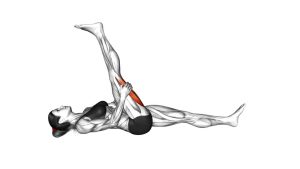
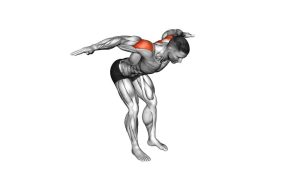
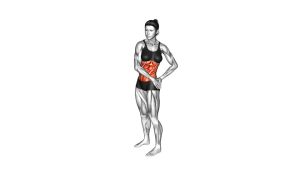
Inchworm to Cobra
This exercise is especially useful before strength training, running, bodyweight workouts, or mobility sessions. First, the forward fold helps lengthen the posterior chain. Then, the walkout challenges shoulder stability and core control. Finally, the cobra position opens the front of the body while encouraging gentle spinal extension.
Although the movement looks simple, clean technique matters. Therefore, move slowly enough to control each phase. In addition, keep your plank strong before lowering into cobra so your lower back does not take unnecessary pressure.
Quick Overview
| Body Part | Plyometrics |
|---|---|
| Primary Muscle | Core, hamstrings, shoulders, and spinal erectors |
| Secondary Muscle | Glutes, chest, triceps, hip flexors, calves, and upper back |
| Equipment | No equipment required; optional exercise mat |
| Difficulty | Beginner to intermediate, depending on hamstring flexibility and plank control |
Sets & Reps (By Goal)
- General warm-up: Perform 1–3 sets of 4–8 reps with a steady rhythm.
- Mobility focus: Complete 2–4 sets of 5–10 reps, and pause briefly in the fold and cobra.
- Core and shoulder control: Use 3–4 sets of 6–10 reps, while holding plank for 2–5 seconds each rep.
- Bodyweight conditioning: Try 3–5 rounds of 30–45 seconds, but keep the motion smooth.
- Beginner practice: Start with 1–2 sets of 3–5 reps, and bend the knees whenever needed.
Progression rule: Improve control first. After that, add reps, longer plank holds, or a slower tempo. However, avoid progressing by rushing through the exercise.
Setup / Starting Position
- Stand tall: Begin with your feet about hip-width apart and your arms relaxed by your sides.
- Brace lightly: Before folding, set your ribs down and gently tighten your core.
- Soften the knees: If your hamstrings feel tight, use a small knee bend to protect your back position.
- Clear your space: Make sure there is enough room in front of you to walk the hands into plank.
- Control your breathing: In addition, breathe steadily so the movement stays relaxed and coordinated.
Tip: When your hands cannot comfortably reach the floor, bend your knees more. Consequently, you will keep better control and reduce unnecessary strain.
Execution (Step-by-Step)
- Fold forward: Hinge from your hips and guide your hands toward the floor. Meanwhile, avoid bouncing into the hamstring stretch.
- Place your hands down: Set both hands on the floor in front of your feet. If needed, bend the knees so your hands can reach the ground safely.
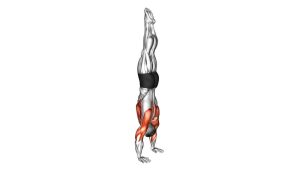
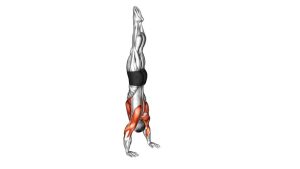
- Walk out gradually: Move one hand forward at a time until your body reaches a high plank position. As you walk out, keep your core engaged.
- Stabilize in plank: Stack your shoulders over your wrists and create a straight line from head to heels. At this point, avoid sagging through the hips.
- Lower into cobra: Drop your hips toward the floor and lift your chest forward and up. Additionally, keep your shoulders away from your ears.
- Open the front body: Lengthen through your chest, abdominals, and hip flexors. However, do not force the lower back into a painful arch.
- Return to plank: Press through your hands and bring your body back into a strong plank. Then, prepare to walk the hands back.
- Walk back with control: Move your hands toward your feet while keeping the hips high. During this phase, maintain a steady pace.
- Stand up smoothly: Rise back to the starting position with control. Finally, reset your posture before the next rep.
Pro Tips & Common Mistakes
- Start with the hips: Instead of rounding sharply through the lower back, hinge first and fold with control.
- Take small hand steps: Smaller steps improve balance; therefore, they usually create a cleaner plank position.
- Protect your plank: Keep the hips from sagging before cobra, because early collapse can stress the lower back.
- Lift the chest, not the chin: During cobra, open the chest while keeping the neck comfortable.
- Use the knees wisely: If hamstring tension limits you, bend the knees and preserve better alignment.
- Control the return: The walk back is still part of the exercise; consequently, it should not be rushed.
- Match it to your workout: For warm-ups, move slowly. For conditioning, increase pace only after technique is stable.
- Avoid overextending: More range is not always better. Instead, choose a range that feels strong and repeatable.
FAQ
What is the Inchworm to Cobra good for?
The Inchworm to Cobra is good for full-body mobility, warm-up preparation, core activation, shoulder stability, hamstring flexibility, and gentle spinal extension. In addition, it helps connect flexibility with active control.
Is the Inchworm to Cobra a strength exercise or a stretch?
It works as both. The walkout and plank challenge strength and stability, while the forward fold and cobra create a strong mobility effect. Therefore, it fits well into warm-ups and movement-prep routines.
Should my legs stay straight during the inchworm?
Straight legs are optional. If your hamstrings are tight, bend your knees slightly so the spine can stay controlled. As flexibility improves, you can gradually reduce the knee bend.
Where should I feel the cobra portion?
You should feel a stretch across the abdominals, hip flexors, and front of the torso. Meanwhile, the back muscles may work lightly to support the lift. However, sharp lower-back compression is not the goal.
Can beginners do the Inchworm to Cobra?
Yes, beginners can perform this exercise with shorter walkouts, softer knees, and a smaller cobra range. Additionally, moving slowly makes the drill easier to control.
When should I use this exercise?
Use it before workouts that involve the hips, core, shoulders, or spine. For example, it works well before strength training, running, calisthenics, mobility sessions, or bodyweight circuits.
Recommended Equipment (Optional)
- Exercise Mat — adds comfort and grip for the hands, wrists, hips, and feet.
- Yoga Blocks — useful if your hands cannot reach the floor comfortably during the fold.
- Non-Slip Workout Mat — improves traction during the hand walkout and plank transition.
- Foam Roller — helps prepare the calves, hamstrings, and upper back before mobility work.
- Wrist Support Wraps — optional support if your wrists feel pressure during plank-based movements.
Tip: Equipment is optional. However, a stable surface and smooth tempo can make the exercise safer, cleaner, and more effective.