Single-Leg Extension on Stability Ball: Form, Sets, Tips & FAQ
Learn the Single-Leg Extension on Stability Ball to build glute, hamstring, and core stability with safe form, sets, tips, FAQs, and gear.
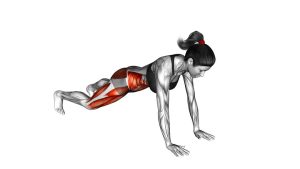
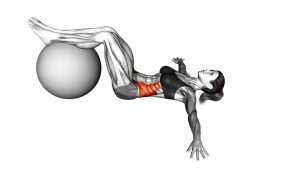
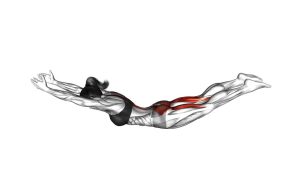
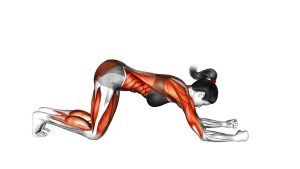
Single-Leg Extension on Stability Ball
This exercise is best performed with smooth, controlled movement instead of speed. The stability ball creates an unstable base, so your supporting leg, glutes, hamstrings, and deep core must work together to maintain alignment. It is especially useful for improving posterior-chain control, single-leg stability, and hip-level awareness.
Quick Overview
| Body Part | Glutes |
|---|---|
| Primary Muscle | Gluteus maximus |
| Secondary Muscle | Hamstrings, gluteus medius, calves, lower back stabilizers, deep core |
| Equipment | Stability ball / exercise ball |
| Difficulty | Intermediate because the ball and single-leg position demand balance, hip control, and core stability |
Sets & Reps (By Goal)
- Glute activation: 2–3 sets × 6–8 reps per side with a slow 2–3 second extension.
- Core and hip stability: 3–4 sets × 8–10 reps per side, keeping the hips level on every rep.
- Hamstring control: 2–3 sets × 6–10 reps per side with a controlled return and no ball rolling.
- Warm-up or corrective work: 1–2 sets × 5–8 reps per side using a small range of motion.
Progression rule: First improve control and hip stability. Then increase reps, hold time, or range of motion. Do not progress if your hips drop, your lower back arches, or the ball rolls away from you.
Setup / Starting Position
- Lie on your back: Keep your head, shoulders, and upper back relaxed on the floor.
- Place the ball under your heels or lower calves: The knees should be slightly bent in the starting bridge position.
- Set your arms wide: Keep your arms on the floor for balance, with palms pressing lightly down.
- Brace gently: Keep your ribs down and your core active before lifting your hips.
- Lift into a bridge: Raise your hips until your body forms a strong line from shoulders to hips and knees.
Start with both feet on the ball until you feel stable. The single-leg extension should only begin after your bridge position is controlled.
Execution (Step-by-Step)
- Hold the bridge position: Keep your hips lifted, glutes squeezed, and core lightly braced.
- Anchor one leg: Press one heel or calf into the stability ball to keep the ball from rolling.
- Lift the opposite leg: Slowly remove one foot from the ball without letting your pelvis rotate.
- Extend the leg: Straighten the lifted leg forward while keeping it in line with your body.
- Pause briefly: Hold the extended position for 1–2 seconds while keeping your hips level.
- Return with control: Bring the leg back toward the ball slowly and reset before the next rep.
- Repeat evenly: Complete all reps on one side, then switch sides with the same controlled tempo.
Pro Tips & Common Mistakes
- Keep your hips level: Avoid dropping one side of the pelvis when the leg lifts off the ball.
- Do not overarch your lower back: Squeeze the glutes and keep the ribs down to protect the spine.
- Use slow reps: Fast movement usually causes the ball to roll and reduces muscle control.
- Press through the supporting heel: This improves hamstring and glute engagement.
- Avoid locking the neck: Keep the head relaxed on the floor and avoid pushing the chin upward.
- Do not chase height: Lift only as high as you can while keeping the pelvis neutral.
- Regress when needed: If the single-leg version is too difficult, perform a two-leg stability ball bridge first.
FAQ
What muscles does the Single-Leg Extension on Stability Ball work?
It mainly works the glutes and hamstrings. It also trains the core, hip stabilizers, calves, and lower-back stabilizers because the ball creates an unstable surface.
Is this exercise good for glute activation?
Yes. It is a strong glute activation exercise because the hips must stay lifted while one leg moves. The glutes work to extend the hips and prevent the pelvis from dropping or twisting.
Why do my hamstrings cramp during this exercise?
Hamstring cramping can happen when the hamstrings take over because the glutes are not contributing enough. Reduce the range, squeeze the glutes before lifting, and try a basic bridge variation first.
Should the ball move during the exercise?
A small amount of movement is normal, but the ball should not roll away or shake aggressively. If it moves too much, slow down and press more steadily through the supporting heel.
Is this a beginner exercise?
It is usually better for intermediate users because it combines a bridge, single-leg control, and an unstable ball. Beginners should first master a floor glute bridge and a two-leg stability ball bridge.
Recommended Equipment
- Stability Ball / Exercise Ball — the main tool for performing this exercise safely and effectively
- Non-Slip Exercise Mat — improves comfort and keeps your upper body stable on the floor
- Mini Resistance Bands — useful for glute activation drills before stability ball work
- Foam Roller — helpful for warming up the hamstrings, glutes, and calves
- Adjustable Ankle Weights — optional progression for advanced users after mastering strict bodyweight control
Tip: Choose a stability ball size that lets you control the bridge position without excessive rolling. A firm, anti-burst ball is usually best for lower-body stability training.