Resistance Band Lying Leg Curl: Form, Sets, Tips & FAQ
Learn the Resistance Band Lying Leg Curl for stronger hamstrings, better knee control, and home leg training with setup, form tips, sets, FAQs, and gear.
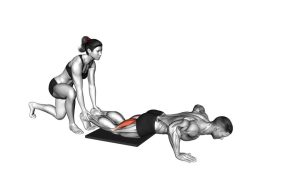
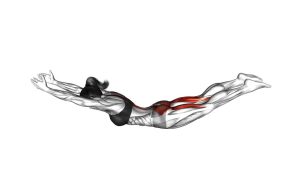
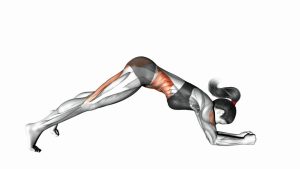
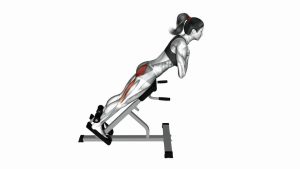
Resistance Band Lying Leg Curl
This exercise works best when the hips stay stable, the thighs remain close to the floor, and the lower legs move in a smooth curling path. The goal is not to rush the band back and forth. Instead, focus on controlled knee flexion, a firm hamstring squeeze at the top, and a slow return as the band pulls your legs forward.
Quick Overview
| Body Part | Hamstrings |
|---|---|
| Primary Muscle | Hamstrings: biceps femoris, semitendinosus, semimembranosus |
| Secondary Muscle | Gastrocnemius, glutes, core stabilizers |
| Equipment | Resistance band and a secure low anchor point |
| Difficulty | Beginner to intermediate |
Sets & Reps (By Goal)
- Beginner control: 2–3 sets × 10–12 reps with a slow, clean tempo.
- Muscle growth: 3–4 sets × 12–20 reps with a strong squeeze at the top.
- Hamstring endurance: 2–4 sets × 15–25 reps using light-to-moderate band tension.
- Warm-up activation: 1–2 sets × 12–15 reps before lower-body training.
- Rehab-style control: 2–3 sets × 8–12 reps with light resistance and a slow eccentric.
Progression rule: First improve control and range of motion. Then progress by using a slightly stronger band, increasing reps, adding a longer top hold, or slowing the lowering phase.
Setup / Starting Position
- Anchor the band low: Secure the resistance band to a stable object in front of your feet.
- Attach the band: Loop the band around your ankles or use ankle straps for a more secure setup.
- Lie face down: Position yourself prone on the floor or on an exercise mat.
- Extend the legs: Start with both legs straight and the band under light tension.
- Set the upper body: Rest your forearms on the floor and keep your chest relaxed.
- Brace lightly: Keep your hips grounded and avoid arching the lower back.
The band should pull from in front of your feet. If the band is too loose at the start, move farther from the anchor. If it pulls too aggressively, move closer or use a lighter band.
Execution (Step-by-Step)
- Start long: Begin with your legs extended, hips flat, and knees pointing down toward the floor.
- Curl the heels in: Bend your knees and pull your heels toward your glutes.
- Keep the thighs stable: Avoid lifting your hips or letting your thighs swing upward.
- Squeeze the hamstrings: Pause briefly when your knees are bent and the band tension is highest.
- Lower slowly: Let the legs return forward with control instead of allowing the band to snap them back.
- Reset with tension: Stop before the band goes completely slack, then begin the next rep.
Pro Tips & Common Mistakes
- Use a smooth tempo: Curl in 1–2 seconds, hold briefly, then return in 2–4 seconds.
- Do not rush the eccentric: The lowering phase is where many hamstring-strength benefits happen.
- Keep the hips down: Lifting the hips turns the drill into a compensation pattern.
- Avoid excessive band tension: If the band is too heavy, your range and control will suffer.
- Keep the knees aligned: Do not let the knees flare wide or collapse inward.
- Use ankle straps if needed: They make the setup more comfortable and reduce band slipping.
- Control the final inches: Do not lock the knees aggressively at the bottom.
- Pair it wisely: Combine with hip-hinge exercises like Romanian deadlifts for complete hamstring training.
FAQ
What muscles does the Resistance Band Lying Leg Curl work?
It mainly targets the hamstrings, including the biceps femoris, semitendinosus, and semimembranosus. The calves and glutes also assist slightly, especially with stabilization.
Is the band lying leg curl good for home workouts?
Yes. It is one of the best home-friendly alternatives to a machine leg curl because it only requires a resistance band and a secure low anchor point.
Should I use a heavy resistance band?
Not at first. Use a band that allows a full curl, a clean squeeze, and a slow return. A band that is too heavy often causes hip lifting, shortened range, or jerky reps.
Where should I feel this exercise?
You should feel the back of your thighs working, especially during the top squeeze and slow lowering phase. If you mainly feel your lower back, reduce resistance and keep your hips pressed down.
Can this replace a machine lying leg curl?
It can be a strong alternative, especially for home training, warm-ups, and high-rep hamstring work. A machine may offer more stable resistance, but the band version is practical, portable, and joint-friendly when controlled.
Recommended Equipment
- Resistance Bands Set — useful for adjusting resistance levels as your hamstrings get stronger
- Ankle Straps for Resistance Bands — helps keep the band secure and more comfortable around the ankles
- Exercise Mat — provides comfort for prone floor-based hamstring curls
- Door Anchor for Resistance Bands — creates a stable low anchor point for home band exercises
- Foam Roller for Legs — useful for warming up and relaxing tight hamstrings after training
Tip: Choose equipment that keeps the movement secure and controlled. If the band slips or the anchor moves, stop and reset before continuing.