Suspended Side Lunge: Form, Muscles Worked, Sets, Tips & FAQ
Learn the Suspended Side Lunge for stronger glutes, quads, and inner thighs. Get proper form, sets, cues, mistakes, FAQs, and gear tips.
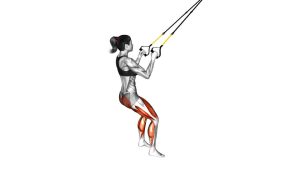
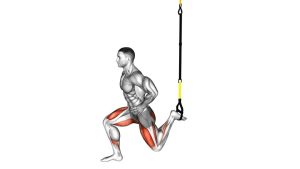
Suspended Side Lunge
This exercise is especially useful for beginners who need support while learning the side lunge pattern, and it is also valuable for advanced lifters who want a controlled warm-up, mobility drill, or unilateral leg accessory movement. The suspension straps help you keep the torso upright, control your descent, and return to standing without losing balance.
Quick Overview
| Body Part | Legs |
|---|---|
| Primary Muscle | Glutes, quadriceps, adductors |
| Secondary Muscle | Hamstrings, calves, glute medius, core stabilizers |
| Equipment | Suspension trainer / TRX-style straps |
| Difficulty | Beginner to intermediate |
Sets & Reps (By Goal)
- Technique practice: 2–3 sets × 6–8 reps per side with slow control.
- Muscle endurance: 3–4 sets × 10–15 reps per side with moderate tempo.
- Warm-up or mobility: 1–3 sets × 6–10 reps per side using a comfortable range.
- Strength accessory work: 3–4 sets × 8–12 reps per side with less strap assistance.
Progression rule: First improve range of motion and balance. Then reduce how much you pull on the straps before adding external load.
Setup / Starting Position
- Anchor the suspension trainer: Attach the straps securely above chest height.
- Hold the handles: Grip one handle in each hand with the arms extended forward.
- Stand wide: Place your feet wider than shoulder-width with toes mostly forward or slightly turned out.
- Create light strap tension: Lean back slightly enough to feel support, but keep your body active.
- Brace your core: Keep your chest lifted, ribs controlled, and spine neutral before moving.
Execution (Step-by-Step)
- Shift your weight: Move your hips toward one side while keeping the opposite leg extended.
- Sit back into the working hip: Bend the working knee and push the hips slightly backward.
- Keep the heel down: Maintain pressure through the working foot, especially the heel and midfoot.
- Control the bottom position: Pause briefly when you feel the glute and inner thigh working.
- Push back to center: Drive through the working leg and use the straps only as light assistance.
- Repeat or alternate: Complete all reps on one side or alternate sides with smooth control.
Pro Tips & Common Mistakes
- Sit into the hip: Think “hips back and sideways,” not “knee forward only.”
- Keep the working foot planted: Do not let the heel lift as you descend.
- Use the straps lightly: They should guide balance, not remove all leg effort.
- Control the extended leg: Keep the non-working leg long without forcing the knee to lock aggressively.
- Avoid knee collapse: Keep the working knee tracking in line with the toes.
- Move slowly: A slower descent improves control, mobility, and muscle activation.
- Stay tall through the chest: A slight forward lean is normal, but avoid rounding the back.
FAQ
What muscles does the Suspended Side Lunge work?
It mainly works the glutes, quadriceps, and adductors. It also trains the hamstrings, calves, core, and hip stabilizers because the body must control side-to-side movement.
Is the Suspended Side Lunge good for beginners?
Yes. The suspension straps make the side lunge easier to learn because they provide balance support and help you control depth without falling or overloading the knee.
Should I pull hard on the straps?
No. Pull only enough to stay balanced. If you pull too hard, your arms do the work and your legs lose the training effect.
How deep should I go?
Go as deep as you can while keeping the working heel down, the knee aligned, and the spine controlled. Depth should improve gradually with mobility and strength.
Is this the same as a regular side lunge?
It is the same general movement pattern, but the suspension trainer makes it more supported. This allows better balance, smoother control, and easier technique practice.
Recommended Equipment
- Suspension Trainer — essential for performing the suspended side lunge safely and effectively
- Door Anchor for Suspension Trainer — useful for setting up straps at home without a fixed wall mount
- Exercise Mat — adds comfort and grip for home lower-body training
- Resistance Bands Set — helpful for glute activation and warm-up drills before side lunges
- Stable Training Shoes — supports better foot grip, balance, and knee tracking during lateral movement
Tip: For best results, choose equipment that helps you maintain stable footing and smooth strap tension. Good control is more important than using a deeper range too early.