Suspended Single-Leg Squat: Form, Muscles, Sets, Tips & FAQ
Learn the Suspended Single-Leg Squat for stronger quads, glutes, balance, and pistol squat control with setup, steps, tips, FAQs, and equipment.
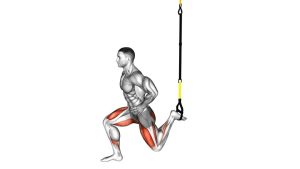
Suspended Single-Leg Squat
This exercise is ideal for building confidence in single-leg squats because the straps help with balance without removing the need for leg strength. The working leg performs most of the movement, while the arms provide light assistance. Keep the planted foot stable, control the knee path, and use the straps only as much as needed to maintain clean form.
Quick Overview
| Body Part | Legs |
|---|---|
| Primary Muscle | Quadriceps |
| Secondary Muscle | Glutes, hamstrings, calves, core, hip stabilizers |
| Equipment | Suspension trainer / TRX-style straps |
| Difficulty | Beginner to Intermediate |
Sets & Reps (By Goal)
- Skill practice: 2–3 sets × 5–8 reps per leg with slow, clean control.
- Muscle building: 3–4 sets × 8–12 reps per leg with moderate strap assistance.
- Strength progression: 3–5 sets × 4–8 reps per leg with less assistance and deeper range.
- Warm-up or activation: 1–2 sets × 6–10 reps per leg using a comfortable range of motion.
Progression rule: First improve depth and control. Then reduce how much you pull with the arms. Progress slowly toward an unassisted single-leg squat only when knee tracking and balance stay consistent.
Setup / Starting Position
- Anchor the straps securely: Set the suspension trainer at a stable overhead anchor point.
- Hold the handles: Stand facing the anchor with both hands gripping the handles around chest height.
- Plant one foot: Place the working foot flat on the floor with the toes pointing forward or slightly outward.
- Lift the opposite leg: Extend the non-working leg slightly forward so it stays off the floor.
- Brace your core: Keep your ribs stacked, chest tall, and shoulders relaxed.
- Create light strap tension: Lean back only enough to feel supported, not enough to hang from the handles.
Your starting position should feel balanced and controlled before the first rep. If you feel unstable, shorten the range of motion and increase strap assistance.
Execution (Step-by-Step)
- Begin tall: Stand on one leg with the opposite leg lifted forward and the straps lightly tensioned.
- Start the descent: Bend the working knee and send the hips slightly back and down.
- Control the knee path: Keep the knee tracking in line with the toes without letting it collapse inward.
- Lower with control: Descend only as far as you can keep your heel grounded and torso stable.
- Use the straps lightly: Pull just enough to maintain balance and reduce excessive strain.
- Pause briefly: Hold the bottom position for a moment without bouncing.
- Drive upward: Push through the working foot and extend the knee and hip together.
- Finish balanced: Return to standing without swinging the lifted leg or over-pulling with the arms.
Pro Tips & Common Mistakes
- Keep the heel down: A stable heel helps protect balance and improves quad and glute engagement.
- Do not bounce: Control the bottom position instead of dropping quickly and rebounding upward.
- Avoid knee cave: Keep the knee aligned with the middle toes throughout the rep.
- Use the straps as assistance, not the main driver: The arms should guide the movement, not replace the legs.
- Keep the lifted leg quiet: Do not swing it aggressively to create momentum.
- Control the descent first: A smooth lowering phase builds better strength and joint control.
- Adjust depth to your mobility: A clean partial rep is better than a deep rep with poor alignment.
- Keep the torso organized: A slight forward lean is normal, but avoid collapsing or rounding excessively.
FAQ
What muscles does the Suspended Single-Leg Squat work?
It primarily works the quadriceps. It also trains the glutes, hamstrings, calves, core, and hip stabilizers because the body must balance and control the movement on one leg.
Is the Suspended Single-Leg Squat the same as a pistol squat?
It is similar, but easier. The suspension straps provide balance and partial assistance, making it a useful progression toward a full pistol squat.
How much should I pull with my arms?
Pull only enough to stay balanced and maintain good form. If the arms are doing most of the work, reduce depth, slow the tempo, or use the exercise as a beginner progression before decreasing assistance.
Is this exercise good for beginners?
Yes, if the range of motion is controlled. Beginners can use the straps for extra support and perform partial reps before progressing to deeper single-leg squats.
Why does my knee move forward during this exercise?
Some forward knee travel is normal in a single-leg squat. The key is to keep the heel grounded, the knee aligned with the toes, and the movement pain-free.
What should I do if I lose balance?
Increase strap assistance, reduce depth, slow down, and focus on keeping the working foot stable. Balance improves with consistent controlled practice.
Recommended Equipment
- Suspension Trainer — the main tool for assisted single-leg squats and other bodyweight strength exercises
- Door Anchor for Suspension Trainer — useful for setting up suspension straps safely at home
- Exercise Mat — provides a comfortable, stable surface for warm-ups and floor-based accessory work
- Slant Board / Ankle Mobility Wedge — helps improve ankle mobility and squat depth practice
- Resistance Bands Set — useful for glute activation, hip stability drills, and lower-body warm-ups
Tip: Choose equipment that helps you improve control, not just depth. Better balance, cleaner knee tracking, and consistent reps matter more than forcing a full-range pistol squat too early.