Lay-Down Push-Up: Proper Form, Sets & Reps, Tips & FAQ
Learn the Lay-Down Push-Up to build chest, triceps, and shoulder strength with strict body alignment. Includes step-by-step form, sets by goal, common mistakes, FAQs, and recommended gear.
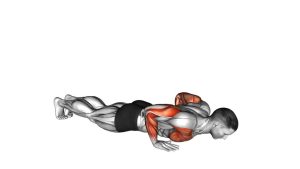
Lay-Down Push-Up
Compared to fast, bouncing push-ups, the lay-down/reset style encourages cleaner reps and more consistent positioning. It’s a great option for building push-up strength, improving pressing mechanics, and getting quality chest volume at home.
Quick Overview
| Body Part | Chest |
|---|---|
| Primary Muscle | Pectoralis major (chest) |
| Secondary Muscle | Triceps, anterior deltoids, serratus anterior, core stabilizers |
| Equipment | None (optional: push-up handles, mat, resistance band, weighted vest) |
| Difficulty | Beginner–Intermediate (scales easily by incline, tempo, or load) |
Sets & Reps (By Goal)
- Strength: 4–6 sets × 3–6 reps (90–150 sec rest, strict form)
- Muscle (hypertrophy): 3–5 sets × 8–15 reps (60–90 sec rest, controlled tempo)
- Endurance/conditioning: 2–4 sets × 15–25 reps (30–60 sec rest)
- Beginner progression: 3–4 sets × 6–12 reps (use incline if needed, stop 1–2 reps before failure)
Progression rule: Add reps first (same clean form). Next, slow the tempo (3 seconds down), add a 1–2 second pause at the bottom, or progress to a harder variation (lower incline, feet elevated, band/vest).
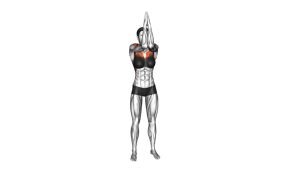
Setup / Starting Position
- Hand position: Place hands slightly wider than shoulders. Spread fingers and grip the floor.
- Wrist/stack: Wrists under hands, elbows soft. If wrists bother you, use push-up handles.
- Body line: Squeeze glutes, brace abs, and keep a straight line from head to heels.
- Shoulders: Set shoulders down and away from ears. Avoid shrugging.
- Brace & breathe: Inhale to brace before lowering; keep ribs “down” (no flaring).
Tip: If full push-ups are too challenging, elevate your hands on a bench/box to reduce load while keeping the same technique.
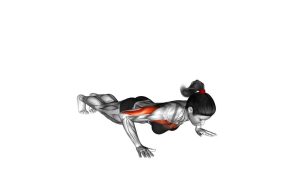
Execution (Step-by-Step)
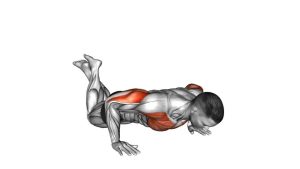
- Lower under control: Bend elbows and lower chest toward the floor in 2–3 seconds.
- Elbow path: Keep elbows around 30–45° from your torso (not straight out to the sides).
- Touch/reset: Chest lightly touches the floor (or gets very close). Keep tension—don’t fully “collapse.”
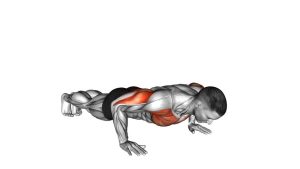
- Press up: Drive through palms, keep core tight, and press to full arm extension.
- Repeat: Re-set your brace each rep so every rep looks the same.
Pro Tips & Common Mistakes
Pro Tips
- Think “chest to floor”: Lead with the sternum, not the head.
- Use a strong plank: Glutes + abs tight = better chest loading and safer shoulders.
- Control the negative: A 2–3 second descent increases time under tension for the chest.
- Hands slightly turned out: A small outward hand angle can feel better on shoulders for some lifters.
- Progress smart: Add reps → slow tempo → add pause → then add load (band/vest).
Common Mistakes
- Elbows flaring at 90°: Often increases shoulder stress and reduces pressing efficiency.
- Hips sagging: Turns the rep into a “snake push-up” and strains the low back.
- Partial reps: Short range limits chest stimulus—use incline if full depth isn’t possible yet.
- Shoulder shrugging: Keep shoulders down away from ears, especially at the top.
- Bouncing off the floor: Touch lightly and press—don’t slam.
FAQ
What’s the difference between a lay-down push-up and a regular push-up?
The lay-down/reset style starts each rep from the floor (or a light chest touch) which can improve consistency and reduce “bouncy” reps. It’s especially useful for building strict pressing strength and clean technique.
Where should I feel it?
Mostly in the chest, with strong support from the triceps and front shoulders. You should also feel your core working to keep your body in a straight line.
My wrists hurt—what should I do?
Try push-up handles or dumbbell handles for a neutral wrist position. You can also use a mat and warm up wrists gently. If pain persists, reduce volume and consult a professional.
How do I make it easier?
Elevate your hands on a bench/box (incline push-up), reduce reps, and slow the tempo. Focus on perfect body alignment before progressing.
How do I make it harder without weights?
Add a pause at the bottom, slow the descent, elevate your feet, or use a resistance band across your back. You can also wear a weighted vest if available.
Recommended Equipment (Optional)
- Push-Up Handles — neutral wrists and deeper range of motion
- Non-Slip Exercise Mat — comfort for hands/knees and better traction
- Resistance Bands Set — add progressive resistance to push-ups
- Weighted Vest — simple way to overload chest and triceps
- Push-Up Board — helps guide hand placement and training variety
Tip: Equipment is optional—great results come from clean reps, smart progression, and consistency.