Prayer Push: Form, Benefits, Sets, Tips & FAQ
Learn how to do the Prayer Push with proper form to target the front shoulders and inner chest. Includes step-by-step instructions, sets and reps by goal, common mistakes, FAQs, and recommended equipment.
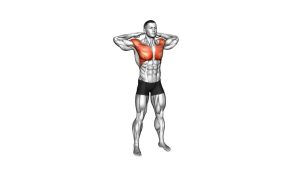
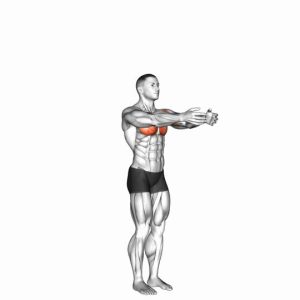
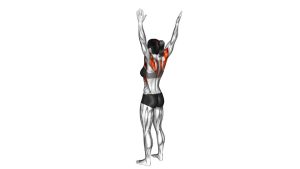
Prayer Push
This exercise works best when you focus on controlled tension rather than speed. The Prayer Push is not about heavy loading; it is about squeezing the palms together, keeping the elbows moving under control, and feeling the anterior deltoids and inner chest stay active throughout the full range. It is a useful option for warm-ups, pump work, burnout sets, or light home training when you want effective upper-body activation without equipment.
Quick Overview
| Body Part | Shoulders |
|---|---|
| Primary Muscle | Anterior deltoids (front shoulders) |
| Secondary Muscle | Pectoralis major (inner chest), triceps, upper chest |
| Equipment | None |
| Difficulty | Beginner |
Sets & Reps (By Goal)
- Warm-up / activation: 2–3 sets × 10–15 reps with slow tempo and full tension
- Muscle endurance: 3–4 sets × 12–20 reps with 30–45 seconds rest
- Finisher / pump work: 2–3 sets × 15–25 reps or 30–45 seconds continuous tension
- Beginner home workout: 2–3 sets × 8–12 controlled reps, focusing on form
Progression rule: First increase control, range quality, and squeeze intensity. Then add reps or extend time under tension before increasing overall volume.
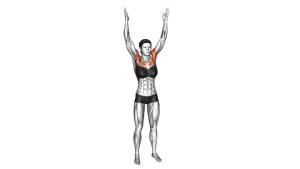
Setup / Starting Position
- Stand tall: Keep your feet about hip-width to shoulder-width apart with your chest up and core lightly braced.
- Bring your hands together: Place your palms together in front of your chest in a prayer position.
- Lift the elbows slightly: Keep them out to the sides naturally without flaring too aggressively.
- Set your shoulders: Pull the shoulders down and back slightly so the upper traps do not take over.
- Create tension early: Press your palms firmly into each other before you start moving forward.
Tip: The movement becomes much more effective when you actively squeeze the palms together the entire time instead of just touching them lightly.
Execution (Step-by-Step)
- Start in prayer position: Hold your hands at chest level with steady pressure between the palms.
- Press forward slowly: Extend your arms forward in front of your body while keeping your palms pressed together hard.
- Stop before locking out: Reach the arms forward until they are nearly straight but still soft at the elbows.
- Pause briefly: Hold the fully extended position for 1–2 seconds while maintaining palm pressure.
- Return under control: Bring the hands back toward your chest slowly, keeping tension in the shoulders and chest the entire time.
- Repeat smoothly: Continue for the target rep range without relaxing the squeeze between reps.
Pro Tips & Common Mistakes
- Press the palms hard together: The squeeze is what makes this exercise effective.
- Move slowly: A controlled tempo creates much better activation than fast reps.
- Do not shrug: Keep the shoulders down so the front delts do the work instead of the upper traps.
- Avoid elbow lockout: Keep a slight bend in the arms at full extension to maintain tension.
- Stay upright: Do not lean forward or backward to fake extra range.
- Keep the chest engaged: Think about squeezing inward as much as pushing outward.
- Use it as a primer: This exercise pairs well with shoulder presses, raises, and chest workouts.
FAQ
What muscles does the Prayer Push work?
The Prayer Push mainly targets the anterior deltoids while also training the inner chest through isometric palm pressure. The triceps and upper chest may assist depending on how hard you press and how far forward you reach.
Is the Prayer Push a chest exercise or a shoulder exercise?
It is primarily a shoulder activation exercise with strong chest involvement. Most people feel it most in the front delts, especially when the arms move farther away from the body.
Can beginners do the Prayer Push?
Yes. It is beginner-friendly because it requires no equipment and allows you to control the intensity through how hard you press your palms together.
When should I use the Prayer Push in a workout?
It works well as a warm-up, activation drill, or finisher. You can also use it in home workouts when you want shoulder and chest tension without weights.
Why don’t I feel much when I do it?
The most common reason is not pressing the palms together hard enough. Increase inward pressure, slow the tempo, and avoid rushing the reps.
Recommended Equipment (Optional)
- Loop Resistance Bands — useful for adding extra shoulder activation and warm-up variety
- Light Dumbbells — great for pairing with front raises, lateral raises, and shoulder finishers
- Exercise Mat — provides a comfortable surface for full-body warm-ups and home training circuits
- Adjustable Resistance Bands Set — helps expand shoulder, chest, and arm training at home
- Posture Trainer Strap — optional reminder tool for maintaining better upper-body alignment between workouts
Tip: The Prayer Push does not require equipment, but a few simple accessories can make your shoulder warm-ups and home workouts more complete.