Lying Prone W Raise: Proper Form, Muscles Worked, Sets, Tips & FAQ
Learn how to perform the Lying Prone W Raise with proper form to strengthen the upper back, rear delts, and shoulder stabilizers. Includes setup, execution, sets by goal, common mistakes, FAQ, and recommended equipment.
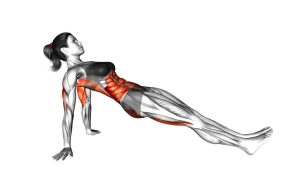
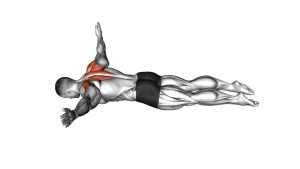
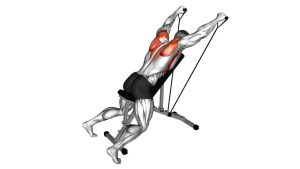
Lying Prone W Raise
This movement is most effective when done with a small, precise range of motion. The goal is not to fling the arms upward, but to create a strong contraction through the rhomboids, middle trapezius, rear deltoids, and other shoulder stabilizers. When performed correctly, you should feel a clean squeeze between the shoulder blades and behind the shoulders, not neck tension or lower-back strain.
Quick Overview
| Body Part | Back |
|---|---|
| Primary Muscle | Middle trapezius and rhomboids |
| Secondary Muscle | Rear deltoids, lower trapezius, rotator cuff, scapular stabilizers |
| Equipment | None; optional exercise mat or flat/incline bench |
| Difficulty | Beginner |
Sets & Reps (By Goal)
- Warm-up / activation: 2–3 sets × 8–12 reps with a 1–2 second squeeze at the top
- Posture / shoulder health: 2–4 sets × 10–15 reps with slow, controlled tempo
- Muscular endurance: 3–4 sets × 12–20 reps with strict form and short rest
- Rehab-style control work: 2–3 sets × 6–10 reps with a 2–4 second hold each rep
Progression rule: Increase control, pause quality, and rep consistency before adding load or range. Clean scapular movement matters more than lifting the arms higher.
Setup / Starting Position
- Lie face down: Position yourself on the floor, a mat, or a bench with your body fully supported and your legs extended comfortably.
- Set the head and neck: Keep your neck neutral by looking down. Your forehead can lightly hover or rest on a towel if needed.
- Form the “W” shape: Bend your elbows to roughly 90 degrees and place your upper arms slightly out from your torso.
- Align the shoulders: Draw your shoulders away from your ears and keep your chest relaxed.
- Brace lightly: Tighten your core just enough to prevent excessive arching in the lower back.
Tip: If the floor feels restrictive, using a bench can increase arm clearance and make the movement easier to feel through the upper back.
Execution (Step-by-Step)
- Start from the prone “W” position: Elbows bent, hands near shoulder level, shoulders packed down.
- Initiate with the shoulder blades: Pull the shoulder blades back and slightly down before the arms lift.
- Raise the arms slightly: Lift the elbows and hands off the floor while maintaining the “W” shape.
- Squeeze at the top: Pause briefly when you feel a strong contraction between the shoulder blades and behind the shoulders.
- Lower under control: Return to the start slowly without dropping the arms or losing posture.
- Repeat smoothly: Keep each rep controlled, quiet, and deliberate rather than fast or jerky.
Pro Tips & Common Mistakes
- Think “squeeze, not swing”: Momentum reduces upper-back engagement and turns the movement into a sloppy arm lift.
- Keep the neck neutral: Avoid lifting the chin or looking forward during the rep.
- Do not shrug: Elevating the shoulders lets the upper traps dominate the movement.
- Maintain the “W” shape: Straightening the elbows changes the exercise and reduces the intended emphasis.
- Use a small range: You do not need a huge lift to make the exercise effective.
- Control the lowering phase: The eccentric portion helps reinforce better posture and scapular control.
- Avoid lower-back overextension: Keep the torso stable instead of trying to lift the chest too high.
FAQ
What muscles does the Lying Prone W Raise work the most?
It primarily targets the middle trapezius and rhomboids, while also involving the rear deltoids, lower traps, and smaller shoulder-stabilizing muscles.
Is this a good exercise for posture?
Yes. It can help strengthen the upper-back muscles that support better shoulder positioning and improved scapular control, especially when paired with rows, face pulls, and thoracic mobility work.
Should I do this on the floor or on a bench?
Both work well. The floor version is simple and beginner-friendly, while a bench can allow slightly more range of motion and make it easier to move freely without the ground limiting your elbows or hands.
How high should I lift my arms?
Only as high as you can while keeping the movement smooth and the shoulders relaxed. A small, high-quality lift is much better than forcing height and losing tension in the target muscles.
Can I add resistance to this exercise?
Yes, but only after you can control bodyweight reps well. Light plates, very small dumbbells, or resistance bands can be used carefully, but this drill is usually most valuable as a strict control and activation movement.
Recommended Equipment (Optional)
- Exercise Foam Mat — adds comfort for prone floor work and makes longer activation sessions more comfortable
- Resistance Bands Set — useful for pairing this drill with rows, pull-aparts, and shoulder-stability work
- Adjustable Weight Bench — gives your arms more room to move and works well for prone upper-back accessories
- Foam Roller — helpful for thoracic mobility work before or after upper-back activation drills
- Yoga Mat — a simple option for home training, mobility sessions, and bodyweight shoulder work
Tip: Use these tools to improve comfort and training quality, not to complicate the exercise. The best results still come from slow reps, clean scapular motion, and consistent practice.