Kettlebell Standing Bottoms-Up One-Arm Shoulder Press: Form, Sets, Tips & FAQ
Learn how to perform the kettlebell standing bottoms-up one-arm shoulder press with proper form. Build shoulder stability, grip strength, and overhead control with setup tips, step-by-step execution, mistakes to avoid, FAQs, and recommended equipment.
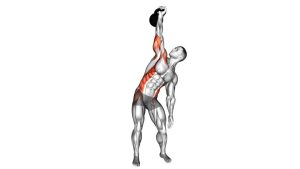
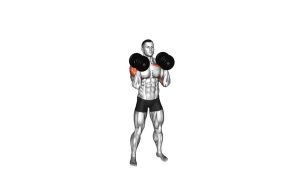
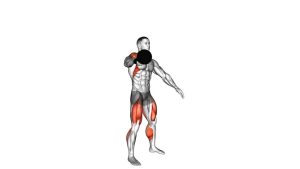
Kettlebell Standing Bottoms-Up One-Arm Shoulder Press
This movement is best treated as a skill-strength exercise rather than a max-strength press. The unstable bottoms-up position teaches you to stay organized from the hand to the shoulder, making every rep a test of coordination, tension control, and overhead alignment. A good rep feels smooth and balanced, not shaky, rushed, or forced.
Quick Overview
| Body Part | Shoulders |
|---|---|
| Primary Muscle | Anterior deltoid |
| Secondary Muscle | Lateral deltoid, triceps, rotator cuff, forearms, upper-back stabilizers |
| Equipment | Kettlebell |
| Difficulty | Intermediate to Advanced (stability-focused unilateral overhead press) |
Sets & Reps (By Goal)
- Shoulder stability and control: 3–4 sets × 4–6 reps per side (60–90 sec rest)
- Strength skill practice: 3–5 sets × 3–5 reps per side (90–120 sec rest)
- Accessory overhead work: 2–4 sets × 6–8 reps per side (60–90 sec rest)
- Warm-up activation: 2–3 sets × 3–5 light reps per side with perfect control
Progression rule: Increase stability first, then reps, then load. If the kettlebell wobbles excessively, shorten the set or reduce the weight before progressing.
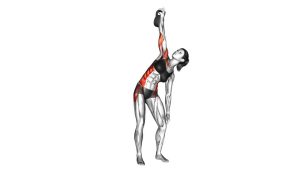
Setup / Starting Position
- Stand tall: Place your feet about hip- to shoulder-width apart and brace your core.
- Clean the kettlebell into position: Bring the bell to shoulder level with one hand.
- Flip to bottoms-up: Turn the kettlebell upside down so the bell sits above the handle.
- Stack the wrist: Keep the wrist neutral and the knuckles facing up, not bent backward.
- Set the elbow: Keep the elbow slightly in front of the body under the kettlebell, with the shoulder packed and stable.
- Free arm position: Let the non-working arm stay relaxed at your side or on your hip for balance.
Tip: A lighter kettlebell with a clean handle and balanced center of mass makes learning this movement much safer and smoother.
Execution (Step-by-Step)
- Brace before pressing: Tighten your midsection, squeeze the handle, and keep your ribs down.
- Press vertically: Drive the kettlebell overhead in a straight, controlled path without jerking or leaning back.
- Keep the bell balanced: Maintain the bottoms-up position by making small corrections through your hand, wrist, and shoulder.
- Reach lockout: Finish with the elbow extended, wrist stacked, and shoulder stable overhead.
- Pause briefly: Hold the top for a moment to own the position and confirm balance.
- Lower with control: Bring the kettlebell back down slowly to the rack position without losing alignment.
- Repeat evenly: Perform all reps on one side, then switch arms.
Pro Tips & Common Mistakes
- Use a lighter bell than your normal press: Bottoms-up pressing is much harder than a standard kettlebell shoulder press.
- Crush the handle: Strong grip tension improves shoulder organization and helps stabilize the kettlebell.
- Keep the forearm vertical: Letting the wrist drift or bend backward makes balance much harder.
- Do not lean back: Rib flare and lumbar extension turn the press into a compensation pattern.
- Avoid rushing the lockout: Press smoothly and finish under control.
- Do not let the elbow flare too far out: A slightly forward pressing angle usually feels stronger and safer.
- Own the eccentric: Lowering under control is part of the training effect, not just the way back down.
- Stop before breakdown: One unstable rep can throw off the whole set. Quality matters more than rep count.
FAQ
What is the main benefit of the bottoms-up position?
The bottoms-up position makes the kettlebell unstable, which forces your grip, wrist, rotator cuff, and shoulder stabilizers to work much harder than they would in a regular press.
Is this better than a standard one-arm kettlebell press?
It is not necessarily better for all goals, but it is more demanding for stability, coordination, and grip. A regular press is usually better for heavier loading, while the bottoms-up press is excellent for improving control and overhead quality.
How heavy should I go?
Start lighter than you think. Most lifters need a noticeably lighter kettlebell for bottoms-up pressing than for standard overhead presses. Choose a load you can balance with clean technique from start to finish.
Should I press one side at a time or alternate?
Either works, but completing all reps on one side before switching usually makes it easier to focus on balance, setup, and consistency.
Who should be cautious with this exercise?
Anyone with current wrist pain, shoulder instability, poor overhead mobility, or limited kettlebell experience should start conservatively or use simpler pressing variations first.
Recommended Equipment
- Adjustable Kettlebell — lets you fine-tune load while practicing control and progression
- Competition Kettlebell — consistent handle shape and balance can make bottoms-up practice feel more predictable
- Kettlebell Wrist Guards — helpful for reducing forearm and wrist discomfort during repeated kettlebell practice
- Liquid Chalk — improves handle security when grip is the limiting factor
- Resistance Bands Set — useful for warm-up drills, shoulder activation, and upper-back support work
Tip: For this exercise, the best equipment upgrades are usually a manageable kettlebell, stronger grip support, and better shoulder prep tools.