Assisted Hanging Knee Raise with Throw Down: Form, Sets, Tips & FAQ
Learn how to do the Assisted Hanging Knee Raise with Throw Down for stronger abs, better hip flexor control, and improved core stability. Includes setup, execution, mistakes, FAQs, and equipment.
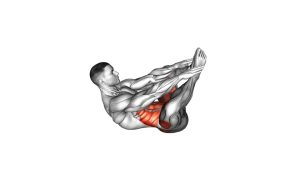
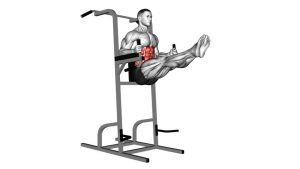
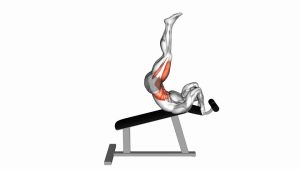
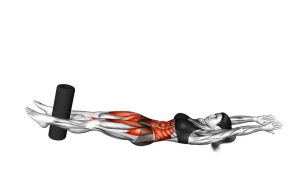
Assisted Hanging Knee Raise with Throw Down
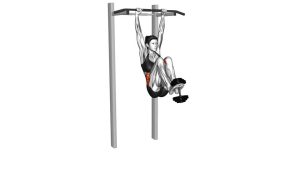
This exercise begins with the body supported on forearm pads while the legs hang below the hips. From there, the knees are lifted toward the chest with control. At the top, the abs contract hard and the pelvis slightly tucks under. Then the legs are driven downward in a sharp but controlled motion, creating the “throw down” effect. The key is to avoid losing control at the bottom. You should not swing wildly, arch the lower back, or let the hips pull you out of position.
The movement is best used when the athlete already understands basic knee raises. Because the throw-down phase creates more momentum, it requires better timing, stronger bracing, and cleaner body control than a standard captain’s chair knee raise. When performed correctly, it teaches the abs to contract powerfully and then stabilize immediately, which makes it useful for athletic core training, hanging leg raise progressions, and advanced ab work.
Quick Overview
| Body Part | Abs |
|---|---|
| Primary Muscle | Rectus abdominis, especially the lower abdominal region |
| Secondary Muscle | Hip flexors, obliques, transverse abdominis, serratus anterior, shoulders, forearms |
| Equipment | Captain’s chair, vertical knee raise station, dip station with forearm pads, or assisted hanging station |
| Difficulty | Intermediate |
Sets & Reps (By Goal)
- Core strength: 3–4 sets × 8–12 reps with a strong pause at the top and controlled reset at the bottom.
- Lower ab focus: 3 sets × 10–15 reps using a slower knee raise and a sharp but controlled throw down.
- Athletic power and control: 4 sets × 6–10 reps with explosive downward intent while preventing swing.
- Beginner progression: 2–3 sets × 6–8 reps using a smaller knee lift and a gentle throw down.
- Core finisher: 2–3 sets × 12–20 reps only if you can maintain clean posture and avoid momentum.
Progression rule: First improve control, then increase reps, then increase the speed of the throw-down phase. Do not make the movement faster if your body swings or your lower back loses position.
Setup / Starting Position
- Position yourself on the station: Step into the captain’s chair or assisted hanging station and place your forearms firmly on the pads. Your elbows should stay supported and bent comfortably.
- Grip the handles: Hold the handles for stability, but avoid squeezing so hard that your shoulders rise toward your ears. The grip should support balance, not create unnecessary tension.
- Set your upper body: Keep the chest tall, shoulders down, and back lightly supported against the pad if the machine has one. Do not collapse into the shoulders.
- Start with the legs hanging: Let the legs hang below the hips with the knees straight or slightly bent. Keep the feet together and avoid swinging before the first rep.
- Brace the core: Gently tighten the abs before lifting. Think about pulling the ribs down and keeping the pelvis controlled instead of letting the lower back arch.
Setup matters because this exercise becomes much harder to control once the throw-down phase begins. A stable starting position helps you train the abs instead of simply swinging from the hips.
Execution (Step-by-Step)
- Begin from a dead-still position: Let your legs hang under control. Brace your abs and keep your shoulders pressed down away from your ears.
- Lift the knees upward: Bend the knees and raise them toward your chest. The movement should come from hip flexion and abdominal contraction, not from swinging the legs.
- Tuck the pelvis slightly: As the knees rise, allow the pelvis to curl slightly upward. This small posterior pelvic tilt helps the abs contract harder and prevents the movement from becoming only a hip flexor drill.
- Pause at the top: Hold briefly when the knees reach chest height or near chest height. Keep the torso stable and avoid leaning back aggressively.
- Perform the throw down: Drive the legs downward with speed, as if throwing the knees and feet back toward the starting position. The motion should be sharp, but not uncontrolled.
- Control the bottom: As the legs return down, immediately brace the abs to stop the body from swinging. Do not let the feet fly behind you or allow the lower back to overarch.
- Reset before the next rep: Once the legs are vertical again, regain control and begin the next repetition. Each rep should start from a stable position.
Pro Tips & Common Mistakes
Pro Tips
- Think “knees to ribs”: Instead of only lifting the thighs, aim to bring the knees toward the rib cage while slightly curling the pelvis.
- Use the throw down as a control drill: The purpose is not just speed. The real benefit comes from stopping the body from swinging after the downward drive.
- Exhale at the top: Blow air out as the knees come up. This helps the ribs stay down and makes the abs contract harder.
- Keep the shoulders packed: Press the forearms into the pads and keep the neck long. This gives the core a stable base to work from.
- Control your range: Only raise the knees as high as you can while keeping the lower back and pelvis controlled.
Common Mistakes
- Swinging into every rep: Using momentum reduces abdominal tension and turns the exercise into a hip-swinging movement.
- Arching the lower back: If the ribs flare and the lower back arches at the bottom, the abs are not controlling the descent well enough.
- Dropping the legs passively: The throw down should be active and controlled, not a loose fall.
- Pulling with the shoulders: Shrugging or pressing too hard through the arms can create neck and trap tension.
- Skipping the reset: Starting the next rep while still swinging makes each repetition less effective.
FAQ
What muscles does the Assisted Hanging Knee Raise with Throw Down work?
It mainly works the rectus abdominis, especially the lower portion of the abs. It also trains the hip flexors, obliques, and deep core muscles that help control pelvic position and reduce swinging.
Is this exercise better than a regular hanging knee raise?
It is not always better, but it is more dynamic. A regular hanging knee raise is better for learning control, while the throw-down version adds a faster eccentric and anti-swing challenge. Use this version after you can perform standard knee raises with clean form.
Should I feel this in my lower abs?
Yes, you should feel strong tension through the abs, especially when the knees lift and the pelvis tucks slightly. However, the hip flexors will also work. To increase abdominal focus, exhale at the top and avoid simply lifting the thighs.
Why do I swing during the throw down?
Swinging usually happens when the legs are thrown down too hard, the abs relax at the bottom, or the starting position is unstable. Slow the movement down and focus on stopping the legs directly under the hips before the next repetition.
Can beginners do this exercise?
Beginners can use a lighter version, but most should first master the standard captain’s chair knee raise. Once they can lift and lower the knees without swinging, they can gradually add a gentle throw-down action.
How high should I lift my knees?
Lift the knees as high as you can while keeping the torso stable and the lower back controlled. Ideally, the knees come toward the chest, but clean control is more important than maximum height.
Recommended Equipment
- Captain’s Chair Power Tower — the best main station for assisted hanging knee raises, leg raises, and dip variations.
- Vertical Knee Raise Station — provides forearm support and back support for controlled ab training.
- Hanging Ab Straps — useful for hanging knee raise variations when a captain’s chair is not available.
- Exercise Mat — helpful for warm-up core drills, dead bugs, reverse crunches, and floor-based ab progressions.
- Resistance Bands Set — useful for core warm-ups, hip flexor activation, and assisted progression work.
Tip: Choose equipment that allows you to keep the shoulders supported and the torso stable. The more stable your setup, the easier it is to focus on abdominal control instead of swinging.