Decline Diamond Pike Push-Up: Form, Muscles Worked, Sets, Tips & FAQ
Learn how to do the Decline Diamond Pike Push-Up with proper form. Discover muscles worked, setup, execution steps, sets and reps by goal, common mistakes, FAQs, and recommended equipment.
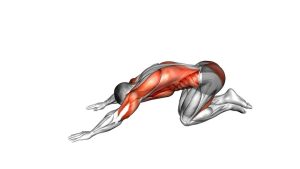
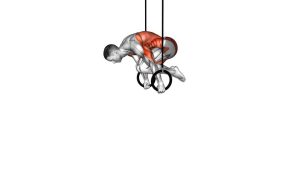
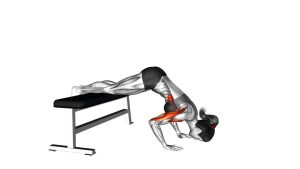
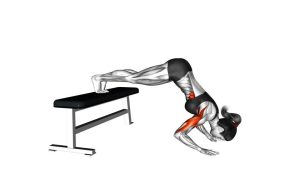
Decline Diamond Pike Push-Up
This exercise works best when you treat it like a controlled bodyweight overhead press rather than a fast push-up. The goal is to keep your hips elevated, lower your head between your hands with control, and press back up without collapsing through the neck, shoulders, or lower back. Because the hands are close together, the triceps work hard, but the elevated pike angle still makes the shoulders the main driver.
Quick Overview
| Body Part | Shoulders |
|---|---|
| Primary Muscle | Anterior deltoids |
| Secondary Muscle | Triceps, upper chest, serratus anterior, upper traps, core stabilizers |
| Equipment | Bodyweight, flat bench or sturdy box, floor mat optional |
| Difficulty | Intermediate to Advanced |
Sets & Reps (By Goal)
- Strength focus: 3-5 sets × 4-8 reps, 90-150 sec rest
- Muscle building: 3-4 sets × 6-12 reps, 60-90 sec rest
- Skill progression for handstand push-ups: 3-5 sets × 3-6 clean reps, full control every rep
- Bodyweight conditioning: 2-4 sets × 8-15 reps, moderate pace, stop before form breaks
Progression rule: First improve control, depth, and body position. Then increase reps. After that, raise the feet slightly higher or slow the tempo before moving to a harder overhead pressing progression.
Setup / Starting Position
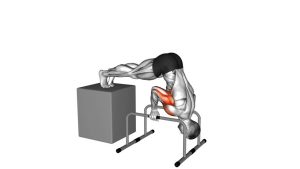
- Set your feet on a bench or sturdy box: Choose a height that challenges you without forcing bad form.
- Place your hands close together: Form a narrow diamond or near-diamond position under your head and upper chest.
- Lift the hips high: Create a strong pike shape so your torso angles downward and the load shifts toward the shoulders.
- Brace the core: Tighten the abs and keep the ribcage controlled to avoid arching the lower back.
- Set the head path: Your head should travel down between the hands, not far in front of them.
Tip: If the diamond position bothers your wrists or feels unstable, bring the hands slightly apart while keeping them narrow.
Execution (Step-by-Step)
- Start in a solid decline pike: Feet elevated, hips high, arms extended, and eyes focused slightly back toward the floor.
- Lower under control: Bend the elbows and let the head move down between the hands.
- Keep elbows relatively tucked: The close hand position naturally increases triceps involvement, so avoid excessive flaring.
- Reach the bottom carefully: Stop when the head comes close to the floor or when shoulder control starts to break.
- Press back up: Drive through the palms and extend the elbows until you return to the top pike position.
- Reset before the next rep: Re-establish hips high, core tight, and shoulders active before descending again.
Pro Tips & Common Mistakes
- Keep the hips elevated: This is what makes the movement shoulder-dominant instead of chest-dominant.
- Use a controlled tempo: A 2-3 second lowering phase helps maintain alignment and shoulder tension.
- Do not dive forward: Lowering too far forward turns the rep into a different pattern and can stress the shoulders.
- Avoid collapsing the neck: Keep space between the shoulders and ears instead of sinking into the bottom.
- Do not force a super-tight diamond: Too narrow can irritate wrists or reduce pressing stability.
- Stop before technical failure: Once hips drop or the head path changes, the quality of the exercise falls quickly.
FAQ
What muscles does the Decline Diamond Pike Push-Up work the most?
It mainly targets the front deltoids, while the triceps and upper chest assist. The close hand placement increases arm involvement, but the pike angle keeps the shoulders as the main focus.
Is this exercise harder than a regular pike push-up?
Yes. Elevating the feet increases the load on the shoulders, and the narrow hand position makes pressing more demanding. For most people, it is a step up from a standard pike push-up.
Is this a good handstand push-up progression?
Yes. It helps build the pressing strength, shoulder stability, and body awareness needed for more vertical bodyweight pressing patterns.
What if the diamond hand position hurts my wrists?
Widen the hands slightly, use push-up bars or parallettes, and reduce the range of motion until you can train pain-free.
How high should the bench be?
Use the lowest height that gives you a strong shoulder challenge while still letting you keep the hips high and the rep controlled. A flat bench is a common starting point for this variation.
Recommended Equipment (Optional)
- Push-Up Bars — useful for a more neutral wrist position and often more comfortable pressing depth
- Low Parallettes / Calisthenics Bars — helpful for wrist comfort, added range of motion, and progression into advanced calisthenics drills
- Adjustable Workout Bench — gives you a sturdy surface for feet elevation and lets you adjust training difficulty
- Resistance Bands Set — great for shoulder warm-ups, activation work, and assisting related pressing progressions
- Exercise Mat — improves floor comfort for hands and head position work during repeated sets
Choose sturdy, non-slip equipment. Stable push-up bars, low parallettes, adjustable benches, resistance band sets, and exercise mats are all widely available on Amazon.