Ear-to-Knee Side Bend: Seated Oblique Stretch, Form, Tips & FAQ
Learn the Ear-to-Knee Side Bend to stretch obliques, lats, hips, and inner thighs with safe seated form, cues, sets, mistakes, FAQs, and gear.
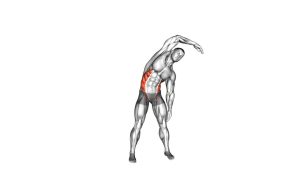
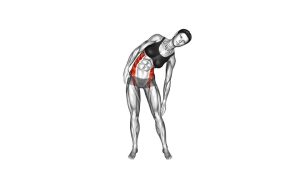
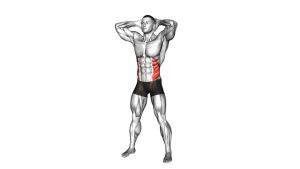
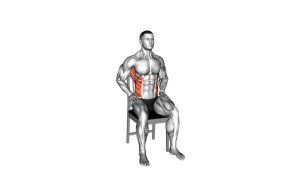
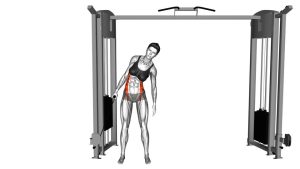
Ear-to-Knee Side Bend
This exercise works best when the bend stays smooth, slow, and controlled. Instead of collapsing forward, keep the chest open and guide the ribs toward the extended-leg side. As a result, the stretch stays focused on the side waist and upper torso rather than turning into a rounded forward fold.
Quick Overview
| Body Part | Obliques |
|---|---|
| Primary Muscle | Obliques |
| Secondary Muscle | Lats, adductors, hamstrings, spinal erectors, hip stabilizers |
| Equipment | No equipment required; optional yoga mat or yoga blocks |
| Difficulty | Beginner |
Sets & Reps (By Goal)
- General flexibility: 2–3 sets × 20–40 seconds per side
- Warm-up mobility: 1–2 sets × 6–8 slow side bends per side
- Cool-down stretching: 2–3 sets × 30–60 seconds per side
- Desk or posture reset: 1–2 easy rounds per side with relaxed breathing
Progression rule: First improve breathing, posture, and control. Then increase hold time gradually. Do not force the ear closer to the knee if the spine begins to round or the extended-leg knee feels strained.
Setup / Starting Position
- Sit on the floor: Begin in a wide seated position with one leg extended out to the side.
- Bend the opposite leg inward: Place the bent-leg foot near the inner thigh area, as shown in the video.
- Lengthen the spine: Sit tall before bending. Keep the chest lifted and the shoulders relaxed.
- Place the support hand: Let the lower hand rest near the floor or leg for balance.
- Prepare the reaching arm: Lift the opposite arm overhead so it can guide the side bend smoothly.
Tip: If your hips feel tight, sit on a folded towel or yoga block. This small elevation can help the pelvis stay more upright.
Execution (Step-by-Step)
- Start tall: Keep your torso upright, your extended leg long, and your bent leg relaxed.
- Reach the arm overhead: Lift the arm on the bending side into a long arc above your head.
- Bend sideways: Slowly move your torso toward the extended leg without twisting the chest downward.
- Keep the stretch long: Reach through the fingertips while keeping the opposite hip grounded.
- Bring the ear toward the knee: Move only as far as your mobility allows. The goal is a side bend, not a forced touch.
- Hold and breathe: Pause in the stretched position while breathing into the ribs and side waist.
- Return with control: Slowly lift the torso back to center and lower the arm before switching sides.
Pro Tips & Common Mistakes
- Think “long side body”: Reach through the top arm instead of dropping heavily toward the leg.
- Avoid rounding forward: If the chest turns toward the floor, reduce the range and reopen the torso.
- Keep the extended leg comfortable: Do not lock the knee aggressively or force the toes into an uncomfortable position.
- Use the lower hand lightly: It should support balance, not pull the torso down.
- Breathe into the ribs: Slow breathing helps the obliques and lats release more naturally.
- Do not bounce: Bouncing can irritate the hips, hamstrings, or lower back. Instead, hold or move slowly.
- Match both sides: Since one side may feel tighter, use the same controlled effort rather than forcing symmetry.
FAQ
What muscles does the Ear-to-Knee Side Bend stretch?
It mainly stretches the obliques and side waist. Additionally, it can stretch the lats, inner thighs, hamstrings, and hip area depending on your seated position and range of motion.
Should my ear actually touch my knee?
No. The name describes the direction of the movement, not a required end position. Instead, aim for a comfortable side bend while keeping the chest open and the movement controlled.
Is this a stretch or a strengthening exercise?
It is primarily a flexibility and mobility exercise. However, the core and hip stabilizers still work lightly to control the seated position and return to center.
Why do I feel this in my inner thigh?
Because one leg is extended to the side, the adductors and hamstrings may also stretch. This is normal as long as the sensation feels gentle and not sharp.
Can beginners do the Ear-to-Knee Side Bend?
Yes. Beginners can perform it with a smaller range of motion, a folded towel under the hips, or a yoga block near the support hand. These adjustments make the position easier to control.
Recommended Equipment (Optional)
- Yoga Mat — provides floor comfort and grip during seated stretching
- Yoga Blocks — useful for supporting the lower hand if the floor feels too far away
- Yoga Strap — helpful for gentle assistance around the foot or leg without forcing reach
- Stretching Strap — supports controlled flexibility work for the hips, hamstrings, and side body
- Foldable Exercise Mat — adds extra cushioning for seated floor mobility sessions
Tip: Equipment is optional. However, a mat and blocks can make the stretch more comfortable, especially if your hips, hamstrings, or lower back feel tight.