Frog Planche: Form, Benefits, Sets, Tips & FAQ
Learn how to perform the Frog Planche with safe form, balance cues, sets by goal, common mistakes, FAQs, and recommended equipment.
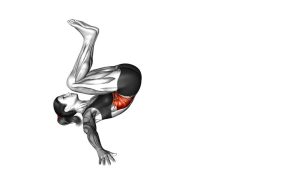
Frog Planche
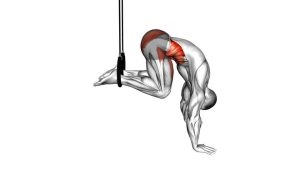
The Frog Planche works best when you move slowly and keep your balance calm. Instead of jumping into the position, you should gradually shift your shoulders past your wrists until your feet become light. Then, you lift both feet while keeping your knees supported on your arms. This makes the exercise safer, smoother, and easier to control.
Although the position looks simple, it teaches several important planche skills. Your hands must grip the floor, your wrists must tolerate forward pressure, your shoulders must stay active, and your core must prevent the body from collapsing. Because of that, the Frog Planche is one of the best beginner exercises for learning bodyweight balance.
Quick Overview
| Body Part | Shoulders |
|---|---|
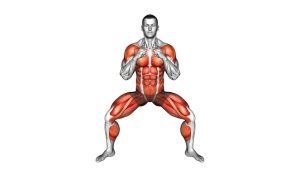
| Primary Muscle | Anterior deltoids, shoulders, wrist stabilizers |
| Secondary Muscle | Triceps, chest, core, forearms, upper back stabilizers |
| Equipment | Bodyweight only; optional parallettes, yoga mat, wrist wraps |
| Difficulty | Beginner to Intermediate |
Sets & Reps (By Goal)
- Skill learning: 4–6 sets × 5–10 second holds with 60–90 seconds rest.
- Balance control: 3–5 sets × 10–20 second holds with slow, clean entry and exit.
- Strength building: 4–6 sets × 8–15 second holds while leaning slightly farther forward.
- Warm-up practice: 2–3 sets × 5–8 second holds before planche or hand-balance training.
- Beginner progression: 5–8 short attempts, resting fully between each attempt.
Progression rule: First increase hold quality, then hold time. After you can hold the Frog Planche for 20–30 seconds with control, begin working toward a tuck planche variation.
Setup / Starting Position
- Start in a low squat: Place your feet on the floor and bring your knees outside or near your arms.
- Plant your hands: Put both palms flat on the ground about shoulder-width apart. Spread your fingers for better balance.
- Turn the elbows slightly back: Keep your arms firm and prepare your upper arms to support the knees.
- Place the knees on the arms: Rest your knees against the triceps or upper-arm area. Keep the contact secure but not painful.
- Shift your chest forward: Move your shoulders gradually past your wrists. This creates the balance point needed to lift the feet.
- Look slightly forward: Keep your neck neutral and your eyes on the floor a short distance ahead of your hands.
Tip: If your wrists feel uncomfortable on the floor, practice on parallettes. They keep the wrists more neutral and can make the hold easier to tolerate.
Execution (Step-by-Step)
- Brace your core: Before lifting, tighten your midsection lightly so your hips do not collapse.
- Press through the hands: Push the floor away and keep steady pressure through the palms, fingers, and knuckles.
- Lean forward slowly: Move your shoulders forward until your toes become light. Avoid rushing this phase.
- Lift one foot slightly: Test your balance by lifting one foot for a moment while keeping the knees supported.
- Lift both feet: Once balanced, bring both feet off the floor and keep them close to the body.
- Hold the compact shape: Keep the elbows strong, knees anchored, shoulders active, and core tight.
- Breathe calmly: Avoid holding your breath. Use slow breathing to reduce tension and improve control.
- Exit with control: Shift your weight slightly back and place your feet down softly. Do not collapse out of the position.
Pro Tips & Common Mistakes
Pro Tips
- Grip the floor: Use your fingers like brakes. Press the fingertips down if you start tipping forward.
- Lean from the shoulders: The balance comes from moving your shoulders beyond your wrists, not from jumping the feet up.
- Keep the knees secure: Place the knees firmly on the upper arms so the body has a stable shelf.
- Round slightly through the upper back: A small amount of scapular protraction helps create stronger shoulder support.
- Practice short clean holds: Five perfect seconds are better than twenty shaky seconds.
- Use soft padding when learning: A mat in front of your head can reduce fear and help you commit to the forward lean.
Common Mistakes
- Not leaning forward enough: If the shoulders stay behind the wrists, the feet will not lift smoothly.
- Jumping into the hold: Jumping makes balance harder and increases the chance of falling forward.
- Letting the elbows flare randomly: Keep the arms stable so the knees do not slide off.
- Collapsing into the wrists: Press actively through the hands instead of dumping all bodyweight passively into the joints.
- Looking too far forward: Overextending the neck can disrupt balance. Keep the gaze slightly ahead of the hands.
- Holding with panic tension: Stay calm. Excess tension makes the movement harder to control.
FAQ
Is the Frog Planche the same as the Frog Stand?
Yes, many people use both names for the same beginner arm-balance position. The term Frog Stand is more common for beginners, while Frog Planche is often used when the exercise is treated as a planche progression.
What muscles does the Frog Planche work?
The Frog Planche mainly works the shoulders, wrists, forearms, triceps, chest, and core. It also trains balance, scapular control, and bodyweight coordination.
Is the Frog Planche good for beginners?
Yes. It is one of the best beginner calisthenics skills because the knees rest on the arms, which reduces the demand compared with a tuck planche or full planche.
How long should I hold the Frog Planche?
Beginners can start with 5–10 second holds. As control improves, work toward 20–30 seconds. Quality matters more than hold length.
Why do my wrists hurt during the Frog Planche?
Wrist discomfort often comes from limited wrist mobility, poor warm-up, or too much forward pressure too soon. Warm up your wrists, spread your fingers, reduce the lean, or use parallettes.
How do I progress after the Frog Planche?
After you can hold the Frog Planche with control, progress to a tuck planche hold, advanced tuck planche, straddle planche progressions, and planche leans.
Recommended Equipment
- Wooden Parallettes — useful for reducing wrist extension and improving planche practice comfort.
- Gymnastics Wrist Wraps — provide light wrist support during bodyweight balance training.
- Exercise / Yoga Mat — adds padding for hands, knees, and safe beginner practice.
- Push-Up Handles — a simple alternative to parallettes for neutral-grip hand support.
- Resistance Bands Set — helpful for shoulder warm-ups, scapular activation, and planche prep drills.
Tip: Equipment should support better control, not replace good technique. Start with clean holds, then use tools to improve comfort, safety, and progression.