Pike Push-Up with Parallettes: Form, Muscles Worked, Sets, Tips & FAQ
Learn how to do the Pike Push-Up with Parallettes for stronger shoulders, better overhead pressing mechanics, and handstand push-up progression. Includes form tips, muscles worked, sets by goal, mistakes, FAQs, and recommended equipment.
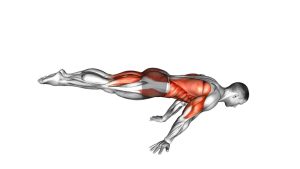
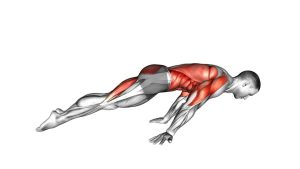
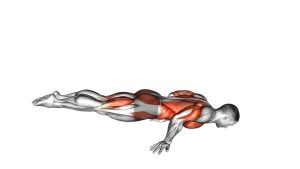
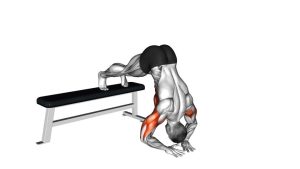
Pike Push-Up with Parallettes
This exercise is most effective when you keep the hips high, shift enough bodyweight into the shoulders, and lower with control. The goal is not to perform a standard push-up angle, but to create a more vertical pressing path so the shoulders do the majority of the work. The parallettes also let you sink lower at the bottom, which can improve strength through a deeper range when your mobility and control are solid.
Quick Overview
| Body Part | Front Shoulders |
|---|---|
| Primary Muscle | Anterior deltoids |
| Secondary Muscle | Triceps, upper chest, serratus anterior, upper traps, core |
| Equipment | Parallettes or push-up bars |
| Difficulty | Beginner to Intermediate |
Sets & Reps (By Goal)
- Technique practice: 2–4 sets × 5–8 reps with slow, controlled lowering
- Shoulder hypertrophy: 3–5 sets × 6–12 reps with 60–90 sec rest
- Strength / handstand push-up progression: 4–6 sets × 3–6 reps with 90–150 sec rest
- Warm-up or activation: 2–3 sets × 4–6 easy reps focusing on alignment and tempo
Progression rule: First improve rep quality, then increase reps, then elevate the feet or slow the tempo to make the movement harder.
Setup / Starting Position
- Place the parallettes shoulder-width apart: Set them on a stable, non-slip surface.
- Grip the handles firmly: Keep wrists neutral and shoulders actively engaged.
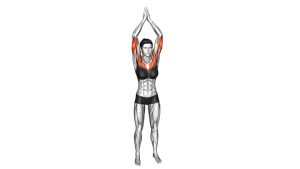
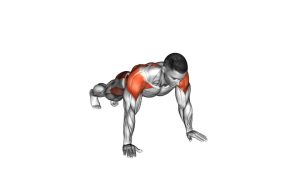
- Step your feet back: Straighten the legs as much as mobility allows and lift the hips high.
- Create a pike shape: Your body should resemble an inverted “V,” with the hips above the shoulders.
- Brace the core: Pull the ribs in slightly and keep the spine controlled rather than sagging.
- Set your head position: Eyes look toward the floor between or slightly ahead of the hands.
Tip: If hamstring flexibility limits your pike position, bend the knees slightly so you can keep the hips high and the torso angle strong.
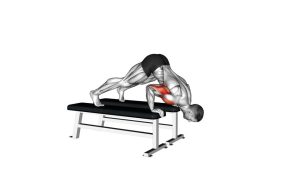
Execution (Step-by-Step)
- Start tall through the shoulders: Push firmly into the parallettes and keep the upper back active.
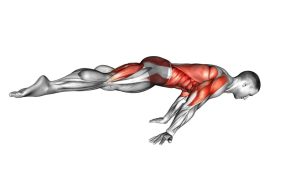
- Lower under control: Bend the elbows and let the head travel downward and slightly forward between the bars.
- Keep the hips elevated: Avoid dropping into a normal push-up shape.
- Reach the bottom safely: Lower as far as your shoulder mobility and control allow without collapsing.
- Press back up: Drive through the hands and extend the elbows until you return to the starting pike position.
- Reset between reps: Re-establish shoulder position, hip height, and core tension before repeating.
Pro Tips & Common Mistakes
- Keep your hips high: This is the easiest way to maintain shoulder emphasis.
- Use a controlled descent: Don’t dive into the bottom or rely on momentum.
- Let the head move slightly forward: A natural forward path creates a better pressing angle.
- Don’t flare the elbows too much: Keep them controlled and stacked for better joint positioning.
- Avoid shrugging passively: Stay active through the shoulders instead of collapsing.
- Don’t chase depth at the expense of form: More range is only useful if you can control it.
- Use the parallettes fully: Grip hard and press down through the bars to create more stability.
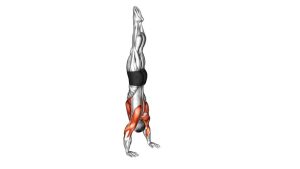
- Progress smartly: Feet-elevated pike push-ups are an excellent next step after standard versions become easy.
FAQ
What muscles does the Pike Push-Up with Parallettes work?
It primarily targets the anterior deltoids. Secondary muscles include the triceps, upper chest, serratus anterior, and core stabilizers.
Why use parallettes instead of doing pike push-ups on the floor?
Parallettes can reduce wrist extension stress for some people and allow a greater range of motion, which may improve strength development and movement quality.
Is this a good progression toward handstand push-ups?
Yes. It helps build the shoulder pressing strength, body alignment, and control needed for more advanced vertical pressing movements like wall-assisted and freestanding handstand push-ups.
Should beginners do Pike Push-Ups with Parallettes?
Yes, as long as they can control the descent and maintain a solid pike position. Beginners may start with shorter range of motion, fewer reps, or a slightly higher hand position if needed.
How can I make this exercise harder?
You can elevate the feet, slow the eccentric, pause at the bottom, add more total reps, or progress toward wall-supported handstand push-up variations.
Recommended Equipment
- Parallettes — the main tool for this exercise, offering wrist comfort and deeper range of motion
- Push-Up Bars — a compact alternative to full-size parallettes for home workouts
- Exercise Mat — helps improve floor grip and comfort under the feet and setup area
- Resistance Bands Set — useful for shoulder warm-ups, mobility drills, and accessory pressing work
- Gym Chalk — improves grip on the handles if your hands get sweaty during calisthenics sessions
Tip: Choose stable, non-slip parallettes with comfortable grip thickness. A secure setup makes a major difference in pressing confidence and control.