Kettlebell Standing Reverse Curl: Forearm Form, Sets, Tips & FAQ
Learn the Kettlebell Standing Reverse Curl to build stronger forearms, brachioradialis, and grip control. Includes setup, execution, sets by goal, mistakes, FAQs, and equipment.
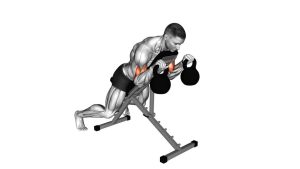
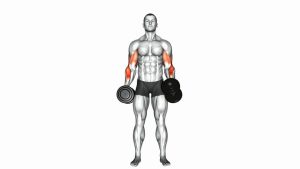
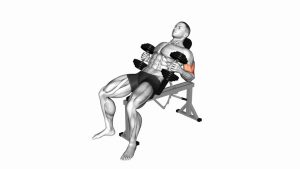
Kettlebell Standing Reverse Curl
This exercise is excellent for building thicker-looking forearms, improving grip control, and strengthening the arm muscles that support pulling, rowing, carrying, and lifting movements. The kettlebell shape adds an extra stability challenge because the load hangs below the hand, making the wrists work harder than they do with a standard dumbbell. For best results, use a moderate weight that allows a smooth curl, a short squeeze at the top, and a controlled lowering phase.
Quick Overview
| Body Part | Forearms |
|---|---|
| Primary Muscle | Brachioradialis |
| Secondary Muscle | Wrist extensors, biceps brachii, brachialis, grip muscles |
| Equipment | Two kettlebells |
| Difficulty | Beginner to Intermediate |
Sets & Reps (By Goal)
- Forearm hypertrophy: 3–4 sets × 8–12 reps with a controlled 2–3 second lowering phase.
- Grip and wrist control: 2–4 sets × 10–15 reps using lighter kettlebells and strict wrist position.
- Arm strength: 3–5 sets × 5–8 reps with heavier kettlebells, no swinging, and full control.
- Warm-up or accessory work: 2–3 sets × 12–15 reps after rows, curls, pull-ups, or grip training.
Progression rule: Add reps first, then increase kettlebell weight only when you can keep the elbows still, wrists neutral, and lowering phase controlled on every rep.
Setup / Starting Position
- Stand tall: Place your feet about hip-width to shoulder-width apart and brace your core lightly.
- Hold the kettlebells: Grab one kettlebell in each hand with the palms facing down or slightly inward/down depending on handle comfort.
- Set the arms: Let the arms hang straight with the elbows close to your sides and shoulders relaxed.
- Lock the wrists: Keep the wrists neutral and firm. Do not allow the knuckles to drop or the wrists to bend forward.
- Prepare the posture: Keep the chest lifted, ribs controlled, neck neutral, and avoid leaning backward before the curl begins.
Tip: Choose kettlebells that feel challenging but not sloppy. Reverse curls are usually much weaker than normal curls, so start lighter than you expect.
Execution (Step-by-Step)
- Begin from the bottom: Start with both arms extended and the kettlebells hanging under control.
- Curl upward: Bend the elbows and lift the kettlebells toward the upper abdomen or lower chest.
- Keep the elbows close: Do not let the elbows flare out or drift far forward. The movement should come mostly from elbow flexion.
- Maintain wrist position: Keep the wrists straight as the kettlebells rise. Avoid curling the wrists to cheat the weight up.
- Pause at the top: Briefly squeeze the forearms and upper arms when the elbows are fully flexed.
- Lower slowly: Return the kettlebells to the starting position with control, resisting the weight on the way down.
- Reset each rep: Let the arms fully extend without relaxing posture, then repeat for the desired reps.
Pro Tips & Common Mistakes
- Use a lighter load than regular curls: The pronated grip makes the lift harder and places more demand on the forearms.
- Do not swing: Keep the torso still and avoid using hip drive to start the curl.
- Keep wrists neutral: A collapsing wrist reduces tension on the target muscles and may irritate the wrist joint.
- Control the lowering phase: The eccentric portion is valuable for forearm strength and muscle growth.
- Avoid shoulder lifting: The shoulders should stay down and relaxed instead of shrugging during the curl.
- Stop before form breaks: End the set when you can no longer curl without leaning back or bending the wrists.
- Use even tempo: Lift smoothly, pause briefly, then lower slower than you lifted.
FAQ
What muscles does the kettlebell standing reverse curl work?
It mainly targets the brachioradialis, a major forearm muscle involved in elbow flexion. It also trains the wrist extensors, brachialis, biceps, and grip muscles.
Is this better for forearms than a regular curl?
For forearm emphasis, yes. The reverse grip reduces some biceps advantage and makes the brachioradialis and wrist stabilizers work harder than they do in a traditional palms-up curl.
Should I use one kettlebell or two?
The video shows two kettlebells, which trains both arms at the same time. You can also perform it one arm at a time if you want to focus on balance, control, or fixing strength differences.
Why do my wrists hurt during reverse curls?
Wrist discomfort usually comes from using too much weight, letting the wrists bend forward, or gripping too hard. Use lighter kettlebells, keep the wrists neutral, and stop if pain feels sharp or joint-based.
Can beginners do kettlebell standing reverse curls?
Yes, but beginners should start light and prioritize wrist control, elbow position, and slow tempo. This exercise becomes intermediate when heavier kettlebells are used because the forearm stability demand increases.
Recommended Equipment
- Cast Iron Kettlebell Set — ideal for progressive reverse curls, carries, rows, and full-body strength training
- Adjustable Kettlebell — useful if you want multiple weight options without buying several kettlebells
- Weightlifting Wrist Wraps — optional support for lifters who need extra wrist stability during forearm work
- Gym Chalk / Liquid Chalk — improves grip security when hands get sweaty during kettlebell training
- Forearm Grip Strengthener — helpful accessory for improving hand strength and grip endurance outside curl work
Tip: For reverse curls, equipment should help you maintain clean wrist position and controlled reps. Avoid going too heavy too quickly because forearm tendons need time to adapt.