Leg Raise Oblique Crunch: Form, Sets, Core Tips & FAQ
Learn the Leg Raise Oblique Crunch for stronger abs and obliques. Includes setup, step-by-step form, sets, mistakes, FAQs, and equipment.
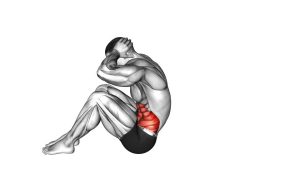
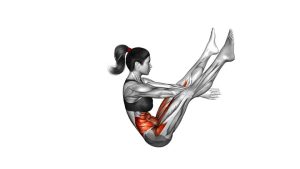
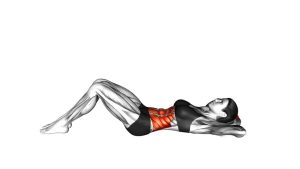
Leg Raise Oblique Crunch
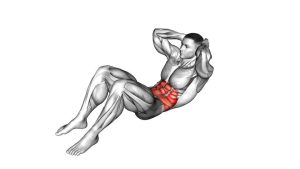
This exercise works best when the leg lift and crunch happen together. First, brace your core and keep the extended legs controlled. Then, raise one leg while curling and rotating your torso toward that side. Because the exercise includes both hip flexion and trunk rotation, it requires more control than a basic crunch. Therefore, use a moderate range of motion and avoid pulling on your neck.
Quick Overview
| Body Part | Abs , Obliques |
|---|---|
| Primary Muscle | Rectus abdominis and obliques |
| Secondary Muscle | Hip flexors, transverse abdominis, and deep core stabilizers |
| Equipment | No equipment required; optional exercise mat for comfort |
| Difficulty | Intermediate, because the exercise combines leg control, crunching, and rotation |
Sets & Reps (By Goal)
- Core control: 2–3 sets × 8–10 reps per side with a slow, clean tempo.
- Muscle endurance: 3–4 sets × 10–15 reps per side with steady breathing.
- Oblique focus: 3 sets × 8–12 reps per side with a brief squeeze at the top.
- Beginner progression: 2 sets × 6–8 reps per side with a smaller leg lift.
- Workout finisher: 2–3 rounds × 30–40 seconds, alternating sides if you can keep form strict.
Progression rule: Add reps before adding speed. After that, increase the top squeeze or slow the lowering phase. However, stop progressing if your lower back starts arching or your neck starts doing the work.
Setup / Starting Position
- Lie on your back: Start flat on the floor with your body long and your legs extended.
- Place your hands near your head: Keep the elbows open, but avoid yanking the head forward.
- Brace your core: Gently tighten your abs before the first rep so your lower back stays controlled.
- Keep the legs straight: Extend both legs and prepare to lift one leg upward during the crunch.
- Set your neck position: Keep the chin slightly tucked and look toward the raised leg as you rotate.
Tip: If the full straight-leg position feels too hard, slightly reduce the leg-lift height or keep the non-working leg closer to the floor. In addition, move slowly so your abs control the motion instead of momentum.
Execution (Step-by-Step)
- Brace first: Tighten your core lightly and keep your lower back stable against the floor.
- Raise one straight leg: Lift one leg upward while keeping the knee mostly straight and the motion controlled.
- Curl and rotate: At the same time, crunch your upper body and rotate your opposite shoulder toward the raised leg.
- Squeeze at the top: Pause briefly when your abs and obliques feel most engaged.
- Lower with control: Return the leg and upper body toward the starting position without dropping or swinging.
- Repeat smoothly: Continue on the same side or alternate sides, depending on your workout plan.
Pro Tips & Common Mistakes
- Move diagonally, not straight up: Rotate toward the raised leg so the obliques contribute more clearly.
- Keep the leg controlled: Raise and lower the leg with tension instead of letting it swing.
- Avoid pulling the neck: Let the hands support the head lightly, but keep the abs responsible for the crunch.
- Do not rush the descent: Lowering slowly increases core tension and reduces lower-back stress.
- Keep the lower back stable: If your back arches, reduce range or bend the non-working leg slightly.
- Exhale during the crunch: Breathing out as you rotate can help you brace and control the top position.
- Use quality over quantity: Clean reps are more effective than high reps with swinging or twisting momentum.
FAQ
What muscles does the Leg Raise Oblique Crunch work?
The exercise mainly works the rectus abdominis and obliques. It also involves the hip flexors because one leg raises during each rep. Additionally, the deep core helps stabilize your pelvis and lower back.
Is the Leg Raise Oblique Crunch beginner-friendly?
It can be challenging for complete beginners because it combines a leg raise with a rotating crunch. However, you can make it easier by using a smaller leg lift, moving slower, or performing fewer reps per side.
Should my elbow touch my knee?
No, touching is not required. Instead, focus on rotating your shoulder toward the raised leg while keeping the movement controlled. Forcing the elbow to touch can cause neck pulling or rushed form.
Why do I feel this in my hip flexors?
Some hip flexor involvement is normal because the leg raises during the movement. Nevertheless, your abs should stay active. If your hip flexors dominate, slow down, reduce the leg-lift range, and brace before each rep.
How do I stop my lower back from arching?
Start by tightening your abs before the leg moves. Then, lower the leg only as far as you can control. If needed, bend the non-working leg slightly or keep the raised leg from dropping too low between reps.
Recommended Equipment
- Exercise Mat — adds comfort for your spine, hips, and shoulders during floor-based core work.
- Thick Yoga Mat — useful if you need extra cushioning for repeated crunch and leg raise exercises.
- Ab Workout Mat — supports the lower back and can make floor crunch variations more comfortable.
- Adjustable Ankle Weights — optional advanced progression for stronger athletes who already control the bodyweight version.
- Resistance Bands Set — helpful for pairing this exercise with anti-rotation, core stability, and warm-up drills.
Tip: Equipment is optional for this exercise. However, a comfortable mat can improve consistency, especially when training abs and obliques on a hard floor.