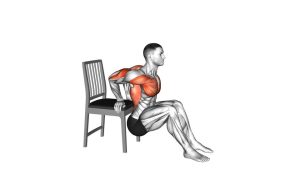
Medicine Ball Close-Grip Push-Up: Triceps Form, Sets, Tips & FAQ
Learn the Medicine Ball Close-Grip Push-Up to build triceps strength, upper-arm control, chest stability, and core balance with step-by-step form, sets, mistakes, FAQs, and equipment.
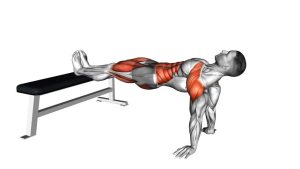
Medicine Ball Close-Grip Push-Up
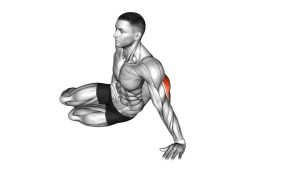
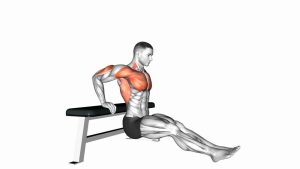
This exercise is best used when you already have solid push-up strength and want a more demanding triceps-focused variation. Since the hands are placed on a rounded surface, the movement requires more balance than a regular close-grip push-up. Therefore, every rep should feel controlled, stable, and smooth. Your elbows should track backward beside your ribs, your chest should move toward the ball, and your hips should stay aligned with your shoulders and heels.
Although the triceps are the main target, the medicine ball also increases activation through the chest, front shoulders, serratus anterior, forearms, and deep core muscles. As a result, this exercise is useful for building pressing strength, upper-arm definition, and body control at the same time.
Quick Overview
| Body Part | Triceps |
|---|---|
| Primary Muscle | Triceps brachii |
| Secondary Muscle | Pectoralis major, anterior deltoids, serratus anterior, forearms, core stabilizers |
| Equipment | Medicine ball and exercise mat optional |
| Difficulty | Intermediate to advanced because of the unstable hand position |
Sets & Reps (By Goal)
- Strength: 3–5 sets × 4–8 reps with slow control and full-body tension.
- Muscle growth: 3–4 sets × 8–12 reps, keeping the elbows close and the descent controlled.
- Triceps endurance: 2–4 sets × 12–18 reps using clean form and a steady tempo.
- Core and shoulder stability: 3 sets × 6–10 slow reps with a 1–2 second pause near the bottom.
- Beginner progression: 2–3 sets × 5–8 reps from the knees before moving to the full plank version.
Progression rule: First increase control, then increase reps. After that, progress by slowing the lowering phase, adding a pause, or using a slightly smaller and more unstable medicine ball.
Setup / Starting Position
- Place the medicine ball on the floor: Choose a firm medicine ball that does not collapse under your bodyweight.
- Set your hands close together: Place both palms on top or slightly around the sides of the ball. Your hands should be close, but your wrists should still feel secure.
- Step into a plank: Extend both legs behind you and set your feet slightly wider than usual for balance.
- Brace your core: Tighten your abs and glutes so your body forms one straight line from head to heels.
- Set your shoulders: Keep your shoulders away from your ears and gently press through the ball to create upper-body stability.
- Point elbows backward: Before you lower, think about bending your elbows toward your ribs rather than flaring them outward.
Execution (Step-by-Step)
- Start in a strong plank: Keep your head neutral, ribs down, hips level, and hands pressing evenly into the medicine ball.
- Begin the descent: Bend your elbows slowly and lower your chest toward the ball. Keep your elbows close to your sides to emphasize the triceps.
- Control the ball: As you lower, resist any side-to-side wobble. Your chest should travel straight down rather than drifting forward or twisting.
- Reach the bottom position: Lower until your chest is close to the ball, or until you can no longer maintain shoulder and wrist control.
- Pause briefly: Hold the bottom for a moment without collapsing your shoulders or letting your hips sag.
- Press back up: Drive through your palms, extend your elbows, and push your body away from the ball.
- Finish tall through the upper back: At the top, lock out with control without shrugging your shoulders or snapping the elbows.
- Reset before the next rep: Re-brace your core, stabilize the ball, and repeat with the same controlled path.
Pro Tips & Common Mistakes
Pro Tips
- Use a wider foot stance: A wider base makes the ball easier to control and helps prevent rotation.
- Lower slower than you press: A controlled descent increases triceps tension and improves shoulder stability.
- Press the ball into the floor: This creates more stability through the hands, wrists, and shoulders.
- Keep the elbows close: The closer elbow path shifts more work into the triceps instead of the chest.
- Brace before every rep: Treat each repetition like a plank first and a push-up second.
- Use the kneeling variation when needed: This keeps the same hand position while reducing total bodyweight load.
Common Mistakes
- Letting the elbows flare: This reduces triceps emphasis and may increase shoulder stress.
- Allowing the hips to sag: A dropped pelvis turns the movement into a lower-back compensation instead of a strict push-up.
- Rushing the bottom position: Bouncing off the ball removes tension and increases injury risk.
- Using a slippery ball: Poor grip can make the exercise unsafe, especially under fatigue.
- Placing the hands too awkwardly: If the wrists feel jammed, adjust the hand angle or choose a larger ball.
- Trying this too early: Build regular push-ups and close-grip push-ups first before adding instability.
FAQ
What muscles does the Medicine Ball Close-Grip Push-Up work?
The main target is the triceps brachii. However, the chest, front shoulders, serratus anterior, forearms, and core also work hard because the medicine ball creates an unstable pressing surface.
Is this exercise better for triceps or chest?
This variation is more triceps-focused than a regular push-up because the hands are close together and the elbows stay near the torso. The chest still assists, but the narrow hand position shifts the emphasis toward the upper arms.
Is the Medicine Ball Close-Grip Push-Up beginner-friendly?
It is usually not ideal for complete beginners. The medicine ball adds instability, so you should first feel confident with standard push-ups, knee push-ups, and close-grip push-ups on the floor.
Why do my wrists hurt during this exercise?
Wrist discomfort can happen if your hands are placed too awkwardly on the ball, if the ball is too small, or if your wrists are not ready for the angle. Use a larger ball, reduce range, try the kneeling version, or return to floor-based close-grip push-ups.
How can I make this exercise easier?
Perform it from your knees, use a larger medicine ball, widen your feet, or reduce the depth of each rep. In addition, you can practice a regular close-grip push-up on the floor before using the ball.
How can I make this exercise harder?
Slow down the lowering phase, pause near the bottom, elevate your feet, use a smaller medicine ball, or add a weighted vest. However, only progress when you can control the ball without shoulder or wrist discomfort.
Should the ball move during the exercise?
A small amount of natural movement is normal, but the ball should not roll away or wobble aggressively. If it moves too much, reduce speed, widen your stance, or use the kneeling version.
Recommended Equipment
- Medicine Ball — the main tool for this close-grip push-up variation and upper-body stability work.
- Non-Slip Exercise Mat — helps keep the ball and body position more stable during floor training.
- Wrist Wraps for Push-Ups — useful for lifters who need extra wrist support during pressing variations.
- Push-Up Handles — a good regression tool for practicing close-grip pressing with a more neutral wrist angle.
- Weighted Vest — an advanced progression option once bodyweight reps become easy and stable.
Tip: Start with the medicine ball and a non-slip mat first. Then add wrist support or loading tools only when your technique is stable.