Doorway Biceps Curl: Proper Form, Muscles Worked, Sets, Tips & FAQ
Learn how to do the Doorway Biceps Curl with proper form. Discover muscles worked, setup, step-by-step execution, sets and reps by goal, common mistakes, FAQs, and recommended equipment.
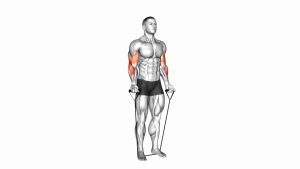
Doorway Biceps Curl
This movement trains the arms through a controlled curl pattern while your bodyweight supplies the load. The deeper you lean back, the more tension the biceps must handle. To get the most from it, keep the elbows as the main drivers of the movement and avoid turning the exercise into a row with excessive shoulder pull. Smooth reps, a stable torso, and controlled elbow flexion are what make this exercise effective.
Quick Overview
| Body Part | Biceps |
|---|---|
| Primary Muscle | Biceps brachii |
| Secondary Muscle | Brachialis, brachioradialis, forearms, anterior deltoids, upper back stabilizers |
| Equipment | Doorway, doorframe, or other stable vertical support |
| Difficulty | Beginner to Intermediate, depending on lean angle and bodyweight control |
Sets & Reps (By Goal)
- Muscle building: 3–4 sets × 8–15 reps with slow lowering and 45–75 seconds rest
- Strength and control: 3–5 sets × 5–8 reps using a deeper lean and 60–90 seconds rest
- Home workout endurance: 2–4 sets × 12–20 reps with clean form and short rest periods
- Beginner practice: 2–3 sets × 6–10 reps using a shallow lean until technique feels natural
Progression rule: First increase control and range, then lean back a little farther to make the movement harder. Do not rush progression if you cannot keep your elbows and wrists comfortable.
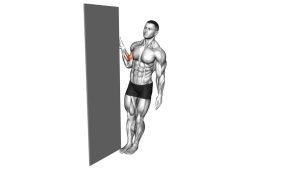
Setup / Starting Position
- Stand facing a sturdy doorway or vertical frame: Position yourself close enough to comfortably grip the sides or edge.
- Grip the frame securely: Your hands should be at about chest height or slightly below, depending on the setup.
- Step your feet forward: Lean your body backward so the arms extend in front of you and bodyweight creates resistance.
- Keep the body straight: Brace the core, keep the chest lifted, and avoid excessive arching or sagging.
- Start with elbows nearly straight: Maintain a soft bend rather than locking the joints completely.
Tip: A shallower lean makes the exercise easier. A deeper lean increases tension and difficulty.
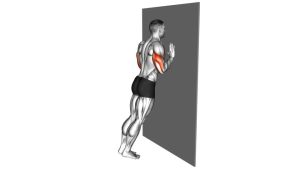
Execution (Step-by-Step)
- Set your body position: Lean back under control with your arms extended and shoulders down.
- Initiate the curl: Bend your elbows and think about pulling your body toward the doorway using your biceps.
- Keep elbows doing the work: Avoid shrugging or yanking with the upper back. The elbow flexion should drive the motion.
- Move until you reach peak contraction: Continue curling until your chest and torso come closer to the frame and the elbows are well bent.
- Squeeze briefly: Pause for a moment at the top and feel the biceps tighten.
- Lower slowly: Extend the elbows under control and lean back to the start position without dropping.
- Repeat smoothly: Keep a steady tempo and consistent body alignment on every rep.
Pro Tips & Common Mistakes
- Use elbow flexion as the priority: The more you lead with the elbows, the more biceps-focused the movement becomes.
- Do not jerk yourself forward: Momentum reduces tension and can stress the joints.
- Control the eccentric: The lowering phase is one of the best parts of this exercise for strength and muscle growth.
- Adjust difficulty with body angle: Step the feet farther forward to increase resistance, or stay more upright to make it easier.
- Keep wrists comfortable: A neutral, secure grip usually feels better than over-twisting the hands.
- Avoid shoulder shrugging: Let the biceps and forearms do the work while the shoulders stay relatively quiet.
- Train with clean reps: Smaller, controlled reps are better than exaggerated pulling with sloppy mechanics.
FAQ
Is the Doorway Biceps Curl effective for building muscle?
Yes, it can be effective when done with enough tension, control, and volume. It works especially well for home training when you do not have dumbbells or cables. Slower eccentrics and deeper body angles can make it more challenging.
What muscles does the Doorway Biceps Curl work?
The main target is the biceps brachii. It also involves the brachialis, brachioradialis, forearms, and some shoulder and upper-back stabilizers.
How can I make the exercise harder?
Step your feet farther forward so your body leans back more, slow down the lowering phase, pause at the top, or perform more reps with strict form.
Can beginners use this exercise?
Yes. Beginners can keep the body more upright and use a very light lean until they develop confidence and elbow control. Start with fewer reps and focus on smooth technique.
What is the most common mistake?
The most common mistake is turning it into a pulling or rowing motion by using too much shoulder movement. Keep your attention on curling with the elbows.
Recommended Equipment
- Resistance Bands with Door Anchor — useful for adding extra arm training variations at home alongside doorway curls
- Grip Strength Trainer — helps improve hand and forearm strength for better control during bodyweight arm work
- Adjustable Dumbbells — a practical upgrade if you want to pair doorway curls with standard biceps exercises
- Workout Gloves with Grip — can improve hand comfort and grip security on some surfaces
- Doorway Pull-Up Bar — expands your home arm and upper-body training options beyond curls alone
Tip: Choose equipment that improves home training variety and grip security rather than replacing good exercise technique.