Seated Foam Roller Hamstring Roll: Form, Benefits, Tips & FAQ
Learn the Seated Foam Roller Hamstring Roll for hamstring release, recovery, mobility, and flexibility with step-by-step form, tips, FAQs, and gear.
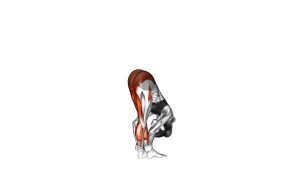
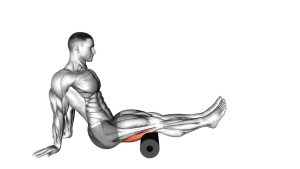
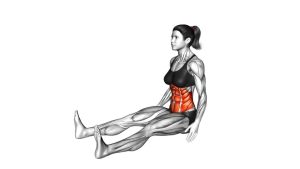
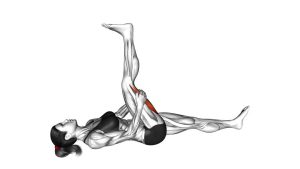
Seated Foam Roller Hamstring Roll
This exercise is performed seated on the floor with a foam roller placed under the hamstrings. Your hands support your body behind you while your arms help move your body forward and backward over the roller. It is best used before training as a warm-up mobility drill, after training as a recovery tool, or during a separate flexibility routine when the hamstrings feel stiff.
Quick Overview
| Body Part | Hamstrings |
|---|---|
| Primary Muscle | Hamstrings: biceps femoris, semitendinosus, and semimembranosus |
| Secondary Muscle | Glutes, calves, core stabilizers, shoulders, and triceps for body support |
| Equipment | Foam roller |
| Difficulty | Beginner |
Sets & Reps (By Goal)
- Warm-up mobility: 1–2 rounds × 20–40 seconds per leg or both legs together
- Recovery after training: 2–3 rounds × 30–60 seconds with slow, controlled rolling
- Tight hamstring release: 2–4 rounds × 45–75 seconds, pausing briefly on tender spots
- Beginner comfort practice: 1–2 rounds × 15–30 seconds with light pressure
Progression rule: Increase time and control before increasing pressure. For more intensity, cross one leg over the other or shift more body weight onto one hamstring.
Setup / Starting Position
- Sit on the floor: Extend your legs in front of you and place the foam roller under the back of your thighs.
- Position the roller: Start around the mid-hamstring area, not directly behind the knee.
- Place your hands behind you: Keep your palms on the floor with fingers facing slightly outward or backward.
- Lift your hips slightly: Press through your hands so your hamstrings rest firmly on the roller.
- Relax your legs: Keep the knees mostly straight but not locked, and allow the hamstrings to settle into the roller.
Tip: If the pressure feels too strong, keep more body weight on your hands or allow your hips to stay closer to the floor.
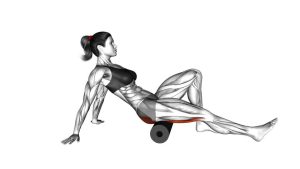
Execution (Step-by-Step)
- Brace lightly: Keep your chest lifted, shoulders relaxed, and core gently engaged.
- Move with your arms: Use your hands to push and pull your body so the roller moves along the hamstrings.
- Roll toward the glutes: Move slowly upward along the back of the thighs without rushing.
- Roll back toward the knees: Return with control, stopping before the roller reaches the knee joint.
- Pause on tight areas: If you find a tender muscular spot, pause for 5–15 seconds while breathing calmly.
- Repeat smoothly: Continue for the target time while keeping pressure controlled and comfortable.
Pro Tips & Common Mistakes
- Roll slowly: Fast rolling often reduces effectiveness because the muscle does not have time to relax.
- Control your pressure: Use your arms to adjust how much body weight goes into the roller.
- Avoid the knee joint: Stay on the muscular part of the hamstrings and stop before the back of the knee.
- Do not hold your breath: Slow breathing helps reduce guarding and improves relaxation.
- Change angles: Slightly rotate the leg inward or outward to target different hamstring fibers.
- Do not chase pain: Mild discomfort is normal, but sharp pain is a sign to reduce pressure or stop.
- Pair with movement: After rolling, use light hamstring stretches or hip-hinge drills to reinforce mobility.
FAQ
What muscles does the seated foam roller hamstring roll target?
It mainly targets the hamstrings on the back of the thigh, including the biceps femoris, semitendinosus, and semimembranosus. The arms, shoulders, triceps, and core help support your body while rolling.
Is this exercise for strength or recovery?
This is primarily a recovery and mobility drill, not a strength exercise. It helps apply pressure to tight tissue, improve local blood flow, and prepare the hamstrings for better movement.
How long should I foam roll my hamstrings?
Most people do well with 30–60 seconds per area. If your hamstrings are very sensitive, start with 15–30 seconds and use lighter pressure.
Should I roll directly behind my knees?
No. Avoid rolling directly behind the knee joint. Stay on the muscle belly of the hamstrings and stop before the roller reaches the sensitive area behind the knee.
Can I do this before leg training?
Yes. Use it briefly before leg training to reduce stiffness and improve movement readiness. For best results, follow it with dynamic warm-up drills such as hip hinges, bodyweight squats, or leg swings.
How can I make the exercise harder?
To increase pressure, lift your hips higher, shift more body weight onto one leg, or cross one leg over the other. Progress gradually and avoid forcing painful pressure.
Recommended Equipment
- High-Density Foam Roller — firm roller for deeper hamstring and lower-body release
- Medium-Density Foam Roller — more comfortable option for beginners or sensitive hamstrings
- Textured Foam Roller — adds varied pressure points for targeted muscle release
- Massage Stick Roller — useful for controlled hamstring pressure without supporting body weight
- Exercise Mat — provides comfort for seated floor-based mobility and recovery drills
Tip: Choose a softer roller if you are new to foam rolling. A firmer roller is better for experienced users who can control pressure without creating excessive discomfort.