Sitting Toe Touch: Proper Form, Core Benefits, Sets, Tips & FAQ
Learn the Sitting Toe Touch to improve core control, hamstring mobility, and seated rotation with step-by-step form, tips, sets, FAQs, and equipment.
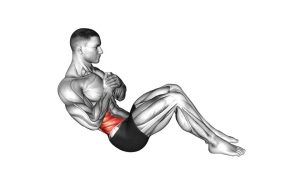
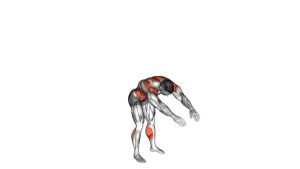
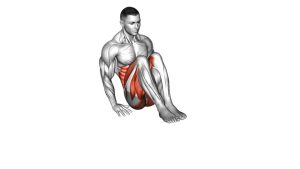
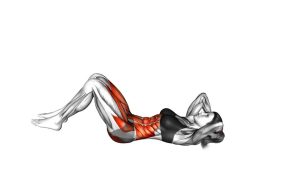
Sitting Toe Touch
This exercise works best when each repetition is slow, balanced, and intentional. During the movement, the torso reaches toward the foot while the abdominal muscles help control the rotation. Meanwhile, the hamstrings and lower back receive a light mobility challenge. Therefore, the Sitting Toe Touch is useful as a warm-up drill, active stretch, or low-impact core exercise.
Quick Overview
| Body Part | Core |
|---|---|
| Primary Muscle | Obliques and rectus abdominis |
| Secondary Muscle | Hamstrings, hip flexors, spinal stabilizers, and shoulders |
| Equipment | No equipment required; optional exercise mat |
| Difficulty | Beginner-friendly |
Sets & Reps (By Goal)
- Warm-up mobility: 1–2 sets × 8–12 reps per side with a slow, easy reach.
- Core control: 2–3 sets × 10–15 reps per side with a brief pause near the foot.
- Flexibility practice: 2–4 sets × 6–10 reps per side using a longer, relaxed tempo.
- Beginner conditioning: 2–3 rounds × 30–45 seconds while alternating sides smoothly.
Progression rule: First improve control and range. Afterward, add more reps or a slower tempo. Avoid adding speed until your posture stays smooth and pain-free.
Setup / Starting Position
- Sit on the floor: Extend both legs forward with the feet slightly apart and toes pointing upward.
- Lengthen the spine: Sit tall through the crown of the head before starting the reach.
- Relax the shoulders: Keep the neck long and avoid shrugging as the arms prepare to move.
- Brace lightly: Engage the core just enough to control the torso without holding your breath.
- Choose your range: If the hamstrings feel tight, bend the knees slightly or reach toward the shin instead of the toes.
A folded towel under the hips can make the seated position easier if your lower back rounds too quickly.
Execution (Step-by-Step)
- Start tall: Begin seated with both legs extended, chest lifted, and arms ready to reach.
- Reach across the body: Move one hand toward the opposite foot while rotating the torso gently.
- Hinge with control: Lean forward from the hips as much as comfortable, then allow a small amount of spinal flexion near the end range.
- Touch or approach the toes: Pause briefly without bouncing, forcing, or pulling aggressively.
- Return to center: Lift the torso back to the upright position with control.
- Switch sides: Repeat the same pattern with the opposite hand reaching toward the other foot.
Pro Tips & Common Mistakes
- Move slowly: A controlled tempo helps the core guide the reach instead of using momentum.
- Keep the hips down: Avoid lifting one hip off the floor when reaching across the body.
- Do not bounce: Bouncing can irritate the hamstrings or lower back, especially when flexibility is limited.
- Breathe naturally: Exhale during the reach and inhale as you return upright.
- Adjust knee position: Slightly bent knees are acceptable if straight legs cause excessive rounding.
- Reach with the torso, not only the arm: The trunk should rotate and fold gently, while the shoulder stays relaxed.
- Stay even on both sides: If one side feels tighter, reduce range and match the smoother side first.
FAQ
What is the Sitting Toe Touch good for?
The Sitting Toe Touch helps train core control, trunk rotation, and hamstring mobility. In addition, it can work well as a warm-up exercise before lower-body, core, or mobility-focused workouts.
Is the Sitting Toe Touch a stretch or an ab exercise?
It can be both. The hamstrings receive a stretch as you reach forward, while the abs and obliques help control the cross-body movement. Therefore, it fits well in both mobility and beginner core routines.
Should I touch my toes every rep?
No. Touching the toes is not required. Instead, reach only as far as you can while keeping the movement controlled and comfortable. Over time, your range may improve naturally.
Why does my lower back round during this exercise?
Lower-back rounding often happens when the hamstrings are tight or the pelvis cannot tilt forward easily. To fix this, bend the knees slightly, sit on a folded towel, and reduce the reaching distance.
Can beginners do Sitting Toe Touches?
Yes. This exercise is beginner-friendly when performed slowly and within a comfortable range. However, anyone with back pain, nerve symptoms, or a recent injury should use caution and seek professional guidance if needed.
Recommended Equipment (Optional)
- Exercise Mat — adds floor comfort and support during seated mobility drills.
- Yoga Strap — useful if you cannot comfortably reach the toes yet.
- Foam Roller — helpful for warming up the hamstrings, calves, and back before mobility work.
- Stretching Strap with Loops — provides controlled assistance for hamstring flexibility practice.
- Yoga Block — can elevate the hips or support modified seated positions.
Equipment is optional. However, a mat and stretching strap can make the Sitting Toe Touch more comfortable, especially for beginners with tight hamstrings.