Side-Lying Side Crunch: Form, Benefits, Sets, Tips & FAQ
Learn the Side-Lying Side Crunch to target obliques, improve core control, and build side-ab strength with proper form, sets, tips, and FAQs.
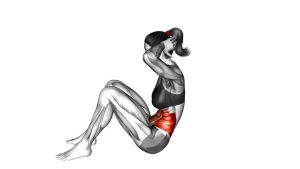
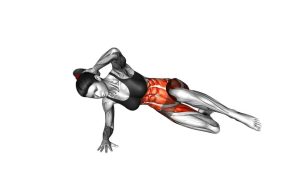
Side-Lying Side Crunch
This exercise works best when the movement stays slow, compact, and controlled. Instead of pulling on the neck or swinging the leg upward, focus on using your side waist to shorten the distance between your upper ribs and your top hip. The bottom arm may help you stay balanced, but it should not push your torso up.
Quick Overview
| Body Part | Obliques |
|---|---|
| Primary Muscle | External obliques and internal obliques |
| Secondary Muscle | Rectus abdominis, transverse abdominis, hip flexors, deep core stabilizers |
| Equipment | None; optional exercise mat for comfort |
| Difficulty | Beginner to intermediate, depending on range of motion and tempo |
Sets & Reps (By Goal)
- Beginner core activation: 2–3 sets × 8–10 reps per side, slow tempo, 30–45 sec rest
- Oblique strength: 3–4 sets × 10–15 reps per side, 45–60 sec rest
- Core endurance: 2–4 sets × 15–20 reps per side, controlled rhythm, 30–45 sec rest
- Warm-up or finisher: 1–3 sets × 10–15 reps per side after planks, crunches, or leg raises
Progression rule: First improve control and range of motion. Then increase reps, add a longer top squeeze, or slow down the lowering phase before adding any resistance.
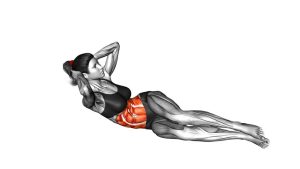
Setup / Starting Position
- Lie on one side: Place your body in a long side-lying position with your legs stacked or slightly staggered.
- Support your base: Keep the bottom arm bent on the floor for balance, or place it comfortably in front of your torso.
- Position the top hand: Place your top hand lightly behind your head without pulling your neck forward.
- Stack the hips: Keep your hips facing sideways. Avoid rolling backward onto your glutes.
- Brace gently: Tighten your core enough to keep your torso stable before the first rep.
Setup cue: Think of your body as staying on a narrow side line. The crunch should happen through the side waist, not by twisting or rocking backward.
Execution (Step-by-Step)
- Start long: Begin with your torso and legs extended in a side-lying position.
- Begin the crunch: Contract the top-side obliques and lift your upper torso slightly off the floor.
- Bring knee and elbow closer: Bend the top knee upward as your upper body crunches sideways.
- Squeeze at the top: Pause briefly when your ribcage moves closest to your top hip.
- Lower with control: Return your torso and leg back to the starting position without dropping or swinging.
- Repeat evenly: Complete all reps on one side, then switch sides and match the same number of reps.
Pro Tips & Common Mistakes
- Do not pull the neck: Keep the hand light behind the head. The core should lift the torso.
- Avoid rolling backward: Keep the hips stacked so the obliques stay loaded through the side crunch.
- Control the leg: Do not kick the knee upward with momentum. Move it smoothly with the torso.
- Use a small, strong range: A clean short crunch is better than a large sloppy swing.
- Exhale during the crunch: Breathe out as you lift to help the ribs move down and the obliques contract.
- Lower slowly: The eccentric phase builds control and prevents the body from collapsing back to the floor.
- Train both sides equally: Match reps and tempo on both sides to avoid left-right core imbalance.
FAQ
What muscles does the Side-Lying Side Crunch work?
The main muscles are the external obliques and internal obliques. The rectus abdominis, transverse abdominis, hip flexors, and deep stabilizers also assist during the movement.
Is the Side-Lying Side Crunch good for beginners?
Yes. It is beginner-friendly when performed with a small range of motion and controlled tempo. Beginners should focus on clean side flexion instead of trying to lift too high.
Should I feel this exercise in my neck?
No. Your neck should stay relaxed. If you feel neck strain, reduce the range, stop pulling the head, and focus on lifting from the side of your waist.
Is this exercise better than regular crunches?
It is not necessarily better, but it targets the core differently. Regular crunches emphasize the front abs, while the Side-Lying Side Crunch places more focus on the obliques and lateral core strength.
How can I make the Side-Lying Side Crunch harder?
You can slow the lowering phase, pause longer at the top, keep the top leg straighter, or hold a light ankle weight. Only progress when you can stay balanced without twisting or swinging.
How many reps should I do per side?
Most people do well with 8–15 controlled reps per side. For endurance, use 15–20 reps, but only if form stays clean.
Recommended Equipment (Optional)
- Exercise Mat — adds comfort for the hip, ribs, and elbow during side-lying core work
- Thick Yoga Mat — useful if the floor feels too hard on the side of the body
- Adjustable Ankle Weights — optional progression for advanced users who can control the leg movement
- Core Sliders — helpful for pairing this exercise with other oblique and core stability drills
- Mini Resistance Bands — useful for adding hip and core activation work before or after oblique training
Tip: Equipment is optional. The Side-Lying Side Crunch is highly effective with bodyweight when the movement is slow, precise, and controlled.