Hip Roll Plank: Core Form, Oblique Tips, Sets & FAQ
Learn the Hip Roll Plank to train obliques, abs, and core stability with safe form, step-by-step cues, sets, mistakes, FAQs, and equipment.
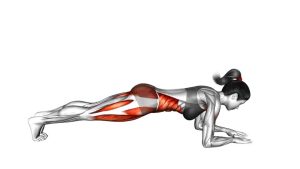
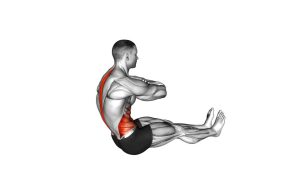
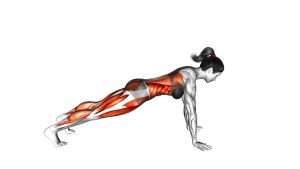
Hip Roll Plank
This exercise works best when the rotation stays slow, clean, and deliberate. Because the hips move side to side, your core must resist excessive sagging while also controlling rotation. Therefore, the movement is excellent for building stronger obliques, better plank endurance, and improved trunk control. Keep your shoulders steady, brace your abs, and allow your feet to pivot naturally as your hips rotate.
Quick Overview
| Body Part | Core |
|---|---|
| Primary Muscle | Obliques |
| Secondary Muscle | Rectus abdominis, transverse abdominis, shoulders, glutes, lower-back stabilizers |
| Equipment | No equipment required; exercise mat optional |
| Difficulty | Intermediate |
Sets & Reps (By Goal)
- Core control: 2–3 sets × 8–12 total reps with slow, smooth rotations.
- Oblique strength: 3–4 sets × 12–20 total reps, alternating evenly from side to side.
- Plank endurance: 2–4 sets × 20–40 seconds, keeping every rotation controlled.
- Beginner progression: 2 sets × 6–10 total reps with a smaller hip drop and longer rest.
Progression rule: First increase control and range. After that, add reps or time. However, do not progress if your hips sag, your shoulders shift excessively, or your lower back starts taking over.
Setup / Starting Position
- Start on your forearms: Place both elbows under your shoulders and keep your forearms on the floor.
- Extend your legs back: Set your feet close together or slightly apart, depending on your balance.
- Create a strong plank line: Keep your body long from head to heels without letting the hips drop.
- Brace your core: Tighten your abs as if preparing for a light punch to the stomach.
- Relax your neck: Look slightly down so your head stays aligned with your spine.
Setup note: A wider foot position can make the movement easier. Meanwhile, a closer foot position usually makes the rotation feel more demanding.
Execution (Step-by-Step)
- Hold a solid forearm plank: Keep your elbows planted, shoulders stable, and core tight.
- Rotate one hip downward: Slowly roll your pelvis toward one side as that hip moves closer to the floor.
- Keep your chest controlled: Allow a small torso rotation, but do not let your shoulders collapse or slide.
- Return through center: Bring your hips back to a neutral plank position with control.
- Rotate to the opposite side: Lower the other hip toward the floor while keeping your abs engaged.
- Continue alternating: Move side to side with a steady rhythm and equal range on both sides.
Pro Tips & Common Mistakes
- Move from the hips: The main action is pelvic rotation, not shoulder rocking.
- Keep the elbows grounded: Press your forearms into the floor to stabilize the upper body.
- Avoid rushing: Fast reps often reduce oblique tension and increase lower-back stress.
- Do not over-drop the hips: Lower each hip only as far as you can control without pain or collapse.
- Keep breathing: Exhale gently as you rotate, then inhale as you return through center.
- Control both sides equally: If one side feels weaker, reduce the range until both sides look balanced.
- Brace before each rep: A strong brace protects your spine and keeps the movement focused on the core.
FAQ
What muscles does the Hip Roll Plank work?
The Hip Roll Plank mainly targets the obliques. Additionally, it trains the rectus abdominis, transverse abdominis, shoulders, glutes, and spinal stabilizers because your body must stay controlled while the hips rotate.
Is the Hip Roll Plank good for abs?
Yes. It is especially useful for training the abs through rotation control. However, it should be performed with slow technique because the core benefits come from controlled tension, not from swinging the hips quickly.
Should my hips touch the floor?
Your hips can move toward the floor, but they do not need to touch it. In fact, stopping just before contact often keeps more tension in the obliques and helps you avoid relaxing at the bottom.
Why do I feel this in my lower back?
Lower-back discomfort usually means your hips are sagging, your brace is weak, or your range is too large. Reduce the hip drop, tighten your abs, and keep your ribs pulled down as you rotate.
Is this exercise beginner-friendly?
It can be challenging for beginners because it requires plank strength and rotation control. Therefore, beginners should start with a basic forearm plank first, then use a smaller hip roll before increasing range.
Recommended Equipment (Optional)
- Exercise Mat — adds forearm comfort and helps protect the elbows during plank work.
- Thick Yoga Mat — provides extra cushioning for longer plank sets.
- Elbow Pads for Planks — useful if forearm pressure limits your set quality.
- Core Sliders — helpful for advanced core progressions after mastering hip roll planks.
- Resistance Bands Set — useful for pairing with anti-rotation core drills and upper-body stability work.
Tip: Equipment should improve comfort and control. If any item changes your plank alignment or causes pain, remove it and return to the basic bodyweight version.