Weighted Leg Extension Crunch: Form, Sets, Tips & FAQ
Learn the Weighted Leg Extension Crunch for stronger abs, better core control, and cleaner leg-extension crunch form with sets, tips, FAQs, and gear.
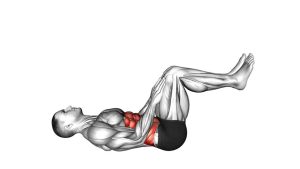
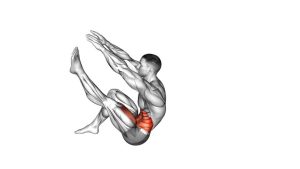
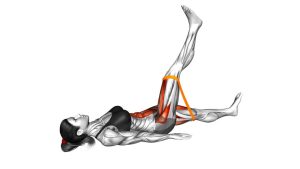
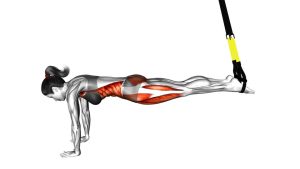
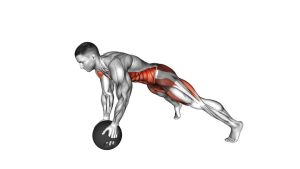
Weighted Leg Extension Crunch
This exercise works best when the movement stays slow, compact, and controlled. The legs should extend smoothly while the torso crunches upward. At the top, the ribs move closer to the pelvis, the ball stays secure between the feet, and the lower back stays controlled against the floor. Avoid rushing the rep, because momentum can reduce abdominal tension and shift stress into the hip flexors or lower back.
Quick Overview
| Body Part | Abs |
|---|---|
| Primary Muscle | Rectus abdominis |
| Secondary Muscle | Hip flexors, transverse abdominis, obliques, adductors, and deep core stabilizers |
| Equipment | Stability ball, medicine ball, soft weighted ball, or light object held between the feet |
| Difficulty | Intermediate because it requires abdominal strength, leg control, and coordination |
Sets & Reps (By Goal)
- Core control: 2–3 sets × 8–10 reps with a slow 2–3 second lowering phase.
- Ab strength: 3–4 sets × 10–12 reps using a light weighted ball or stability ball.
- Muscle endurance: 2–4 sets × 12–15 reps with strict form and short rest periods.
- Beginner progression: 2–3 sets × 6–8 reps using a very light ball and a smaller leg-extension range.
- Advanced control: 3–4 sets × 8–12 reps with a longer hold at the top and a slower eccentric return.
Progression rule: First improve control, then increase reps, then increase hold time. Add weight only when your lower back stays stable and your neck stays relaxed through every rep.
Setup / Starting Position
- Lie on your back: Start on a mat with your spine supported and your head relaxed.
- Place the ball between your feet: Hold a stability ball, medicine ball, or soft weighted object securely between both feet.
- Bend the knees: Bring the knees toward a 90-degree angle so the ball is stable and easy to control.
- Brace the core: Gently pull the ribs down and keep the lower back from arching away from the floor.
- Set the upper body: Keep the neck neutral and avoid pulling the head forward.
- Prepare to move together: The torso and legs should move as one coordinated pattern, not as two separate actions.
Tip: If the object feels difficult to control, use a larger stability ball first. A larger ball can be easier to grip because it gives the feet more surface contact.
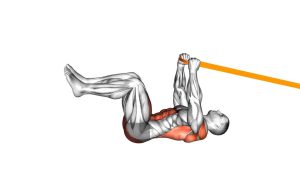
Execution (Step-by-Step)
- Start from the bent-knee position: Keep the ball secure between the feet and maintain light abdominal tension.
- Begin the crunch: Lift the head, shoulders, and upper back slightly from the floor by curling the ribs toward the pelvis.
- Extend the legs: As the upper body rises, extend the legs upward and slightly forward while keeping the ball controlled.
- Reach the peak contraction: Pause when the legs are extended and the abs feel fully shortened.
- Keep the lower back stable: Do not let the pelvis tilt forward or the lower back pop off the floor.
- Lower with control: Slowly bend the knees and lower the upper back toward the floor at the same time.
- Reset before the next rep: Return to the starting position without dropping the ball or relaxing the core completely.
Pro Tips & Common Mistakes
- Move the ribs toward the hips: Do not simply lift the head. Focus on curling the upper spine.
- Control the ball: Squeeze gently with the feet so the object stays centered throughout the rep.
- Avoid lower-back arching: If your back lifts from the floor, reduce the leg-extension distance.
- Use a slow lowering phase: The eccentric return builds more control than a fast drop.
- Do not yank the neck: Keep the chin slightly tucked and let the abs create the crunch.
- Exhale during the crunch: Breathe out as you lift and extend. This helps the ribs come down.
- Do not choose a heavy ball too early: Too much load can turn the movement into a hip-flexor drill.
- Keep reps clean: Stop the set when your form becomes shaky or your lower back starts compensating.
FAQ
What muscles does the Weighted Leg Extension Crunch work?
The main muscle is the rectus abdominis, which creates the crunching motion. The hip flexors, transverse abdominis, obliques, adductors, and deep core stabilizers also assist because the legs must extend while the ball stays controlled.
Is the Weighted Leg Extension Crunch good for lower abs?
Yes. It strongly challenges the lower-ab region because the legs move away from the body while the abs work to control pelvic position. However, the lower abs do not work separately from the rest of the abdominal wall. Clean control matters more than using a heavy ball.
Should I use a stability ball or medicine ball?
A stability ball is better for learning because it is lighter and easier to squeeze between the feet. A medicine ball is more challenging and should be used only when you can keep the lower back stable.
Why does my lower back arch during this exercise?
Your legs may be extending too far, the ball may be too heavy, or your core may not be bracing enough. Shorten the range, slow down, and keep the ribs pulled down as the legs extend.
Can beginners do the Weighted Leg Extension Crunch?
Beginners can do a modified version with a light stability ball and a shorter leg-extension range. If control is still difficult, start with dead bugs, reverse crunches, or basic crunches first.
Recommended Equipment (Optional)
- Stability Ball — ideal for learning the movement with light resistance and better foot control.
- Soft Medicine Ball — adds controlled resistance without feeling too hard between the feet.
- Thick Exercise Mat — supports the spine and makes floor-based crunch work more comfortable.
- Pilates Mini Ball — useful for lighter variations and easier progression before heavier loading.
- Adjustable Ankle Weights — optional advanced progression for users who already have strong core control.
Tip: Choose equipment that lets you move slowly and safely. The best tool is the one that helps you keep tension in the abs without forcing the lower back to arch.