Wrist Push-Up: Forearm Strength, Wrist Control, Form, Sets & FAQ
Learn the Wrist Push-Up to build forearm strength, wrist mobility, and joint control. Includes setup, execution, sets by goal, common mistakes, FAQs, and recommended equipment.
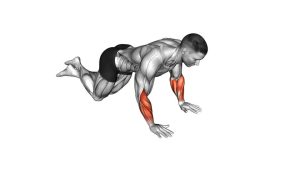
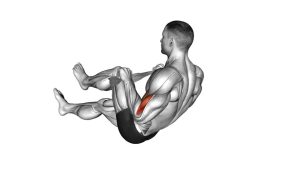
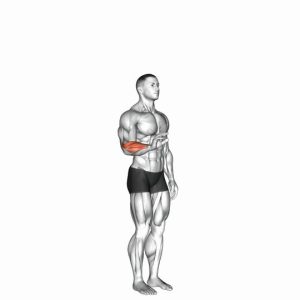
Wrist Push-Up
This exercise is especially useful for calisthenics, push-ups, handstand preparation, planche progressions, and anyone who wants stronger wrists for pressing movements. The motion should feel controlled and muscular, not sharp or forced. Most of the work comes from the forearms, wrist flexors, wrist extensors, and finger stabilizers as they resist and control the forward body shift.
Quick Overview
| Body Part | Forearms |
|---|---|
| Primary Muscle | Forearm flexors and wrist stabilizers |
| Secondary Muscle | Wrist extensors, finger flexors, triceps, shoulders, and core stabilizers |
| Equipment | Bodyweight only; optional exercise mat or wrist support tools |
| Difficulty | Beginner to Intermediate depending on wrist strength and bodyweight loading |
Sets & Reps (By Goal)
- Wrist mobility warm-up: 1–2 sets × 8–12 slow reps with light pressure
- Forearm strength: 3–4 sets × 8–15 reps with controlled forward loading
- Joint conditioning: 2–3 sets × 6–10 reps with a 2–3 second pause at the end range
- Calisthenics preparation: 3–5 sets × 10–20 reps before push-up, handstand, or planche work
Progression rule: First increase control and range, then increase reps. Only progress to a stronger forward lean when your wrists stay pain-free and your elbows remain stable.
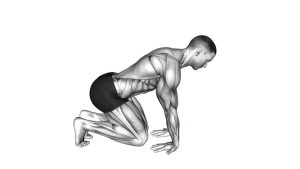
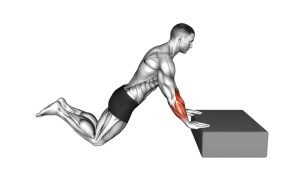
Setup / Starting Position
- Start on all fours: Place your knees on the floor and position your hands under or slightly in front of your shoulders.
- Set the hands: Keep palms flat, fingers spread, and fingertips lightly pressing into the floor.
- Stack the body: Keep your shoulders stable, arms straight but not aggressively locked, and spine neutral.
- Brace lightly: Engage your core enough to prevent your torso from sagging or shifting unevenly.
- Choose the range: Begin with a small forward lean before attempting a deeper wrist extension angle.
Tip: If the floor feels too intense, start on a soft exercise mat or perform the drill with less bodyweight pressure.
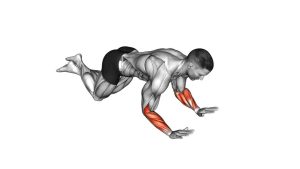
Execution (Step-by-Step)
- Begin in the kneeling push-up position: Hands flat, arms straight, knees down, and shoulders relaxed.
- Shift forward slowly: Move your shoulders slightly past your wrists while keeping the palms grounded.
- Load the wrists: Allow the wrists to move into extension gradually without bouncing or collapsing.
- Pause briefly: Hold the forward position for 1–3 seconds while keeping the fingers active and elbows stable.
- Return with control: Shift your body back until the shoulders return over the wrists.
- Repeat smoothly: Keep each repetition slow, controlled, and pain-free.
Pro Tips & Common Mistakes
- Keep the movement slow: Fast bouncing increases joint stress and reduces control.
- Spread the fingers: Active fingers help distribute pressure and stabilize the hand.
- Do not collapse the elbows: Keep arms mostly straight so the wrists and forearms do the work.
- Avoid forcing range: Wrist conditioning improves gradually; do not chase a deep angle too soon.
- Keep shoulders controlled: Avoid shrugging or sinking between the shoulder blades.
- Use the knees first: Full plank loading is much harder and should only be used after mastering the kneeling version.
- Warm up first: Add wrist circles, palm rocks, and gentle forearm stretches before higher-volume sets.
FAQ
What muscles does the wrist push-up work?
The wrist push-up mainly targets the forearm muscles, especially the wrist flexors, wrist extensors, and stabilizers around the wrist joint. It also involves the fingers, triceps, shoulders, and core for support.
Is the wrist push-up good for wrist strength?
Yes. When performed with control, it can help build wrist strength, wrist extension tolerance, and forearm endurance. Start with low pressure and gradually increase the range over time.
Should my elbows bend during this exercise?
Only slightly. This exercise is not meant to be a traditional push-up. The main movement should come from shifting your body forward and backward to load the wrists, not from lowering your chest to the floor.
Why do my wrists hurt during wrist push-ups?
Wrist discomfort may come from too much range, too much bodyweight pressure, poor warm-up, or limited wrist mobility. Reduce the lean, use your knees, warm up first, and stop if the pain feels sharp or joint-based.
Can beginners do wrist push-ups?
Yes, but beginners should start from the knees with a small forward lean. The goal is gradual conditioning, not maximum pressure. If needed, use a mat or reduce the range until your wrists adapt.
Recommended Equipment (Optional)
- Exercise Mat — adds cushioning for knees and hands during wrist conditioning drills
- Workout Wrist Wraps — useful for extra wrist support during pressing and calisthenics training
- Push-Up Bars — helps reduce wrist extension stress during regular push-up variations
- Hand Grip Strengthener — strengthens the fingers and forearm muscles that support wrist stability
- Forearm Wrist Roller — builds forearm endurance and wrist control for stronger pressing positions
Tip: Equipment is optional. For this exercise, your best tool is controlled bodyweight loading. Use accessories only to support comfort, progression, or extra forearm training.