Kneeling Wrist Flexor Stretch: Proper Form, Sets, Tips & FAQ
Learn the Kneeling Wrist Flexor Stretch to improve forearm flexibility, wrist mobility, and hand comfort. Includes setup, execution, sets by goal, common mistakes, FAQs, and recommended equipment.
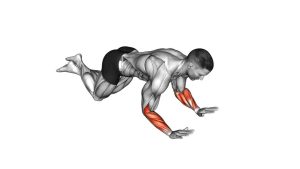
Kneeling Wrist Flexor Stretch
This stretch works best when you move slowly and stay within a comfortable range. You should feel a broad stretch across the underside of the forearms and around the wrist flexor area, not sharp pressure in the wrist joint itself. A small forward lean is often enough to create a productive stretch, especially if your wrists are stiff from gripping, typing, pressing, or upper-body training.
Quick Overview
| Body Part | Forearms |
|---|---|
| Primary Muscle | Wrist flexors / forearm flexor group |
| Secondary Muscle | Finger flexors, wrist stabilizers, palms and connective tissues around the wrist |
| Equipment | None (optional: exercise mat or folded towel for comfort) |
| Difficulty | Beginner |
Sets & Reps (By Goal)
- Warm-up before training: 1–2 sets × 20–30 second holds
- Mobility improvement: 2–4 sets × 20–45 second holds
- Post-workout recovery: 2–3 sets × 30–45 second holds
- Desk-work or grip-fatigue reset: 1–3 sets × 15–30 second holds throughout the day
Progression rule: Increase hold time gradually before increasing stretch depth. Better wrist mobility comes from consistency and control—not from pushing into discomfort.
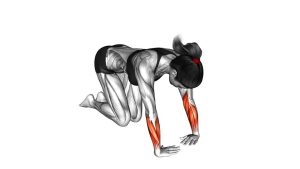
Setup / Starting Position
- Kneel on the floor: Start in a comfortable kneeling position with knees about hip-width apart.
- Place the palms down: Put both hands on the floor in front of you with the fingers pointing back toward your knees.
- Straighten the elbows softly: Keep the arms extended without aggressively locking the joints.
- Spread the fingers: Press through the whole hand so the load is distributed evenly.
- Set a tall torso: Keep the chest open, shoulders relaxed, and neck neutral before leaning into the stretch.
Tip: If the floor feels too hard, place a yoga mat or folded towel under the knees.
Execution (Step-by-Step)
- Start light: With the palms planted and fingers turned back, begin with only a small amount of bodyweight on the hands.
- Lean forward gradually: Shift your shoulders forward until you feel a stretch along the underside of the forearms and wrists.
- Keep the palms down: Avoid letting the hands peel off the floor as the stretch increases.
- Hold and breathe: Stay in the stretch for the planned time while keeping the shoulders relaxed and breathing steady.
- Ease out slowly: Shift your body weight back to reduce the stretch, then release the hands gently.
Pro Tips & Common Mistakes
- Use gradual loading: Don’t drop your body weight quickly into the stretch.
- Keep pressure even: Spread the fingers and use the full palm instead of collapsing into one side of the wrist.
- Don’t force range: More angle is not always better—stay in a stretch you can control.
- Avoid shrugging: Keep the shoulders down and away from the ears.
- Respect wrist sensitivity: If both hands down is too intense, try reducing range or stretching one side more gently.
- Pair it intelligently: This stretch works well after gripping, push-ups, planks, calisthenics, or long typing sessions.
FAQ
Where should I feel the Kneeling Wrist Flexor Stretch?
You should feel it mostly along the front/underside of the forearms and through the wrist flexor area. You may also feel light tension in the palms and fingers. Sharp pain in the wrist joint means you should reduce the stretch.
Is this stretch good before workouts?
Yes, especially before exercises that load the wrists such as push-ups, planks, presses, hand-balancing progressions, or upper-body mobility work. Keep the holds shorter before training and avoid overstretching.
How long should I hold it?
Most people do well with 20 to 45 seconds per hold depending on the goal. Use shorter holds for warm-ups and slightly longer holds for flexibility or recovery sessions.
What if I can’t place my palms flat?
Reduce the lean, change the hand angle slightly, or decrease how much body weight you place into the stretch. Limited wrist mobility is common, so build range gradually over time.
Who should be cautious with this exercise?
Anyone with an active wrist injury, acute inflammation, nerve symptoms, or severe pain should avoid forcing the position and consider professional guidance before stretching aggressively.
Recommended Equipment (Optional)
- Extra-Thick Exercise Yoga Mat — adds knee comfort and gives you a more forgiving surface for floor-based wrist mobility work
- Resistance Bands Set — useful for pairing forearm mobility with light strengthening and upper-body warm-up drills
- Lacrosse Massage Ball — helpful for self-massage and soft-tissue work on tight forearms before or after stretching
- Push-Up Bars — can reduce flat-palm wrist stress during training if your wrists are sensitive during floor exercises
- Adjustable Wrist Support Wrap — useful when you want light support during training while still working on mobility separately
Tip: Mobility tools should support your practice, not replace it. Use them to make training more comfortable while continuing to improve wrist control and flexibility over time.