Fingers-Down Forearm Stretch: Proper Form, Benefits, Sets & FAQ
Learn how to do the Fingers-Down Forearm Stretch to lengthen tight forearm extensors, improve wrist mobility, and reduce tension from gripping, typing, and lifting. Includes setup, execution, tips, FAQ, and recommended equipment.
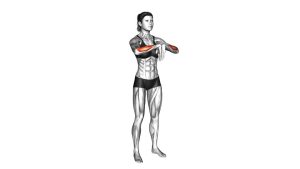
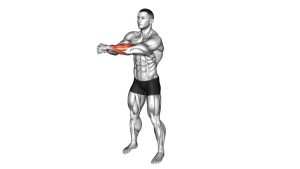
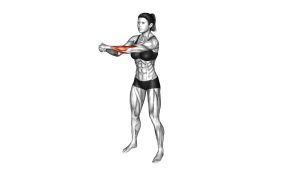
Fingers-Down Forearm Stretch
This stretch is best performed with light pressure, steady breathing, and a controlled hold. You should feel the stretch mainly along the top side of the forearm, sometimes extending toward the wrist and back of the hand. The sensation should feel like tissue lengthening, not pinching, tingling, or joint pain.
Quick Overview
| Body Part | Forearms |
|---|---|
| Primary Muscle | Forearm extensors |
| Secondary Muscle | Finger extensors, wrist stabilizers, hand musculature |
| Equipment | None |
| Difficulty | Beginner |
Sets & Reps (By Goal)
- Daily mobility: 2–3 sets × 20–30 second holds per side
- Warm-up before lifting or gripping work: 1–2 sets × 15–20 second holds per side
- Post-workout recovery: 2–4 sets × 20–40 second holds per side
- Desk-break tension relief: 1–3 quick holds of 15–25 seconds per side
Progression rule: Increase hold time gradually before increasing stretch intensity. A better stretch is one that feels smooth and repeatable, not one that feels extreme.
Setup / Starting Position
- Stand or sit tall: Keep your chest up, shoulders relaxed, and neck neutral.
- Extend one arm forward: Raise the arm to about chest height with the elbow straight.
- Turn the palm down: The back of the hand should face upward slightly while the palm faces the floor.
- Use the opposite hand: Place it over the fingers of the stretched hand.
- Stay relaxed: Avoid shrugging the shoulders or twisting the torso.
Tip: Keep the arm long but not rigid. A softly extended elbow usually feels better than aggressively locking the joint.
Execution (Step-by-Step)
- Start in the neutral position: Arm straight in front, palm facing down, fingers long.
- Apply gentle pressure: Use your opposite hand to pull the fingers downward toward the floor.
- Let the wrist flex: As the fingers move down, the wrist bends into flexion and the forearm extensors begin to lengthen.
- Hold the stretch: Pause once you feel a clear but tolerable stretch across the top of the forearm and wrist.
- Breathe and stay still: Keep the shoulder relaxed and avoid leaning or rotating to create extra range.
- Release slowly: Return to the start position under control, then switch sides.
Pro Tips & Common Mistakes
- Keep the palm facing down: This helps bias the stretch toward the forearm extensors.
- Pull gradually: Ease into the stretch over 1–2 seconds instead of forcing it.
- Don’t shrug the shoulder: Keep the upper trap relaxed so the forearm does the work.
- Use moderate pressure only: More force does not always mean a better result.
- Keep the elbow extended: Bending the arm can reduce tension on the target tissues.
- Don’t bounce: This is a static stretch, so hold steady rather than pulsing.
- Pair it with wrist mobility and grip recovery: It works well after rows, pull-ups, deadlifts, climbing, or long typing sessions.
FAQ
Where should I feel the Fingers-Down Forearm Stretch?
You should usually feel it along the top side of the forearm, sometimes extending into the wrist and back of the hand. That area corresponds to the forearm extensor muscles and tendons.
Should this stretch hurt?
No. It should feel like a controlled stretch, not sharp pain. If you feel tingling, joint pain, or nerve-like symptoms, reduce the intensity or stop.
When should I use this stretch?
It works well after upper-body training, during work breaks, or as part of a wrist and forearm warm-up before gripping-based exercise.
Can this help with tight forearms from typing or lifting?
Yes, it can help reduce stiffness and improve short-term comfort in the forearm extensors, especially when paired with smart workload management and general wrist mobility work.
How long should I hold the stretch?
Most people do well with 15–40 second holds. Start short and increase the hold only if the stretch feels smooth and comfortable.
Recommended Equipment (Optional)
- Therapy Putty for Hand & Forearm Work — useful for light hand therapy, finger strength, and balancing stretching with controlled strengthening
- Resistance Bands / Rehab Bands — great for wrist, elbow, and forearm strengthening alongside mobility work
- Massage Ball or Forearm Roller — helpful for soft-tissue work before or after stretching tight forearms
- Forearm Compression Sleeve — may help with comfort and support during repetitive work or training sessions
- Hand Therapy / Wrist Rehab Kit — a practical option for combining grip work, finger control, and forearm recovery in one setup
Tip: Recovery tools should support the basics, not replace them. Gentle stretching, smart training volume, and regular wrist movement usually matter most.