Kneeling Wrist Sinkers: Forearm Strength, Wrist Mobility, Form & FAQ
Learn how to do Kneeling Wrist Sinkers to build wrist mobility, forearm strength, and joint control. Includes setup, execution, sets, mistakes, FAQs, and equipment.
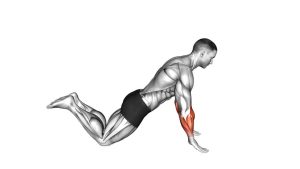
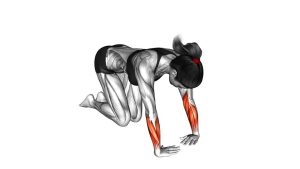
Kneeling Wrist Sinkers
This movement should feel controlled, smooth, and gradual. The goal is not to drop your bodyweight into the wrists. Instead, you should slowly glide forward, increase pressure through the palms and fingers, pause briefly, and then return with control. Because the knees stay on the floor, the exercise lets you load the wrists without using your full bodyweight.
In addition, Kneeling Wrist Sinkers help teach the hands, wrists, forearms, elbows, and shoulders to work together. The fingers actively grip the floor, the palms stay grounded, and the forearms stabilize the wrist joint while the shoulders guide the forward-and-back shift.
Quick Overview
| Body Part | Forearms |
|---|---|
| Primary Muscle | Wrist flexors and wrist extensors |
| Secondary Muscle | Finger flexors, hand intrinsic muscles, elbow stabilizers, anterior shoulders |
| Equipment | Bodyweight only; optional exercise mat for knee comfort |
| Difficulty | Beginner to Intermediate depending on wrist mobility and loading depth |
Sets & Reps (By Goal)
- Wrist warm-up: 1–2 sets × 8–12 slow reps before push-ups, handstands, or upper-body training.
- Mobility development: 2–3 sets × 10–15 reps with a 1–2 second pause in the forward sink.
- Forearm conditioning: 3–4 sets × 8–12 reps using a slower 3-second forward shift and controlled return.
- Handstand or calisthenics prep: 2–4 sets × 10–20 reps, staying smooth and pain-free.
- Rehab-style control: 1–3 sets × 6–10 gentle reps with reduced range and very light pressure.
Progression rule: First increase control, then increase range. After that, gradually shift slightly more bodyweight into the hands. Never progress by forcing the wrists deeper.
Setup / Starting Position
- Kneel on the floor: Place both knees on a mat or soft surface so your lower body can support part of your weight.
- Place your hands in front: Set the palms flat on the floor with the fingers spread wide for stability.
- Point the fingers forward: Keep the fingertips facing forward or slightly outward depending on wrist comfort.
- Stack the upper body: Start with your shoulders slightly behind or directly above your wrists.
- Keep the elbows long: Extend the arms without aggressively locking or hyperextending the elbows.
- Brace lightly: Keep your ribs controlled, spine neutral, and shoulders relaxed away from the ears.
- Press through the whole hand: Use the heel of the palm, base of the fingers, and fingertips evenly.
Tip: If your wrists feel stiff at the start, begin with a smaller lean and gradually increase the range over several reps.
Execution (Step-by-Step)
- Start in a stable kneeling position: Keep both hands flat, fingers spread, elbows straight, and shoulders controlled.
- Shift your body forward: Slowly move your shoulders past the wrists while keeping the palms connected to the floor.
- Let the wrists sink: Allow the wrists to move into a deeper extension angle as your bodyweight gently increases over the hands.
- Control the pressure: Keep the fingers active so the weight does not dump only into the heel of the palm.
- Pause briefly: Hold the loaded position for 1–2 seconds while breathing normally.
- Return slowly: Push lightly through the hands and shift your hips and shoulders back until wrist pressure decreases.
- Reset without collapsing: Maintain hand contact and repeat the next rep with the same slow rhythm.
Pro Tips & Common Mistakes
Pro Tips
- Spread the fingers wide: A wider hand base improves stability and reduces unnecessary wrist stress.
- Use active fingertips: Lightly gripping the floor helps control the forward sink.
- Move slowly: A controlled tempo builds better tendon tolerance than fast bouncing reps.
- Keep the elbows long: Straight arms create a clearer wrist-loading pattern.
- Breathe through the hold: Relaxed breathing prevents excessive tension in the shoulders and neck.
- Stay symmetrical: Keep both hands loaded evenly instead of shifting into your stronger side.
Common Mistakes
- Dropping forward too fast: This can overload the wrists and irritate the joint.
- Forcing end range: More range is not better if control disappears.
- Lifting the fingers: This reduces hand stability and places more pressure into the palm heel.
- Hyperextending the elbows: Locking hard into the elbows can create unnecessary joint stress.
- Shrugging the shoulders: Keep the shoulders down and controlled while the body shifts forward.
- Ignoring discomfort: Mild muscular stretch is fine; sharp pain or nerve symptoms are not.
FAQ
What are Kneeling Wrist Sinkers good for?
Kneeling Wrist Sinkers are useful for improving wrist extension tolerance, forearm strength, hand stability, and loaded wrist mobility. They are especially helpful before push-ups, handstands, crawling drills, and calisthenics work.
Where should I feel this exercise?
You should feel a controlled stretch and muscular effort around the wrists and forearms. In addition, the fingers and palms should feel active as they stabilize the floor contact. You should not feel sharp pain inside the wrist joint.
Is this exercise beginner-friendly?
Yes, it can be beginner-friendly because the knees stay on the floor and reduce the amount of bodyweight placed on the wrists. However, beginners should use a small range of motion and move slowly.
Can I use Kneeling Wrist Sinkers before handstands?
Yes. This drill is a great handstand preparation exercise because it teaches the wrists to accept pressure in extension. For best results, combine it with wrist circles, palm lifts, finger pulses, and gentle shoulder activation.
How deep should I sink into the wrists?
Sink only as far as you can control without pain, pinching, or compensation. A smaller controlled range is more effective than a deep position that feels forced.
Should my elbows bend during the movement?
No. Keep the elbows mostly straight but not aggressively locked. The goal is to load the wrists through a forward body shift, not turn the movement into a push-up.
How often can I do this exercise?
Many people can perform it 3–5 times per week at low to moderate intensity. However, if your wrists feel sore or irritated, reduce the volume and allow more recovery time.
Recommended Equipment
- Thick Exercise Mat — provides knee comfort during kneeling wrist drills.
- Workout Wrist Wraps — useful for extra wrist support during heavier upper-body sessions.
- Hand Grip Strengthener — helps build general grip and forearm strength alongside wrist work.
- Forearm Wrist Roller — strengthens wrist flexors and extensors through loaded rolling patterns.
- Push-Up Bars / Handles — helpful for people who need a neutral wrist option during pressing exercises.
Tip: Equipment is optional. For this exercise, your best tool is controlled bodyweight pressure, active fingers, and slow tempo.