Wrist Ulnar Deviator and Flexor Stretch: Form, Benefits, Sets & FAQ
Learn how to do the Wrist Ulnar Deviator and Flexor Stretch with proper form. Improve forearm flexibility, reduce wrist stiffness, and target the wrist flexors and ulnar-side forearm muscles with step-by-step guidance, tips, FAQs, and recommended equipment.
Wrist Ulnar Deviator and Flexor Stretch
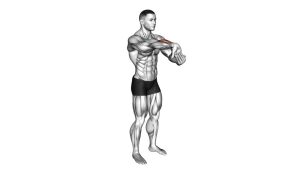
This stretch works best when performed with light, steady pressure instead of aggressive pulling. You should feel a smooth stretch along the inner forearm and toward the ulnar side near the pinky side of the wrist. The goal is to lengthen the tissues without creating joint pain, tingling, or sharp discomfort.
Quick Overview
| Body Part | Forearms |
|---|---|
| Primary Muscle | Wrist flexors, especially the flexor carpi ulnaris and related forearm flexor tissues |
| Secondary Muscle | Finger flexors, ulnar deviators, and supporting soft tissues around the wrist and forearm |
| Equipment | None |
| Difficulty | Beginner |
Sets & Reps (By Goal)
- General flexibility: 2–3 sets per side × 20–30 second hold
- Warm-up mobility: 1–2 sets per side × 10–20 second hold with gentle tension
- Post-training recovery: 2–4 sets per side × 20–40 second hold
- High-use wrist relief (typing, gripping, racquet work): 2–3 sets per side × 15–30 second hold
Progression rule: Increase hold time gradually before increasing stretch intensity. Better results usually come from consistent, relaxed holds rather than forcing a deeper range.
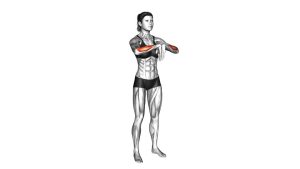
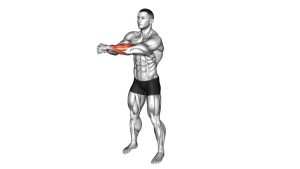
Setup / Starting Position
- Stand or sit tall: Keep your spine neutral and shoulders relaxed.
- Extend one arm forward: Straighten the elbow and bring the arm to about chest height.
- Position the hand: Turn the palm forward or slightly upward so the inner forearm is exposed.
- Use the opposite hand: Place your assisting hand across the fingers and palm of the working hand.
- Prepare for a gentle pull: Keep the elbow straight and the wrist relaxed before applying stretch pressure.
Tip: Keep the shoulder down and avoid letting the arm drift inward. A stable arm position makes the stretch more focused on the forearm.
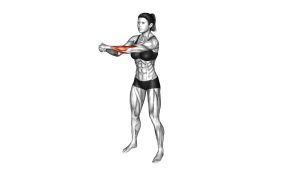
Execution (Step-by-Step)
- Lock in the arm position: Keep the elbow extended and the forearm steady in front of you.
- Pull the hand back: Use the opposite hand to gently draw the fingers and palm backward into wrist extension.
- Add a slight pinky-side angle: Guide the hand into a small amount of ulnar deviation to emphasize the ulnar-side forearm tissues.
- Hold the stretch: Maintain light, even pressure while breathing normally and keeping the shoulder relaxed.
- Release slowly: Return the hand to neutral in a controlled way and repeat on the other side.
Pro Tips & Common Mistakes
- Keep the elbow straight: A bent elbow reduces tension on the target tissues.
- Use gentle pressure: Stretching harder does not always stretch better. Stay controlled.
- Do not shrug the shoulder: Keep the neck and upper trap relaxed.
- Angle the hand slightly toward the pinky side: This helps bias the ulnar deviators instead of turning it into a basic wrist stretch only.
- Do not force finger extension aggressively: Too much pull can irritate the wrist or fingers.
- Breathe during the hold: Relaxed breathing helps reduce unnecessary tension in the forearm.
- Use after gripping sessions: This stretch fits well after curls, rows, deadlifts, climbing, martial arts, or long keyboard sessions.
FAQ
Where should I feel this stretch?
You should feel it mainly along the inner forearm and closer to the pinky-side of the wrist and forearm. The sensation should be a firm stretch, not a sharp or nerve-like feeling.
Is this the same as a normal wrist flexor stretch?
It is very similar, but the added ulnar deviation shifts more emphasis toward the ulnar-side forearm tissues, especially the muscles involved in wrist flexion and pinky-side wrist movement.
When should I do this stretch?
It works well after training, during mobility sessions, or after repetitive wrist use such as typing, gaming, manual work, racquet sports, or heavy gripping.
How hard should I pull?
Use only enough pressure to feel a mild-to-moderate stretch. A good target is around 4 to 6 out of 10 in intensity. You should still be able to breathe and relax during the hold.
Who should be cautious with this stretch?
Anyone with an acute wrist injury, recent forearm strain, nerve irritation, carpal tunnel symptoms, or unexplained hand numbness should be careful and avoid forcing range until properly evaluated.
Recommended Equipment (Optional)
- Forearm Massage Roller — useful for soft-tissue work before or after stretching tight forearms
- Hand Therapy Putty — helps strengthen the hands and forearms after mobility and rehab work
- Wrist Brace Support — can provide temporary support during periods of wrist irritation or overuse
- Massage Ball for Hands and Forearms — good for targeted release in the forearm and palm tissues
- Resistance Bands Set — useful for pairing mobility with light wrist, forearm, and upper-body strengthening work
Tip: Stretching works even better when combined with smart load management, recovery work, and gradual forearm strengthening.