Rolling Bridge Exercise: Core Control, Glute Activation & Safe Form
Learn the Rolling Bridge exercise for core control, glute activation, spinal mobility, safe setup, step-by-step form, tips, FAQs, and equipment.
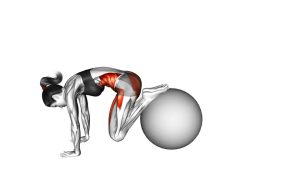
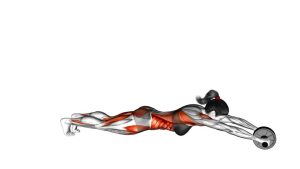
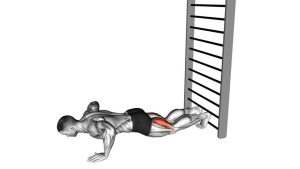
Rolling Bridge
The Rolling Bridge is useful for warm-ups, mobility sessions, Pilates-style core training, glute activation, and beginner-friendly posterior chain work. Although the movement looks simple, it requires patience and precision. First, the pelvis tilts. Then, the lower back lifts. After that, the hips rise into a controlled bridge. Finally, the spine rolls back down smoothly until the pelvis returns to the floor.
Because the exercise uses bodyweight only, it is easy to practice at home, in the gym, or during a corrective training routine. However, the goal is not to push the hips as high as possible. Instead, the goal is to control each phase without rushing, arching the lower back, gripping the neck, or using momentum from the legs.
Quick Overview
| Body Part | Core |
|---|---|
| Primary Muscle | Rectus abdominis, transverse abdominis, and glutes |
| Secondary Muscle | Hamstrings, spinal stabilizers, hip stabilizers, and lower-back stabilizers |
| Equipment | Exercise mat only; optional yoga block, towel, Pilates ball, or resistance band |
| Difficulty | Beginner to intermediate, depending on tempo and control |
Sets & Reps (By Goal)
- Mobility and spine control: 2–3 sets of 6–10 slow reps with a 2–3 second roll up and 3–4 second roll down.
- Glute activation warm-up: 2–4 sets of 10–15 reps with a brief squeeze at the top of each bridge.
- Core stability practice: 3 sets of 8–12 reps while keeping the ribs down and the pelvis controlled.
- Pilates-style control: 2–3 sets of 5–8 very slow reps, holding the top position for 3–5 seconds.
- Beginner home workout: 2 sets of 8–10 reps with comfortable range and 45–60 seconds of rest.
Progression rule: Improve control before adding difficulty. Once every rep feels smooth, increase the hold time, slow the lowering phase, or add a light resistance band above the knees.
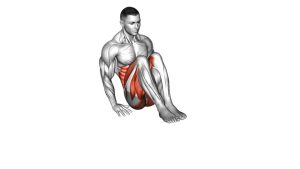
Setup / Starting Position
- Lie on your back: Place your body on a mat with your head, shoulders, spine, and pelvis supported by the floor.
- Bend the knees: Keep your feet flat and place them about hip-width apart. Your heels should be close enough that you can maintain control without cramping.
- Set the arms: Rest your arms beside your body with palms facing down. This gives you light stability without turning the exercise into an arm press.
- Relax the upper body: Keep the neck long, jaw relaxed, and shoulders away from the ears. This helps prevent unnecessary tension.
- Brace gently: Exhale slightly, draw the ribs down, and prepare the core before lifting the hips.
- Find neutral feet: Press evenly through the heels and mid-foot. Avoid rolling the feet outward or collapsing the knees inward.
A good starting position should feel stable, quiet, and controlled. If your hamstrings cramp immediately, bring the feet slightly farther away or reduce how high you lift the hips.
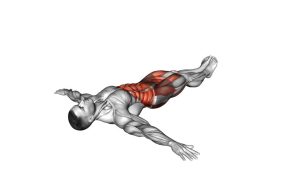
Execution (Step-by-Step)
- Start with a small pelvic tilt: Before lifting, gently tuck the pelvis so the lower back moves closer to the floor. This prepares the spine to roll instead of arch.
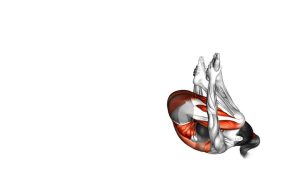
- Lift one section at a time: Begin peeling the pelvis and lower back away from the floor. Then, continue lifting through the mid-back until the hips rise into a bridge position.
- Reach the top with control: At the top, squeeze the glutes lightly and keep the ribs from flaring. Your body should feel supported, not forced into a hard lower-back arch.
- Pause briefly: Hold for 1–3 seconds while breathing calmly. During this pause, keep the knees aligned with the feet.
- Roll down slowly: Lower the upper back first, then the mid-back, then the lower back, and finally the pelvis. This controlled descent is the key part of the exercise.
- Reset before the next rep: Once the pelvis touches down, breathe, re-brace gently, and repeat with the same smooth rhythm.
Pro Tips & Common Mistakes
Pro Tips
- Move slowly: A slower tempo makes the exercise more effective because it forces the core and glutes to control each phase.
- Exhale as you lift: This helps the ribs stay down and keeps the lower back from taking over.
- Think “roll,” not “thrust”: The movement should feel like the spine is peeling from the floor, not like a fast hip drive.
- Keep the knees steady: Maintain knee alignment over the feet to improve glute engagement and protect the hips.
- Use the arms lightly: Press the palms into the floor only enough to stay balanced. Do not push the body up with the arms.
- Control the lowering phase: The descent builds awareness and strength, so avoid collapsing back onto the mat.
Common Mistakes
- Arching the lower back: This shifts tension away from the glutes and core. Keep the ribs controlled and lift only as high as you can manage.
- Lifting too fast: Fast reps usually reduce spinal control. Therefore, slow down and make every rep deliberate.
- Letting the knees collapse: If the knees fall inward, the glutes may not be stabilizing well. Keep the knees tracking forward.
- Overusing the hamstrings: If the hamstrings cramp, reduce the bridge height or adjust foot placement.
- Pressing through the toes: This often reduces glute activation. Instead, press evenly through the heels and mid-foot.
- Tensing the neck: Keep the head relaxed on the mat and avoid looking around during the rep.
FAQ
What muscles does the Rolling Bridge work?
The Rolling Bridge primarily trains the glutes, deep core, and abdominal control. In addition, it uses the hamstrings, spinal stabilizers, and hip stabilizers to support the movement.
Is the Rolling Bridge good for beginners?
Yes. The Rolling Bridge is beginner-friendly when performed slowly with a comfortable range of motion. However, beginners should focus on smooth control instead of lifting the hips very high.
Is this exercise the same as a glute bridge?
It is similar, but not exactly the same. A standard glute bridge often emphasizes hip extension. The Rolling Bridge adds more spinal articulation, which makes it useful for core control and mobility practice.
Should I feel the Rolling Bridge in my lower back?
You may feel light work around the lower-back stabilizers, but the lower back should not dominate. If you feel pinching, excessive arching, or sharp discomfort, reduce the range and focus on glute engagement.
How can I make the Rolling Bridge harder?
You can slow the lowering phase, hold the top position longer, add a mini band above the knees, or perform the movement with more precise segment-by-segment control.
How often can I do Rolling Bridges?
Most people can perform Rolling Bridges 2–4 times per week. For light mobility or warm-up work, they may also be used more often if there is no pain or excessive soreness.
Recommended Equipment
- Exercise Mat — provides cushioning for the spine, shoulders, and pelvis during floor work.
- Mini Resistance Bands — useful for adding light glute activation by placing the band above the knees.
- Pilates Ball — helpful for core control drills and beginner-friendly bridge variations.
- Yoga Block — can be used for alignment feedback or gentle support during mobility work.
- Foam Roller — useful for warm-up, hip mobility, and post-workout recovery.
Tip: Start with only a mat. Then, add tools gradually if they improve control without creating tension or discomfort.