Side Stretch Crunch: Proper Form, Oblique Benefits, Sets, Tips & FAQ
Learn the Side Stretch Crunch to train your obliques, improve core control, and build standing side-crunch strength with proper form and tips.
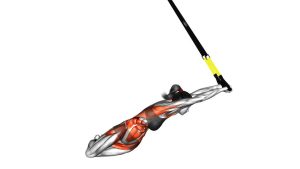
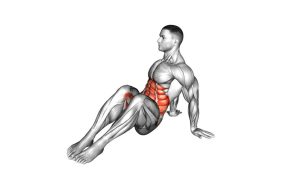
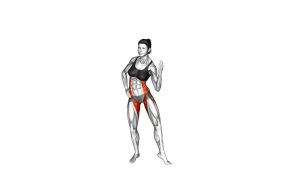
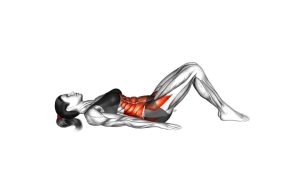
Side Stretch Crunch
This exercise is useful for beginners because it teaches the body how to contract the side abs without needing equipment. It also works well in warm-ups, home workouts, fat-loss circuits, and standing core routines. The key is not to rush the movement. Each repetition should feel smooth, balanced, and controlled.
The goal is to bring your elbow and knee toward each other by bending through the side of the torso, not by pulling on your head or swinging your leg. When performed correctly, the Side Stretch Crunch helps build better awareness of the obliques, improves trunk control, and adds a low-impact core movement to your routine.
Quick Overview
| Body Part | Obliques |
|---|---|
| Primary Muscle | Internal and external obliques |
| Secondary Muscle | Rectus abdominis, hip flexors, glute medius, quadriceps, spinal stabilizers |
| Equipment | No equipment required |
| Difficulty | Beginner |
Sets & Reps (By Goal)
- Beginner core activation: 2–3 sets of 8–12 reps per side with slow control.
- Oblique endurance: 3–4 sets of 12–20 reps per side using a steady rhythm.
- Fat-loss circuit training: 30–45 seconds per side, resting 20–40 seconds between rounds.
- Warm-up or mobility flow: 1–2 sets of 8–10 reps per side with gentle range.
- Balance and coordination work: 2–3 sets of 6–10 slow reps per side with a brief pause at the top.
Progression rule: First improve control, balance, and range of motion. Then increase reps, add a pause at peak contraction, or perform the exercise more slowly.
Setup / Starting Position
- Stand tall: Place your feet about hip-width apart and keep your weight balanced through both feet.
- Position your arms: Place one hand lightly behind your head with the elbow pointing outward.
- Relax your neck: Keep the hand behind the head as a guide only. Do not pull your head forward.
- Brace your core: Lightly tighten your midsection as if preparing for a controlled side bend.
- Set your posture: Keep your chest lifted, shoulders relaxed, and gaze forward.
- Prepare the working side: The knee and elbow on the same side will move toward each other during the crunch.
Tip: Start with a smaller range of motion if balance is difficult. A clean short rep is better than a wide, swinging rep.
Execution (Step-by-Step)
- Begin from a tall stance: Keep your ribs stacked over your hips and avoid leaning forward before the rep starts.
- Lift the knee to the side: Raise one knee upward and slightly outward while keeping the standing leg stable.
- Crunch the elbow down: Bend through the side of your torso and guide the elbow toward the rising knee.
- Contract the obliques: Pause briefly when the elbow and knee are closest together. Focus on squeezing the side of your waist.
- Avoid neck pulling: Keep the hand light behind the head. The movement should come from your torso, not your neck.
- Return with control: Lower the knee and bring your torso back to the tall starting position.
- Repeat smoothly: Complete all reps on one side, then switch sides, or alternate sides depending on your workout goal.
Pro Tips & Common Mistakes
Pro Tips
- Move slowly at first: A slower tempo helps you feel the obliques and avoid momentum.
- Keep the elbow wide: This prevents the movement from turning into a forward neck pull.
- Exhale during the crunch: Breathing out as the elbow and knee come together improves abdominal contraction.
- Use the standing leg as an anchor: Keep the standing foot planted and stable throughout the movement.
- Pause at the top: A short pause increases time under tension and improves control.
Common Mistakes
- Pulling the head: Your hand should not drag your neck downward. Keep it light and relaxed.
- Swinging the knee: Momentum reduces core tension and makes the exercise less effective.
- Leaning forward: The movement should be mostly sideways, not a forward crunch.
- Rushing the return: Lowering with control keeps the obliques active for the full rep.
- Overarching the lower back: Keep the ribs down and core lightly braced.
- Losing balance: If you wobble too much, reduce the range and slow the tempo.
FAQ
What muscles does the Side Stretch Crunch work?
The Side Stretch Crunch mainly works the obliques, which are the muscles along the sides of your waist. It also involves the rectus abdominis, hip flexors, glute medius, and lower-body stabilizers.
Is the Side Stretch Crunch good for beginners?
Yes. It is beginner-friendly because it requires no equipment and uses a simple standing pattern. Beginners should start slowly and focus on balance, posture, and controlled side bending.
Should my elbow touch my knee?
Touching is not required. The goal is to bring the elbow and knee closer while contracting the side of the waist. If forcing contact causes poor posture or neck pulling, use a smaller range of motion.
Can this exercise help reduce side belly fat?
The exercise strengthens and tones the obliques, but it does not directly burn fat from one specific area. For visible results, combine it with full-body strength training, cardio, and a consistent nutrition plan.
How many Side Stretch Crunches should I do?
A good starting point is 2–3 sets of 8–12 reps per side. As control improves, you can increase to 12–20 reps per side or use timed sets in a circuit.
Why do I feel this exercise in my hip instead of my abs?
You may be lifting the knee too aggressively or relying too much on the hip flexors. Slow down, reduce the leg lift, and focus on bending the ribs toward the hip on the working side.
Recommended Equipment
- Exercise Mat — useful for warm-ups, stretching, and floor-based core exercises after standing crunches.
- Resistance Bands Set — great for pairing with core circuits, standing rotations, and posture exercises.
- Adjustable Ankle Weights — optional progression for advanced users who can control the knee lift without swinging.
- Balance Pad — helps make standing core work more challenging by improving balance and ankle stability.
- Interval Training Timer — ideal for timed core circuits, HIIT workouts, and standing abs routines.
Tip: Equipment is optional for this exercise. Master the bodyweight version first before adding ankle weights or balance challenges.