Suspender Oblique Rollout: Form, Core Benefits, Sets & Tips
Learn the Suspender Oblique Rollout to build oblique strength, anti-rotation control, and core stability with step-by-step form tips.
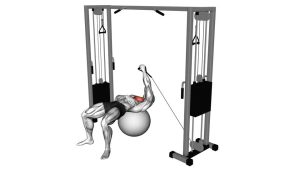
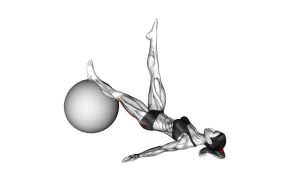
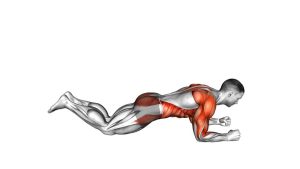
Suspender Oblique Rollout
This exercise works best when you treat every repetition like a moving plank. Because your feet are suspended, your core must stabilize against both forward extension and side-to-side rotation. As a result, the movement builds strong obliques, better trunk control, and improved full-body coordination. However, it should not feel like a lower-back exercise. If your back arches, your hips drop, or your straps swing aggressively, reduce the range of motion and rebuild control first.
Quick Overview
| Body Part | Obliques |
|---|---|
| Primary Muscle | Obliques |
| Secondary Muscle | Rectus abdominis, transverse abdominis, serratus anterior, shoulders, hip stabilizers |
| Equipment | Suspension trainer / suspender straps |
| Difficulty | Intermediate to advanced |
Sets & Reps (By Goal)
- Core control: 2–3 sets × 6–8 slow reps per side or direction.
- Oblique strength: 3–4 sets × 8–10 controlled reps with a short pause at full reach.
- Stability and anti-rotation: 3 sets × 5–8 reps using a 3-second rollout and 2-second return.
- Advanced conditioning: 3–5 sets × 10–12 reps only if your spine and hips stay fully stable.
Progression rule: First increase control, then range of motion, and finally volume. Do not add more reps if your hips rotate, your lower back arches, or your shoulders lose position.
Setup / Starting Position
- Set the straps low: Adjust the suspension trainer so the foot cradles hang close to the floor.
- Place your feet in the straps: Kneel on the floor, secure both feet, and turn into a hands-and-knees position.
- Stack the upper body: Place your hands under your shoulders with your fingers spread for a strong base.
- Brace your core: Pull the ribs down, tighten the abs, and keep the pelvis from tipping forward.
- Find a straight line: Maintain alignment from shoulders through hips to knees before starting the rollout.
A padded mat under the knees can make the setup more comfortable. In addition, it helps you focus on core tension instead of knee pressure.
Execution (Step-by-Step)
- Brace before moving: Exhale slightly, tighten your abs, and keep your shoulders packed.
- Roll forward slowly: Let your hands move forward while your suspended feet stay controlled behind you.
- Add the oblique angle: Guide the rollout slightly toward one side without letting your hips collapse or twist hard.
- Reach your safe end range: Stop when you feel strong abdominal tension but can still keep a neutral spine.
- Pause briefly: Hold the extended position for 1–2 seconds while keeping the straps quiet.
- Pull back under control: Use your core and shoulders to return to the start without snapping backward.
- Reset your plank: Re-brace before the next repetition so every rep starts with clean alignment.
Pro Tips & Common Mistakes
- Keep the ribs down: This prevents your lower back from taking over at the end range.
- Move with control: A slow rollout creates better core tension than a fast, loose repetition.
- Avoid over-rotating: The oblique bias should be controlled, not a full torso twist.
- Do not let the hips sag: Sagging usually means the rollout is too long or the core is not braced enough.
- Keep your shoulders active: Push the floor away slightly so your shoulder blades stay stable.
- Use a shorter range first: Smaller clean reps are more valuable than long sloppy reps.
- Breathe with tension: Exhale during the hardest part, but avoid fully relaxing your brace.
FAQ
What muscles does the Suspender Oblique Rollout work?
The main target is the obliques. However, the exercise also trains the rectus abdominis, transverse abdominis, serratus anterior, shoulders, and hip stabilizers because your body must resist extension and rotation at the same time.
Is the Suspender Oblique Rollout good for beginners?
It is usually better for intermediate and advanced trainees. Beginners should first master planks, dead bugs, kneeling rollouts, and basic suspension planks before adding the diagonal rollout pattern.
Why do I feel this in my lower back?
Lower-back tension often means your range is too long, your ribs are flaring, or your hips are dropping. Reduce the distance of the rollout, brace harder, and keep your pelvis slightly tucked.
Should I perform the rollout to both sides?
Yes. Training both directions helps develop balanced oblique strength and better anti-rotation control. Start with the weaker side and match the same number of quality reps on the stronger side.
How can I make this exercise easier?
Shorten the rollout, keep your knees closer to your hands, slow the tempo, or perform a regular suspension plank first. You can also practice a straight rollout before adding the oblique angle.
How can I make this exercise harder?
Increase the rollout distance, add a longer pause at full extension, slow the return phase, or move from a kneeling setup toward a more extended plank variation. Progress only when your hips and spine remain stable.
Recommended Equipment
- Suspension Trainer Straps — the main tool needed for suspended oblique rollouts and other bodyweight core exercises
- TRX-Style Suspension Trainer — useful for home, gym, and travel-based suspension workouts
- Thick Exercise Mat — provides knee comfort during kneeling rollout variations
- Push-Up Handles — can reduce wrist strain and create a stronger hand position during floor-based core drills
- Ab Wheel Roller — helpful for building rollout strength before or alongside suspension rollout progressions
Tip: Choose equipment that helps you control the movement better, not equipment that makes the exercise harder too soon. For this drill, stability and smooth strap control matter more than speed or extreme range.