Dumbbell Side Bridge: Core Stability, Oblique Strength, Form Tips & FAQ
Learn the Dumbbell Side Bridge to build oblique strength, core stability, and hip control with safe setup, form cues, sets, tips, FAQs, and gear.
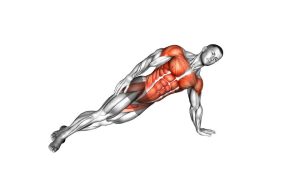
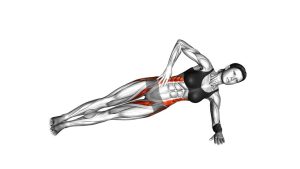
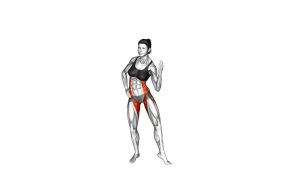
Dumbbell Side Bridge
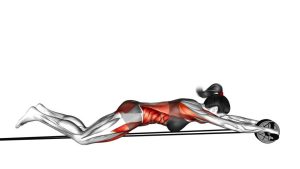
This exercise works best when the body stays long, stacked, and quiet. Therefore, the elbow should stay under the shoulder, the feet should remain stacked, and the hips should stay lifted without sagging. In addition, the dumbbell should be held securely on the upper hip with the top hand so the load increases core demand without causing twisting.
Quick Overview
| Body Part | Core |
|---|---|
| Primary Muscle | Obliques |
| Secondary Muscle | Transverse abdominis, glutes, quadratus lumborum, shoulder stabilizers |
| Equipment | Dumbbell and exercise mat |
| Difficulty | Intermediate |
Sets & Reps (By Goal)
- Core endurance: 2–4 sets × 20–40 seconds per side with a light-to-moderate dumbbell.
- Oblique strength: 3–5 sets × 10–25 seconds per side with a controlled heavier load.
- Stability training: 2–3 sets × 15–30 seconds per side while keeping perfect alignment.
- Beginner progression: 2–3 sets × 10–20 seconds per side using bodyweight first.
Progression rule: Increase hold time before increasing weight. Once you can hold both sides with clean posture, add a small amount of load and rebuild control.
Setup / Starting Position
- Lie on your side: Place your lower forearm on the floor with the elbow directly under the shoulder.
- Stack your legs: Keep both legs extended and place the top foot directly over the bottom foot.
- Place the dumbbell: Rest the dumbbell on the upper hip and secure it with your top hand.
- Brace before lifting: Tighten your abs gently, squeeze the glutes, and keep the ribs stacked over the pelvis.
- Lift into position: Raise the hips until your body forms a straight line from head to feet.
Tip: If stacking the feet feels unstable, slightly stagger the feet while learning the movement. However, keep the hips square and lifted.
Execution (Step-by-Step)
- Set the shoulder: Press the forearm into the floor and keep the shoulder away from the ear.
- Lift the hips: Raise your hips until the body forms one long diagonal line.
- Hold the dumbbell steady: Keep the dumbbell on the upper hip and prevent it from sliding or pulling you forward.
- Brace the side core: Maintain tension through the obliques so the waist does not sink toward the floor.
- Keep the neck neutral: Look forward and avoid dropping or twisting the head.
- Hold for time: Breathe slowly while maintaining the same body position from start to finish.
- Lower with control: Bring the hips down only after the target time is complete.
Pro Tips & Common Mistakes
- Keep the hips high: The most common mistake is letting the hips sag as fatigue builds.
- Do not rotate forward: Keep the chest, hips, knees, and feet stacked as much as possible.
- Use the top hand wisely: Hold the dumbbell in place, but do not pull your torso out of alignment.
- Press the floor away: A strong forearm press helps protect the shoulder and improve stability.
- Breathe through the brace: Avoid holding your breath for the entire set.
- Choose smart loading: A lighter dumbbell with perfect posture is better than a heavy dumbbell with hip drop.
- Train both sides evenly: Since this is a side-to-side core exercise, match time and quality on each side.
FAQ
What muscles does the Dumbbell Side Bridge work?
The Dumbbell Side Bridge primarily works the obliques. It also trains the transverse abdominis, quadratus lumborum, glutes, hip stabilizers, and shoulder stabilizers.
Is the Dumbbell Side Bridge the same as a weighted side plank?
Yes, it is very similar. In this version, the dumbbell rests on the upper hip while you hold a side plank position. As a result, the load increases the demand on the side core.
How heavy should the dumbbell be?
Start light. A dumbbell that allows you to hold a straight body line for 20–30 seconds is usually a better choice than a heavier weight that causes rotation or hip drop.
Should I move my hips up and down?
In the version shown, the exercise is an isometric hold. Therefore, you keep the hips lifted and steady instead of performing repeated hip dips.
Why do I feel this in my shoulder?
Some shoulder stabilization is normal. However, if the shoulder feels painful or unstable, check that your elbow is under your shoulder, press the forearm into the floor, and reduce the load.
Can beginners do this exercise?
Beginners should first master the bodyweight side bridge. After that, they can add a light dumbbell once they can hold the position without sagging, twisting, or losing shoulder control.
Recommended Equipment
- Hex Dumbbell — ideal for adding stable resistance on the upper hip.
- Adjustable Dumbbells — useful for gradually progressing the load over time.
- Thick Exercise Mat — adds comfort under the forearm and side of the foot.
- Non-Slip Yoga Mat — helps prevent sliding during the side bridge hold.
- Workout Interval Timer — helps track timed holds accurately on each side.
Tip: Choose equipment that improves control and consistency. If any tool makes your position unstable, reduce the load or return to bodyweight.