Lying Leg Hip Raise on Floor: Form, Sets, Core Tips & FAQ
Learn the Lying Leg Hip Raise on Floor to train abs, hip flexors, and pelvic control with step-by-step form, sets, tips, FAQs, and gear.
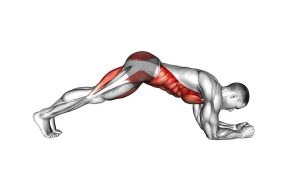
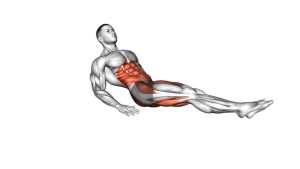
Lying Leg Hip Raise on Floor
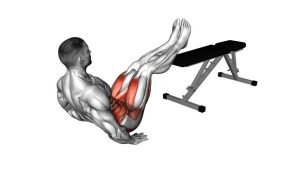
This movement combines a leg raise pattern with a reverse-crunch-style hip lift. First, the legs hover above the floor. Then, the knees bend toward the torso before the hips curl upward. Finally, the body returns with control until the legs extend again. Because the hips lift at the top, the abs must work harder to control the pelvis instead of simply swinging the legs.
Quick Overview
| Body Part | Abs |
|---|---|
| Primary Muscle | Rectus abdominis |
| Secondary Muscle | Hip flexors, lower abs region, deep core stabilizers, obliques for control |
| Equipment | No equipment required; optional exercise mat for comfort |
| Difficulty | Beginner to intermediate, depending on leg height and control |
Sets & Reps (By Goal)
- Core control: 2–3 sets × 8–12 slow reps, resting 45–60 seconds between sets.
- Ab strength: 3–4 sets × 10–15 reps with a controlled hip lift at the top.
- Beginner practice: 2 sets × 6–10 reps with a smaller tuck and shorter leg extension.
- Home ab workout finisher: 2–3 sets × 12–20 reps, only if form stays clean.
Progression rule: Add reps only after you can lower your legs without arching your lower back. After that, increase the pause at the top or extend the legs slightly farther from the body.
Setup / Starting Position
- Lie on your back: Position your body flat on the floor with your head relaxed and your gaze upward.
- Place your arms beside you: Keep your palms down on the floor so they can help stabilize your body.
- Set your legs: Extend both legs forward and let them hover slightly above the ground.
- Brace your core: Lightly tighten your abs before the first rep so your pelvis stays controlled.
- Keep the movement compact: Start with a range you can control instead of forcing the legs too low.
Tip: If the floor feels uncomfortable, use a firm exercise mat. However, avoid a very soft surface because it can make pelvic control harder.
Execution (Step-by-Step)
- Start with the legs extended: Keep both legs hovering above the floor while your arms stay planted beside your body.
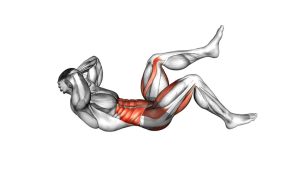
- Bend the knees inward: Draw your knees toward your torso in a smooth, controlled motion.
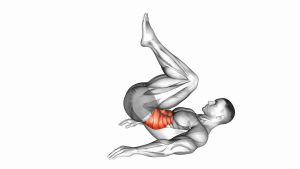
- Lift the hips: As the knees come closer, curl your pelvis upward and raise your hips slightly off the floor.
- Squeeze at the top: Pause briefly while your abs stay tight and your lower back rounds gently.
- Lower with control: Bring your hips back down first, then move your legs away from your body.
- Return to the hover: Extend your legs again without dropping your feet heavily to the floor.
Pro Tips & Common Mistakes
- Move slowly: A slower tempo keeps tension on the abs and reduces swinging.
- Lift the hips, not just the legs: The visible hip raise is the key feature of this exercise.
- Keep your arms supportive: Press the palms lightly into the floor, but do not push so hard that the abs stop working.
- Avoid dropping the legs: Lower with control so your lower back does not arch away from the floor.
- Do not rush the tuck: Bring the knees in smoothly before curling the hips upward.
- Keep your neck relaxed: Avoid pulling the head forward or straining through the jaw.
- Use a smaller range when needed: If control breaks, shorten the leg extension and rebuild clean reps.
FAQ
What muscles does the lying leg hip raise on floor work?
It mainly works the rectus abdominis, especially during the hip lift. In addition, the hip flexors help move the legs, while the deep core and obliques assist with stability and pelvic control.
Is this exercise the same as a reverse crunch?
It is similar, but the visible movement includes a leg extension and hover before the knees tuck in and the hips lift. Because of that, it feels like a combination of a lying leg raise and a reverse crunch.
Should my hips come off the floor?
Yes. A small hip lift is part of the exercise. However, the lift should come from abdominal control, not from kicking the legs or swinging the body upward.
Why does my lower back arch during the lowering phase?
Your legs may be extending too far or lowering too close to the floor. Therefore, keep the range smaller, brace your abs, and stop the lowering phase before your back starts to arch.
Is the lying leg hip raise good for beginners?
It can be beginner-friendly when performed with a short range of motion. Beginners should focus on slow reps, controlled hip lifts, and clean lowering instead of high repetitions.
Recommended Equipment (Optional)
- Exercise Mat — adds floor comfort for the spine, hips, and elbows during core training
- Thick Yoga Mat — useful if you need extra cushioning for lying floor exercises
- Non-Slip Fitness Mat — helps keep your body stable while the legs move in and out
- Adjustable Ankle Weights — optional advanced progression only after bodyweight reps are controlled
- Core Sliders — useful for related core progressions and controlled floor-based ab work
Tip: Equipment is optional for this exercise. Still, a stable mat can make the movement more comfortable and help you focus on clean abdominal control.