Lever Trunk Rotation: Proper Form, Core Muscles, Sets, Tips & FAQ
Learn lever trunk rotation form to train obliques, core control, and trunk rotation safely with setup cues, reps, mistakes, FAQs, and gear.
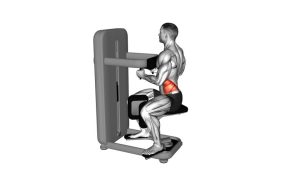
Lever Trunk Rotation
This exercise works best when the torso rotates as one controlled unit. Because the machine helps stabilize the body, it can make rotational core training easier to learn than free-standing twisting drills. However, control still matters. Therefore, use a smooth tempo, avoid bouncing at the end range, and keep the movement focused through the midsection.
Quick Overview
| Body Part | Core |
|---|---|
| Primary Muscle | Obliques |
| Secondary Muscle | Rectus abdominis, transverse abdominis, spinal stabilizers |
| Equipment | Lever trunk rotation machine / seated torso rotation machine |
| Difficulty | Beginner to Intermediate |
Sets & Reps (By Goal)
- Beginner control: 2–3 sets × 10–12 reps per side with light resistance and slow tempo.
- Core endurance: 3–4 sets × 12–20 reps per side with steady breathing and no swinging.
- Strength focus: 3–5 sets × 8–12 reps per side using moderate resistance while keeping full control.
- Warm-up activation: 1–2 sets × 8–10 reps per side before rotational training or upper-body sessions.
Progression rule: First improve control and symmetry. Then increase resistance gradually only when every rep stays smooth, centered, and free from hip shifting.
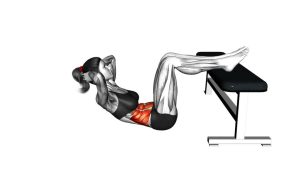
Setup / Starting Position
- Sit on the machine: Position yourself upright with your back supported and torso aligned with the machine’s rotation path.
- Secure the lower body: Keep your hips, thighs, and feet stable so the movement comes from the trunk rather than the legs.
- Set the resistance: Choose a light to moderate load that lets you rotate without jerking or forcing the range.
- Grip the handles: Hold the machine handles or pads firmly enough to stay connected, but do not yank with the arms.
- Brace gently: Keep the ribs controlled, spine tall, and shoulders relaxed before the first rotation.
Tip: If you are new to the exercise, start with a smaller range of motion. Then expand the range only if the torso remains controlled.
Execution (Step-by-Step)
- Start from center: Sit tall and face forward with the lower body fixed against the machine.
- Rotate to one side: Turn the torso slowly while keeping the hips stable and the chest moving with the machine.
- Control the end range: Stop at a comfortable point without bouncing, forcing, or twisting aggressively.
- Return to center: Rotate back with the same smooth tempo instead of letting the weight pull you back.
- Repeat to the opposite side: Move through the same controlled pattern while keeping the movement symmetrical.
Pro Tips & Common Mistakes
- Rotate through the trunk: Let the torso turn as one unit instead of pulling only with the arms.
- Avoid momentum: Swinging makes the movement easier, but it reduces core control and increases unnecessary strain.
- Keep the hips fixed: If the pelvis rotates with the torso, the exercise becomes less focused on the obliques.
- Use a moderate range: More rotation is not always better. A clean range is safer and more effective.
- Control both directions: The return phase matters as much as the twist, so do not let the machine snap back.
- Breathe steadily: Exhale gently during rotation and avoid holding your breath for the entire rep.
- Do not overload too soon: Heavy weight can cause compensation through the shoulders, hips, or lower back.
FAQ
What muscles does the lever trunk rotation work?
The main target is the obliques. In addition, the rectus abdominis, transverse abdominis, and spinal stabilizers help control the torso during the rotation.
Is the lever trunk rotation good for beginners?
Yes, it can be beginner-friendly when performed with light resistance and controlled range. Because the machine stabilizes the lower body, it helps beginners learn trunk rotation without needing advanced balance.
Should I rotate as far as possible?
No. Rotate only through a comfortable, controlled range. Forcing the end range can shift stress away from the obliques and into the lower back or hips.
Why do I feel this in my lower back?
You may be using too much weight, rotating too far, or moving with momentum. Reduce the load, slow the tempo, and keep the hips fixed while the trunk rotates smoothly.
How many times per week should I do lever trunk rotations?
Most people can train this exercise 2–3 times per week as part of a core routine. However, recovery, exercise selection, and training volume should guide the final frequency.
Recommended Equipment (Optional)
- Torso Rotation Machine — useful for dedicated seated rotational core training.
- Adjustable Ab Bench — helpful for building a complete core training setup.
- Resistance Bands Set — practical for standing rotational drills and anti-rotation core work.
- Exercise Mat — useful for floor-based core exercises after machine work.
- Medicine Ball — great for progressing rotational strength with controlled dynamic drills.
Tip: Equipment should support better control, not heavier twisting. If a tool encourages speed or strain, reduce the difficulty and return to cleaner movement.