Sitting Side Crunch: Form, Oblique Benefits, Sets, Tips & FAQ
Learn the Sitting Side Crunch to train obliques, abs, and seated core control with step-by-step form, sets, mistakes, FAQs, and equipment.
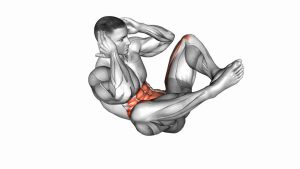
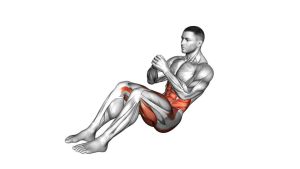
Sitting Side Crunch
This movement works best when each repetition is performed with control, balance, and a small but clear side-crunch action. Because the legs stay lifted, the abs must stabilize the pelvis while the obliques shorten one side of the torso. As a result, the exercise can build waist control, seated core endurance, and better awareness of lateral trunk movement.
Quick Overview
| Body Part | Core |
|---|---|
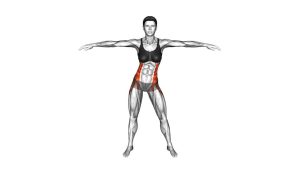
| Primary Muscle | Obliques |
| Secondary Muscle | Rectus abdominis, transverse abdominis, hip flexors |
| Equipment | None |
| Difficulty | Beginner to intermediate, depending on leg height and control |
Sets & Reps (By Goal)
- Beginner control: 2–3 sets × 8–10 reps per side, slow tempo, 45–60 sec rest.
- Core endurance: 3–4 sets × 12–16 reps per side, controlled rhythm, 45 sec rest.
- Oblique focus: 3 sets × 10–12 reps per side with a 1-second squeeze at each side.
- Finisher: 2–3 rounds × 30–40 seconds, alternating sides without rushing.
Progression rule: First improve control and balance. Then increase reps, extend time under tension, or lift the legs slightly higher only if your lower back stays comfortable.
Setup / Starting Position
- Sit on the floor: Start in a seated position with your torso slightly leaned back.
- Lift the legs: Bend the knees and keep the feet lightly elevated if you can maintain control.
- Place the hands near the head: Keep the elbows open, but do not pull the neck forward.
- Brace the abs: Keep the ribs controlled and avoid collapsing through the lower back.
- Find balance: Stay tall enough to move side to side without rocking backward.
If balance feels too difficult, place the heels lightly on the floor and master the same side-crunch pattern first.
Execution (Step-by-Step)
- Start centered: Sit with your chest lifted, abs braced, and legs stable.
- Crunch to one side: Bend the torso sideways and bring one elbow toward the same-side hip.
- Squeeze briefly: Pause for a moment when the side of your waist shortens.
- Return to center: Move back smoothly without dropping the legs or relaxing the core.
- Switch sides: Repeat the same side-bending action toward the opposite hip.
- Continue alternating: Keep each rep controlled and even from side to side.
Pro Tips & Common Mistakes
- Move from the waist: Let the obliques create the side bend instead of swinging the elbows.
- Keep the legs steady: If the legs bounce too much, lower the feet or reduce the rep speed.
- Do not pull the head: Hands should stay light near the head, while the neck remains neutral.
- Avoid rushing: Fast reps often reduce oblique tension and increase momentum.
- Stay slightly leaned back: This keeps the abs engaged throughout the set.
- Control the return: The center position is part of the rep, so avoid collapsing between sides.
- Use a smaller range if needed: Clean side bending is better than forcing a big motion.
FAQ
What muscles does the Sitting Side Crunch work?
The Sitting Side Crunch mainly works the obliques. However, the rectus abdominis, transverse abdominis, and hip flexors also help stabilize the body while the legs remain elevated.
Is the Sitting Side Crunch good for beginners?
Yes, it can be beginner-friendly when performed slowly. However, beginners may keep the heels lightly on the floor until balance and core control improve.
Should I twist or side bend during this exercise?
Based on the visible movement, the exercise is mostly a side-bending crunch. Therefore, focus on bringing the elbow toward the same-side hip instead of rotating aggressively.
Why do my hip flexors work during Sitting Side Crunches?
Your hip flexors may work because the legs stay elevated. To reduce hip flexor tension, lower the feet, bend the knees more, or perform fewer reps with better control.
How can I make the Sitting Side Crunch harder?
You can slow the tempo, pause longer at each side, increase reps, or keep the feet higher. However, only progress when your lower back stays stable and pain-free.
Recommended Equipment (Optional)
- Exercise Mat — provides floor comfort and better support during seated core exercises.
- Thick Yoga Mat — useful if your tailbone or lower back feels uncomfortable on hard floors.
- Core Sliders — helpful for adding other oblique and ab variations to your routine.
- Mini Resistance Bands — useful for pairing seated core work with hip and glute activation.
- Ab Workout Mat — supports repeated core sessions and improves comfort during floor training.
Tip: Equipment is optional for this exercise. A comfortable mat is usually the most useful choice because the movement is performed seated on the floor.