Low Plank Alternating Leg Raise: Form, Core Benefits, Sets & Tips
Learn the Low Plank Alternating Leg Raise for core stability, glute activation, and better plank control with form tips, sets, mistakes, and FAQs.
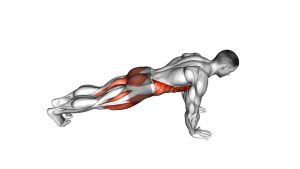
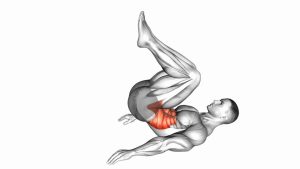
Low Plank Alternating Leg Raise
This exercise works best when the movement is slow, smooth, and controlled. Your forearms stay planted, your elbows remain under your shoulders, and your body forms a strong line from head to heels. Each leg raise should come from the glute, while the abs and obliques resist rotation. If your hips sway side to side or your lower back starts to dip, reduce the leg height and focus on better tension.
Quick Overview
| Body Part | Core |
|---|---|
| Primary Muscle | Rectus abdominis, transverse abdominis, and gluteus maximus |
| Secondary Muscle | Obliques, hamstrings, hip stabilizers, shoulders, and lower-back stabilizers |
| Equipment | No equipment required; optional exercise mat for elbow comfort |
| Difficulty | Beginner to Intermediate, depending on plank strength and hip control |
Sets & Reps (By Goal)
- Core endurance: 2–4 sets × 8–12 leg raises per side with a slow, steady tempo.
- Glute activation: 2–3 sets × 10–15 reps per side, lightly squeezing the glute at the top.
- Anti-rotation control: 3–4 sets × 6–10 reps per side with a 1–2 second pause at the top.
- Beginner strength practice: 2–3 sets × 5–8 reps per side, resting when plank form breaks.
- Workout finisher: 2 rounds × 30–45 seconds, alternating legs while keeping hips level.
Progression rule: First improve control, then add reps, then add hold time. Do not progress by lifting the leg higher if it causes lower-back arching.
Setup / Starting Position
- Start on the floor: Place your forearms on the ground with elbows directly under your shoulders.
- Set your plank: Extend both legs behind you and balance on your toes.
- Align your body: Keep your head, ribs, hips, knees, and heels in one long line.
- Brace your core: Pull the ribs slightly down and tighten your abs as if preparing for a light punch.
- Set your feet: Keep feet about hip-width apart for stability. Narrow feet make the movement harder.
- Relax the neck: Look slightly ahead of your hands so your neck stays neutral.
Setup checkpoint: Before lifting a leg, make sure your hips are not sagging and your shoulders are not drifting behind your elbows.
Execution (Step-by-Step)
- Brace first: Tighten your core and squeeze your glutes lightly before moving.
- Lift one leg: Raise one straight leg a few inches off the floor by squeezing the glute.
- Keep the knee extended: Avoid bending the knee or turning the movement into a hamstring curl.
- Control the hips: Keep both hip bones facing the floor. Do not rotate open to the side.
- Pause briefly: Hold the top position for 1 second while keeping your lower back neutral.
- Lower slowly: Return the foot to the floor without dropping or bouncing.
- Switch sides: Repeat with the opposite leg while keeping the same plank position.
Pro Tips & Common Mistakes
- Lift with the glute, not the lower back: Think about pushing the heel back and slightly up.
- Keep the leg lift small: A moderate lift is better than a high kick that arches the spine.
- Do not let the hips rotate: Keep the pelvis square to the floor throughout every rep.
- Avoid sagging: If your hips drop, shorten the set or widen your feet for more stability.
- Keep elbows stacked: Elbows should stay under shoulders to reduce shoulder strain.
- Control your breathing: Exhale gently during the lift and breathe steadily through the hold.
- Use a mat if needed: Forearm discomfort can distract from proper core engagement.
- Do not rush alternating reps: Reset your plank briefly before lifting the opposite leg.
FAQ
What muscles does the Low Plank Alternating Leg Raise work?
It mainly works the core and glutes. The abs and obliques stabilize the torso, while the gluteus maximus lifts the leg. The shoulders, hamstrings, and hip stabilizers also assist.
Is this exercise good for abs?
Yes. It is especially effective for core stability because your abs must resist movement while your leg lifts. It trains the core to stay strong during hip movement.
Should I lift my leg as high as possible?
No. Lifting too high often causes lower-back arching. Raise the leg only as high as you can while keeping your hips level and spine neutral.
Why do I feel this in my lower back?
You may be lifting too high, losing your brace, or allowing your hips to sag. Reduce the range of motion and focus on squeezing the glute instead of arching the back.
Is this beginner-friendly?
It can be beginner-friendly if you already have a basic forearm plank. Beginners should use shorter sets, wider feet, and smaller leg lifts until core control improves.
How can I make the exercise easier?
Widen your feet, lift the leg lower, perform fewer reps, or hold a standard low plank first before adding leg raises.
How can I make it harder?
Add a longer pause at the top, slow the lowering phase, narrow your foot stance, or use ankle weights only after you can maintain perfect plank alignment.
Recommended Equipment
- Exercise Mat — provides forearm and elbow comfort during plank-based core exercises.
- Adjustable Ankle Weights — useful for advanced progression once plank control is strong and stable.
- Resistance Loop Bands — helpful for glute activation drills that pair well with plank leg raises.
- Core Sliders — useful for progressing plank variations and anti-rotation core training.
- Foam Roller — supports warm-ups and recovery for hips, glutes, hamstrings, and lower back.
Tip: Equipment is optional. Master the bodyweight version first before adding ankle weights or harder plank variations.