Knee Touch Crunch: Proper Form, Core Benefits, Sets, Tips & FAQ
Learn the Knee Touch Crunch to strengthen your abs with safe form, controlled reps, setup tips, common mistakes, FAQs, and core equipment.
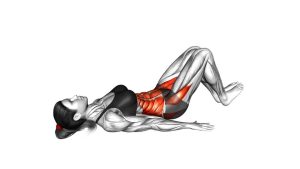
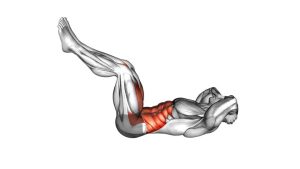
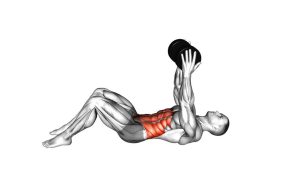
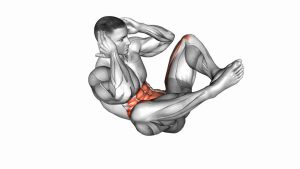
Knee Touch Crunch
This exercise works best when every repetition is slow, controlled, and intentional. Because the movement is small, the goal is not to sit all the way up. Instead, lift the shoulders off the floor, reach toward the knees, briefly squeeze the abs, and then return with control. As a result, the exercise can be a useful option for beginners, home workouts, warm-ups, or high-rep core finishers.
Quick Overview
| Body Part | Core |
|---|---|
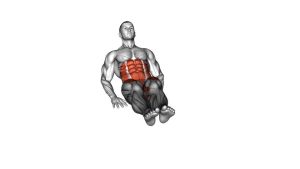
| Primary Muscle | Rectus abdominis |
| Secondary Muscle | Obliques, deep core stabilizers, hip flexors lightly for position support |
| Equipment | No equipment required; exercise mat optional |
| Difficulty | Beginner |
Sets & Reps (By Goal)
- Beginner core practice: 2–3 sets × 8–12 reps with slow control
- Ab endurance: 3–4 sets × 15–25 reps with steady breathing
- Warm-up activation: 1–2 sets × 10–15 reps before a core or lower-body session
- Core finisher: 2–3 rounds × 20–30 seconds with clean form
Progression rule: First improve control and breathing. Then add reps, extend the top squeeze, or slow the lowering phase before increasing total volume.
Setup / Starting Position
- Lie on your back: Start flat on the floor or on an exercise mat.
- Bend your knees: Place both feet on the floor with the knees pointing upward.
- Reach your arms forward: Extend your hands toward your knees without locking your shoulders aggressively.
- Set your spine: Keep the lower back comfortable and avoid excessive arching before you begin.
- Relax the neck: Keep the head in line with the upper body and avoid yanking the chin toward the chest.
Tip: Before the first rep, exhale gently and brace the abs. This makes it easier to lift with the core instead of leading with the neck.
Execution (Step-by-Step)
- Begin from the floor: Keep your knees bent, feet planted, and arms reaching toward the knees.
- Exhale and curl upward: Lift your head, shoulders, and upper back slightly off the floor.
- Reach toward the knees: Move your hands closer to the knees without swinging the arms for momentum.
- Squeeze briefly: Pause at the top and feel the abs contract.
- Lower with control: Return the shoulders and head toward the floor slowly instead of dropping down.
- Reset smoothly: Keep the feet planted and repeat with the same controlled rhythm.
Pro Tips & Common Mistakes
- Use your abs first: Start the lift by curling the upper spine, not by throwing the arms forward.
- Keep the feet planted: Stable legs help the core work more consistently throughout each rep.
- Avoid neck pulling: Since the hands reach forward, keep the neck relaxed and let the abs create the lift.
- Do not rush the lowering phase: Control the descent so the abs stay active on the way down.
- Limit the range if needed: A smaller lift with clean tension is better than a higher lift with strain.
- Breathe on every rep: Exhale as you crunch up, then inhale as you return to the start.
- Do not bounce: Bouncing reduces tension and can make the movement less effective.
FAQ
What muscles does the Knee Touch Crunch work?
The Knee Touch Crunch mainly trains the rectus abdominis, which is the front abdominal muscle responsible for trunk flexion. Additionally, the obliques and deeper core muscles help stabilize the torso during the movement.
Is the Knee Touch Crunch good for beginners?
Yes. Because it uses a short range of motion and requires no equipment, it is beginner-friendly. However, beginners should move slowly, keep the neck relaxed, and stop before form breaks down.
Should my hands touch my knees every rep?
Touching the knees can be a useful target, but it is not required if it causes strain. Instead, focus on lifting the shoulders and upper back with control while reaching toward the knees.
Is this the same as a sit-up?
No. A sit-up lifts much more of the torso from the floor. In contrast, the Knee Touch Crunch uses a smaller movement that emphasizes upper-spine flexion and abdominal contraction.
Why do I feel this in my neck?
Neck tension usually happens when the head leads the movement or when the reps are rushed. To fix this, reduce the range, exhale before lifting, and imagine the ribs curling toward the pelvis.
How can I make the Knee Touch Crunch harder?
You can slow the lowering phase, pause longer at the top, increase reps, or add a light resistance band only after your basic form is stable and pain-free.
Recommended Equipment (Optional)
- Exercise Mat — adds comfort and support for floor-based crunches and core workouts
- Ab Mat — supports the lower back during controlled abdominal training
- Non-Slip Yoga Mat — helps keep the body stable during repeated floor reps
- Resistance Bands Set — useful for future core progressions and full-body warm-up work
- Foam Roller — helpful for recovery, mobility work, and pre-workout preparation
Tip: Equipment is optional for this exercise. However, a comfortable mat can make floor crunches easier to perform consistently.