Hollow Body 45 Degrees: Core Form, Sets, Tips & FAQ
Learn the Hollow Body 45 Degrees to build strong abs, core control, and anti-extension strength with safe form, sets, tips, FAQs, and gear.
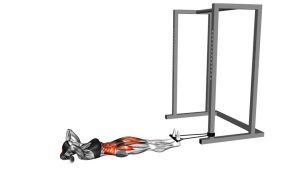
Hollow Body 45 Degrees
This exercise works best when the body stays long, tight, and controlled. The goal is not to lift the legs as low as possible; instead, the goal is to keep the ribs down, pelvis tucked, and lower back flat. Therefore, a higher leg angle is better than a low leg position if your back starts to arch.
Quick Overview
| Body Part | Core |
|---|---|
| Primary Muscle | Rectus abdominis |
| Secondary Muscle | Transverse abdominis, obliques, hip flexors, quadriceps, and shoulder stabilizers |
| Equipment | No equipment required; optional exercise mat |
| Difficulty | Intermediate |
Sets & Reps (By Goal)
- Core endurance: 3–4 sets × 20–40 seconds, resting 45–75 seconds between sets.
- Beginner control: 2–3 sets × 10–20 seconds with bent knees or slightly higher legs.
- Calisthenics strength: 4–5 sets × 20–45 seconds while maintaining full-body tension.
- Warm-up activation: 2 sets × 10–20 seconds before plank work, leg raises, or gymnastics training.
- Advanced progression: 3–5 sets × 30–60 seconds only if the lower back stays firmly pressed down.
Progression rule: First increase hold time. Then straighten the legs more fully, lower the legs slightly, or extend the arms farther overhead. However, never progress if your lower back arches.
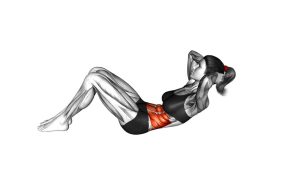
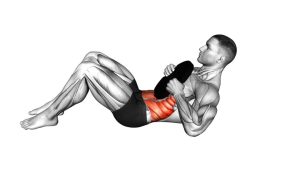
Setup / Starting Position
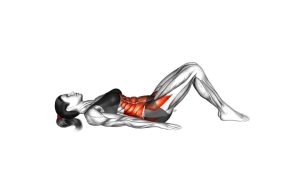
- Lie on your back: Use a flat surface or exercise mat so your spine can stay supported.
- Set your pelvis: Gently tuck the pelvis by pulling the ribs down and pressing the lower back into the floor.
- Lift the shoulders: Raise the upper back slightly so the abs stay engaged without pulling hard on the neck.
- Extend the arms: Reach the arms overhead while keeping the shoulders away from the ears.
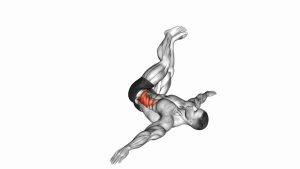
- Raise the legs: Extend both legs at about a 45-degree angle, then lock in the hollow shape before starting the hold.
If the full position feels too hard, bend the knees or raise the legs higher. This keeps the core working without placing extra stress on the lower back.
Execution (Step-by-Step)
- Brace first: Exhale gently, pull the ribs down, and flatten the lower back against the floor.
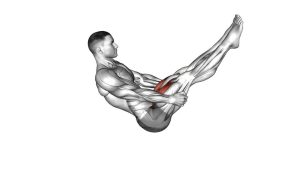
- Create the hollow shape: Lift the head, shoulders, arms, and legs while keeping the body long.
- Hold the 45-degree position: Keep the legs extended and elevated without letting the lower back arch.
- Breathe with control: Take short, steady breaths while maintaining abdominal tension.
- Finish cleanly: Lower the legs and shoulders slowly instead of dropping out of the position.
Pro Tips & Common Mistakes
- Keep the ribs down: This helps prevent the chest from flaring and the lower back from arching.
- Do not chase a lower leg angle: Although lower legs increase difficulty, they also increase the chance of losing core position.
- Relax the neck: Look slightly upward and avoid forcing the chin into the chest.
- Point the toes and squeeze the quads: This creates better full-body tension and cleaner alignment.
- Use controlled breathing: Holding your breath may make the position feel stronger at first, but it usually reduces endurance.
- Scale before you fail: Bent knees, higher legs, or arms by the sides are better than a sloppy full hollow hold.
- Avoid rocking: The position should stay still, stable, and deliberate from start to finish.
FAQ
What muscles does the Hollow Body 45 Degrees work?
It mainly works the rectus abdominis, while the transverse abdominis and obliques help stabilize the pelvis and ribs. Additionally, the hip flexors, quads, and shoulder stabilizers assist with maintaining the extended body position.
Is the Hollow Body 45 Degrees good for beginners?
It can be challenging for beginners. However, beginners can perform it safely by bending the knees, keeping the legs higher, or shortening the hold time. Once the lower back stays flat, the exercise can gradually become harder.
Where should I feel this exercise?
You should feel strong tension through the front of the core, especially the abs. You may also feel some hip flexor involvement. However, the lower back should not feel pinched or overloaded.
Why does my lower back arch during hollow body holds?
Your lower back usually arches when the variation is too difficult or when the ribs are not pulled down. To fix it, raise the legs, bend the knees, or place the arms by your sides until your core control improves.
How long should I hold the Hollow Body 45 Degrees?
Most people should start with 10–20 seconds. Then, as control improves, they can progress toward 30–45 seconds. Quality matters more than duration, so stop the set before your form breaks.
Recommended Equipment (Optional)
- Exercise Mat — adds comfort and support for floor-based core training.
- Thick Yoga Mat — useful if your lower back or tailbone feels uncomfortable on hard floors.
- Ab Mat — helpful for additional core drills and controlled abdominal training.
- Mini Resistance Bands — useful for pairing hollow holds with glute and hip stability work.
- Core Sliders — great for progressing into body saws, plank slides, and advanced anti-extension drills.
Tip: Equipment is optional for this exercise. Nevertheless, a comfortable mat can make the hold easier to practice consistently and safely.