Standing Tilt and Extend: Oblique Exercise for Core Control
Learn the Standing Tilt and Extend to train obliques, improve lateral core control, and build better trunk stability with safe form tips.
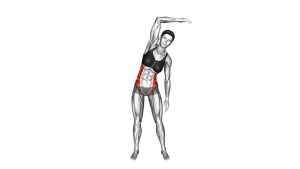
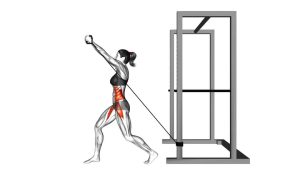
Standing Tilt and Extend
This movement is useful for beginners who want a simple standing core drill, but it also works well as a warm-up for athletes who need better trunk control. The exercise should feel clean and balanced from side to side. You should feel the working side of the waist contract while the opposite side gently lengthens.
Quick Overview
| Body Part | Core |
|---|---|
| Primary Muscle | Obliques |
| Secondary Muscle | Rectus abdominis, transverse abdominis, spinal stabilizers, hip stabilizers |
| Equipment | No equipment required |
| Difficulty | Beginner |
Sets & Reps (By Goal)
- Beginner core activation: 2–3 sets × 8–12 reps per side with slow control.
- Oblique endurance: 3–4 sets × 12–20 reps per side using a steady rhythm.
- Warm-up or mobility prep: 1–2 sets × 8–10 reps per side before core or full-body training.
- Posture and trunk awareness: 2–3 sets × 6–10 reps per side with a 1–2 second pause at the side bend.
Progression rule: First improve control, breathing, and range. Add more reps only when you can keep the hips stable and the torso moving strictly side to side.
Setup / Starting Position
- Stand tall: Place your feet about hip-width to shoulder-width apart.
- Set your posture: Keep your chest lifted, ribs controlled, and shoulders relaxed.
- Position your hands: Keep your hands near your upper chest, collarbone, or lightly behind the head depending on comfort.
- Brace lightly: Engage your core as if preparing for a small cough, but do not hold your breath.
- Stabilize the hips: Keep both hips facing forward and avoid shifting your weight side to side.
Tip: Imagine your pelvis is fixed in place while your ribs move sideways. This helps keep the work focused on the obliques.
Execution (Step-by-Step)
- Start from neutral: Stand upright with your spine long and your gaze forward.
- Tilt to one side: Slowly bend your torso sideways, bringing your ribs closer to the same-side hip.
- Keep the chest open: Avoid rounding forward, rotating, or leaning backward during the tilt.
- Pause briefly: Hold the side bend for a moment while keeping your breathing smooth.
- Return to center: Use your obliques to bring your torso back to the upright position.
- Repeat on the other side: Perform the same controlled tilt in the opposite direction.
Pro Tips & Common Mistakes
- Move from the waist: Focus on shortening one side of the torso instead of dropping the shoulder only.
- Keep hips quiet: Do not push the hips out to fake a bigger range of motion.
- Avoid twisting: The torso should bend sideways, not rotate left or right.
- Control the return: Do not bounce back to center. The return phase trains stability too.
- Use smooth breathing: Exhale as you tilt, then inhale as you return to center.
- Do not overreach: A smaller clean range is better than a large sloppy bend.
- Keep the neck relaxed: Let the head follow the torso naturally without pulling or straining.
FAQ
What muscles does the Standing Tilt and Extend work?
The Standing Tilt and Extend mainly works the obliques. It also uses the deep core, rectus abdominis, spinal stabilizers, and hip stabilizers to keep the body controlled during the side bend.
Is the Standing Tilt and Extend good for beginners?
Yes. It is beginner-friendly because it uses bodyweight only and does not require floor work. Beginners should focus on slow reps, light bracing, and a comfortable range of motion.
Should I feel this exercise in my lower back?
You may feel light stabilization around the trunk, but the main effort should come from the side of the waist. If your lower back feels compressed or painful, reduce the range and avoid leaning backward.
Can I add weight to this exercise?
You can progress it with a light dumbbell or resistance band, but only after mastering strict bodyweight control. Weighted side bends should be performed carefully because excessive load or range can irritate the lower back.
How is this different from a standing side crunch?
A standing side crunch often brings the elbow and knee closer together. The Standing Tilt and Extend keeps the feet grounded and focuses more on controlled torso side bending rather than lifting the knee.
Recommended Equipment (Optional)
- Exercise Mat — useful for warm-ups, mobility work, and follow-up core exercises.
- Resistance Bands Set — helpful for progressing standing core drills and anti-rotation exercises.
- Light Dumbbells — optional progression for controlled weighted side-bend variations.
- Adjustable Ankle Weights — useful for related standing core and leg-lift variations.
- Full-Length Workout Mirror — helps check hip position, torso alignment, and side-to-side symmetry.
Tip: Equipment is optional. Master the bodyweight version first, then progress only if you can keep the movement controlled and pain-free.