Kneeling Quadriceps Stretch: Form, Benefits, Sets & FAQ
Learn the kneeling quadriceps stretch to improve thigh flexibility, hip mobility, and posture with safe setup, step-by-step cues, mistakes, FAQs, and gear.
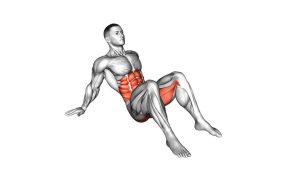
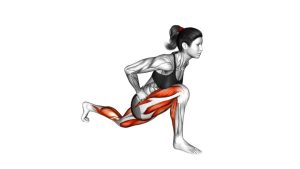
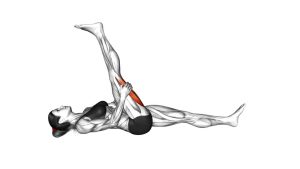
Kneeling Quadriceps Stretch
This exercise is best used after lower-body training, during mobility work, or as part of a warm-up when performed gently. Because the rear foot is held while the back knee stays on the ground, the stretch can strongly lengthen both the quadriceps and the hip flexor region. The most important detail is to move from the hips, not the lower back. Lightly brace your core, squeeze the rear-side glute, and keep the ribs stacked over the pelvis.
Quick Overview
| Body Part | Quads |
|---|---|
| Primary Muscle | Quadriceps, especially rectus femoris |
| Secondary Muscle | Hip flexors, glutes, core stabilizers, and lower-leg stabilizers |
| Equipment | Bodyweight; optional exercise mat, knee pad, yoga block, or stretching strap |
| Difficulty | Beginner to intermediate depending on flexibility and knee comfort |
Sets & Reps (By Goal)
- General flexibility: 2–3 sets × 20–40 seconds per side
- Post-workout recovery: 1–3 sets × 30–60 seconds per side with relaxed breathing
- Hip mobility focus: 2–4 sets × 20–30 seconds per side while lightly squeezing the rear glute
- Warm-up preparation: 1–2 sets × 10–20 seconds per side using a gentle, low-intensity stretch
- Mobility improvement: 3 sets × 30–45 seconds per side, 3–5 times per week
Progression rule: First improve comfort and control. Then gradually increase hold time. Do not increase stretch intensity by yanking the foot or forcing the knee into deep flexion.
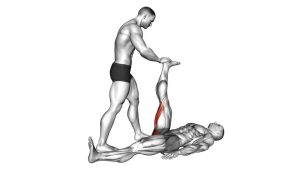
Setup / Starting Position
- Start in a half-kneeling position: Place one foot forward and one knee on the floor behind you.
- Pad the back knee: Use a mat or knee pad so the kneeling side stays comfortable.
- Keep the front foot stable: The front knee should stay stacked near the ankle, not collapsing inward.
- Reach back carefully: Grab the rear foot or ankle with the hand on the same side, or use a strap if needed.
- Set your torso tall: Keep your chest lifted, ribs down, and head aligned over your spine.
- Brace lightly: Engage your core and gently squeeze the rear-side glute to keep the pelvis controlled.
If reaching the foot causes twisting or strain, loop a towel or stretching strap around the rear foot and hold the strap instead.
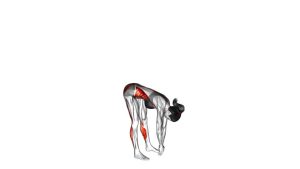
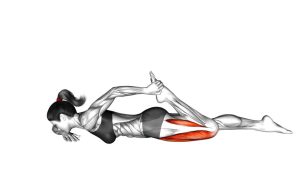
Execution (Step-by-Step)
- Begin tall: Hold the rear foot while keeping your torso upright and your shoulders relaxed.
- Pull the heel gently: Bring the rear heel toward the glute until you feel a stretch through the front thigh.
- Shift the hips slightly forward: Move from the pelvis to increase hip extension without arching the lower back.
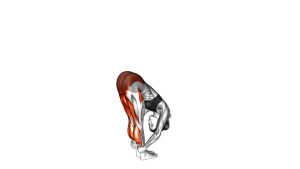
- Squeeze the rear glute: This helps prevent the lower back from taking over the stretch.
- Hold and breathe: Maintain the position while breathing slowly through the nose or relaxed mouth breathing.
- Control the release: Slowly let the foot return down instead of dropping it quickly.
- Switch sides: Repeat the same setup and hold time on the opposite leg.
Pro Tips & Common Mistakes
- Keep the hips square: Do not rotate the pelvis away from the stretching leg.
- Avoid lower-back arching: Keep the ribs down and gently tuck the pelvis to focus the stretch on the quads.
- Do not yank the foot: A smooth pull protects the knee and improves stretch quality.
- Use padding: A soft surface under the back knee helps you relax into the position safely.
- Keep the front leg grounded: The front foot should stay flat and stable for balance.
- Use a strap if mobility is limited: A strap lets you stretch without twisting your shoulder or spine.
- Breathe slowly: Relaxed breathing reduces guarding and helps the muscle lengthen.
- Stop before pain: Strong tension is okay, but sharp pain, knee pressure, or nerve-like symptoms are not.
FAQ
What muscles does the kneeling quadriceps stretch target?
It mainly targets the quadriceps, especially the rectus femoris. Because the rectus femoris crosses both the hip and knee, the kneeling position can stretch it effectively when the hip is extended and the knee is bent.
Should I feel this stretch in my knee?
No. You may feel pressure from kneeling if the floor is hard, but the stretch itself should be felt in the front thigh. If you feel knee pain, use padding, reduce the pull, or use a strap to control the range.
Is this better than a standing quad stretch?
It can be more stable and easier to control for many people. The kneeling position also makes it easier to add hip extension, which helps target the rectus femoris more directly.
How long should I hold the kneeling quad stretch?
Most people can start with 20–40 seconds per side. For flexibility work, use 2–3 sets and stay relaxed. For warm-ups, keep the hold shorter and less intense.
Can beginners do this exercise?
Yes, but beginners should use a mat, keep the stretch mild, and avoid forcing the heel close to the glutes. If grabbing the foot is difficult, use a towel or stretching strap.
Why does my lower back arch during this stretch?
Lower-back arching usually happens when the hips are tight or the stretch is too intense. Lightly brace your core, squeeze the rear glute, and keep your ribs stacked over your pelvis.
Recommended Equipment (Optional)
- Exercise Mat — provides cushioning for the back knee and improves comfort during floor mobility work
- Exercise Knee Pad — useful if kneeling causes discomfort or pressure around the kneecap
- Stretching Strap — helps you reach the rear foot without twisting or forcing the shoulder
- Yoga Blocks — can support balance and help maintain an upright torso
- Foam Roller — useful before or after stretching to reduce quad tightness and improve tissue readiness
Tip: Equipment should make the stretch more comfortable and controlled. It should never increase pain, knee pressure, or lower-back strain.